Brother International Innov-is 6750D Operation Manual - Page 355
upper threading is done, the machine will not operate properly. Also, depending on the pattern
 |
View all Brother International Innov-is 6750D manuals
Add to My Manuals
Save this manual to your list of manuals |
Page 355 highlights
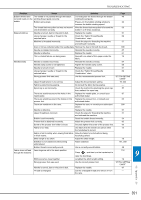
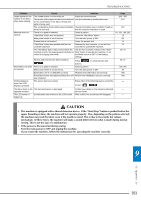
TROUBLESHOOTING Problem Cause Solution Loops appear on the surface of the fabric when embroidering Machine does not operate The thread tension is incorrectly set. Adjust the thread tension. The tension of the upper thread is incorrectly set Use the embroidery needle plate cover. for the combination of the fabric, thread and pattern being used. The combination of the bobbin case and bobbin Change the bobbin case or bobbin thread so thread is incorrect. that the correct combination is used. There is no pattern selected. Select a pattern. "Start/Stop" button was not pushed. Press the "Start/Stop" button. Main power switch is not turned on. Turn the main power to ON. Presser foot is not lowered. Lower the presser foot. "Start/Stop" button was pushed with the foot controller attached. Remove the foot controller, or use the foot controller to operate the machine. The "Start/Stop" button was pressed while the Use the foot controller instead of the "Start/ machine is set for the sewing speed controller to Stop" button to operate the machine, or set control the zigzag stitch width. the Width control to OFF in the Sewing settings. All keys and buttons have been locked by . Press buttons. to unlock all keys and Embroidery unit does There is no pattern selected. not operate Main power switch is not turned on. Select a pattern. Turn the main power to ON. Nothing happens, even if the LCD display is pressed Embroidery unit is not attached correctly. Reattach the embroidery unit correctly. Embroidery frame was attached before the unit Perform the initialization process correctly. was initialized. The screen has been locked. Press either of the following keys to unlock the screen. The fabric feeds in the The feed mechanism is damaged. opposite direction. Contact your dealer or the nearest authorized service center. The LCD screen is fogged up. Condensation has formed on the LCD screen. After a while, the cloudiness will disappear. Page 233 - 235 219 218 91, 156, 190, 265 15 26 15 73 35, 73 65, 67 190, 265 26 188 188 - - - CAUTION • This machine is equipped with a thread detection device. If the "Start/Stop" button is pushed before the upper threading is done, the machine will not operate properly. Also, depending on the pattern selected, the machine may feed the fabric even if the needle is raised. This is due to the needle bar release mechanism. At these times, the machine will make a sound different from what is made during normal sewing. This is not the sign of a malfunction. • If the power is disconnected during sewing: Turn the main power to OFF and unplug the machine. If you restart the machine, follow the instructions for operating the machine correctly. 9 Appendix 353
-
 1
1 -
2
-
3
-
4
-
5
-
6
-
7
-
8
-
9
-
10
-
11
-
12
-
13
-
14
-
15
-
16
-
17
-
18
-
19
-
20
-
21
-
22
-
23
-
24
-
25
-
26
-
27
-
28
-
29
-
30
-
31
-
32
-
33
-
34
-
35
-
36
-
37
-
38
-
39
-
40
-
41
-
42
-
43
-
44
-
45
-
46
-
47
-
48
-
49
-
50
-
51
-
52
-
53
-
54
-
55
-
56
-
57
-
58
-
59
-
60
-
61
-
62
-
63
-
64
-
65
-
66
-
67
-
68
-
69
-
70
-
71
-
72
-
73
-
74
-
75
-
76
-
77
-
78
-
79
-
80
-
81
-
82
-
83
-
84
-
85
-
86
-
87
-
88
-
89
-
90
-
91
-
92
-
93
-
94
-
95
-
96
-
97
-
98
-
99
-
100
-
101
-
102
-
103
-
104
-
105
-
106
-
107
-
108
-
109
-
110
-
111
-
112
-
113
-
114
-
115
-
116
-
117
-
118
-
119
-
120
-
121
-
122
-
123
-
124
-
125
-
126
-
127
-
128
-
129
-
130
-
131
-
132
-
133
-
134
-
135
-
136
-
137
-
138
-
139
-
140
-
141
-
142
-
143
-
144
-
145
-
146
-
147
-
148
-
149
-
150
-
151
-
152
-
153
-
154
-
155
-
156
-
157
-
158
-
159
-
160
-
161
-
162
-
163
-
164
-
165
-
166
-
167
-
168
-
169
-
170
-
171
-
172
-
173
-
174
-
175
-
176
-
177
-
178
-
179
-
180
-
181
-
182
-
183
-
184
-
185
-
186
-
187
-
188
-
189
-
190
-
191
-
192
-
193
-
194
-
195
-
196
-
197
-
198
-
199
-
200
-
201
-
202
-
203
-
204
-
205
-
206
-
207
-
208
-
209
-
210
-
211
-
212
-
213
-
214
-
215
-
216
-
217
-
218
-
219
-
220
-
221
-
222
-
223
-
224
-
225
-
226
-
227
-
228
-
229
-
230
-
231
-
232
-
233
-
234
-
235
-
236
-
237
-
238
-
239
-
240
-
241
-
242
-
243
-
244
-
245
-
246
-
247
-
248
-
249
-
250
-
251
-
252
-
253
-
254
-
255
-
256
-
257
-
258
-
259
-
260
-
261
-
262
-
263
-
264
-
265
-
266
-
267
-
268
-
269
-
270
-
271
-
272
-
273
-
274
-
275
-
276
-
277
-
278
-
279
-
280
-
281
-
282
-
283
-
284
-
285
-
286
-
287
-
288
-
289
-
290
-
291
-
292
-
293
-
294
-
295
-
296
-
297
-
298
-
299
-
300
-
301
-
302
-
303
-
304
-
305
-
306
-
307
-
308
-
309
-
310
-
311
-
312
-
313
-
314
-
315
-
316
-
317
-
318
-
319
-
320
-
321
-
322
-
323
-
324
-
325
-
326
-
327
-
328
-
329
-
330
-
331
-
332
-
333
-
334
-
335
-
336
-
337
-
338
-
339
-
340
-
341
-
342
-
343
-
344
-
345
-
346
-
347
-
348
-
349
-
 350
350 -
 351
351 -
 352
352 -
 353
353 -
 354
354 -
 355
355 -
 356
356 -
 357
357 -
 358
358 -
 359
359 -
 360
360 -
361
-
362
-
363
-
364
-
365
-
366
-
367
-
368
-
369
-
370
-
371
-
372
-
373
-
374
-
375
-
376
-
377
-
378
-
379
-
380
 |
 |