Brother International MA4-B551 Users Manual - English - Page 36
Setting, Double, Chain, Stitch, Sewing
 |
View all Brother International MA4-B551 manuals
Add to My Manuals
Save this manual to your list of manuals |
Page 36 highlights
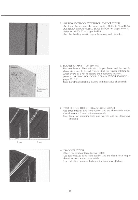
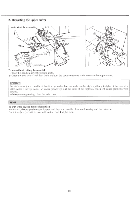
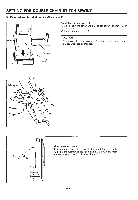
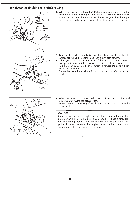
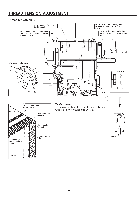
SETTING FOR DOUBLE CHAIN STITCH SEWING 3. Removal and installation of cutter cover II U O Installation of cutter cover II 1) Open the front cover and pull cutter cover I toward you to remove it. 2) Insert the cutter cover II. CAUTION! When using the cutter cover II, the cutter must be down and the upper looper disengaged. Front cover Cutter cover I Cutter cover II Center of double chain stitch needle 10 15 20 25 30 35 40 Lines on cutter cover II Lines are drawn on cutter cover II at 5 mm (0.2 in.) intervals, with the line furthest to the left being 10 mm (0.4 in.) from the center of the double chain stitch needle. It - 31 -
-
 1
1 -
2
-
3
-
4
-
5
-
6
-
7
-
8
-
9
-
10
-
11
-
12
-
13
-
14
-
15
-
16
-
17
-
18
-
19
-
20
-
21
-
22
-
23
-
24
-
25
-
26
-
27
-
28
-
29
-
30
-
 31
31 -
 32
32 -
 33
33 -
 34
34 -
 35
35 -
 36
36 -
 37
37 -
 38
38 -
 39
39 -
 40
40 -
 41
41 -
42
-
43
-
44
-
45
-
46
-
47
-
48
-
49
-
50
-
51
-
52
-
53
-
54
-
55
-
56
-
57
-
58
 |
 |

SETTING
FOR
DOUBLE
CHAIN
STITCH
SEWING
3.
Removal
and
installation
of
cutter
cover
II
U
O
Front
cover
Cutter
cover
I
Cutter
cover
II
Installation
of
cutter
cover
II
1)
Open
the
front
cover
and
pull
cutter
cover
I
toward
you
to
remove
it.
2)
Insert
the
cutter
cover
II.
CAUTION!
When
using
the
cutter
cover
II,
the
cutter
must
be
down
and
the
upper
looper
disengaged.
Center
of
double
chain
stitch
needle
10
15
20
25
30
35
40
It
Lines
on
cutter
cover
II
Lines
are
drawn
on
cutter
cover
II
at
5
mm
(0.2
in.)
intervals,
with
the
line
furthest
to
the
left
being
10
mm
(0.4
in.)
from
the
center
of
the
double
chain
stitch
needle.
-
31
-