Brother International MA4-B551 Users Manual - English - Page 49
lever.
 |
View all Brother International MA4-B551 manuals
Add to My Manuals
Save this manual to your list of manuals |
Page 49 highlights
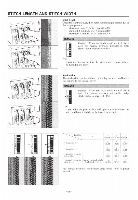
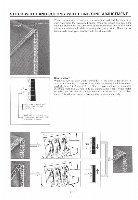
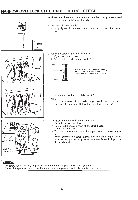
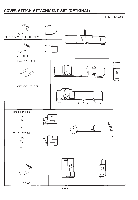
NARROW OVERLOCK STITCH/ROLLED EDGE STITCH * Thread the threads in the same way as when doing three- thread overlock sewing with the right needle. 1. Use the right needle only. Mightly tighten the screws of the unused needle positions to secure. OOO I I 2. Adjust the stitch length and stitch width. 1) Open the control cover. 2) Set the stitch length control dial to "R." Finer 2 Heavier 3 Adjust the stitch length within the range shown in the illustration at left in accordance with the type of material. ra 9 t a 6 3) Set the stitch width control dial to "R." (TIP) For narrow overlock and rolled edge, use R needle, set stitch length control dial and stitch width control dial all to "R." 0 "sly Upper looper 1 Stitch finger change lever 11 Safety guard 3. Swing away the movable wide stitch finger. 1) Raise the presser foot lever. 2) Gently pull the thread chain off the stitch finger. 3) Open the front cover. 4) Turn the handwheel to lower the upper looper to its lowest position. 5) While pressing the safety guard, turn the stitch finger change lever to the right to swing away the movable stitch finger from the needle plate. CAUTION! * The safety guard can only be pressed when the upper looper is at its lowest position. * The stitch finger lever should only be turned when the presser foot has been raised or removed.
-
 1
1 -
2
-
3
-
4
-
5
-
6
-
7
-
8
-
9
-
10
-
11
-
12
-
13
-
14
-
15
-
16
-
17
-
18
-
19
-
20
-
21
-
22
-
23
-
24
-
25
-
26
-
27
-
28
-
29
-
30
-
31
-
32
-
33
-
34
-
35
-
36
-
37
-
38
-
39
-
40
-
41
-
42
-
43
-
 44
44 -
 45
45 -
 46
46 -
 47
47 -
 48
48 -
 49
49 -
 50
50 -
 51
51 -
 52
52 -
 53
53 -
 54
54 -
55
-
56
-
57
-
58
 |
 |
