Brother International MFC 5840CN Software Users Manual - English - Page 121
Scan to OCR, configuration. See
 |
UPC - 012502610922
View all Brother International MFC 5840CN manuals
Add to My Manuals
Save this manual to your list of manuals |
Page 121 highlights
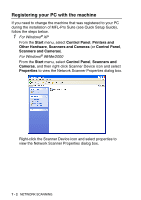
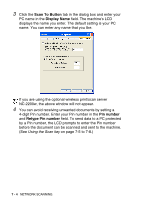
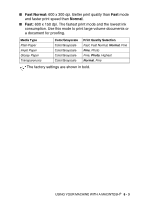
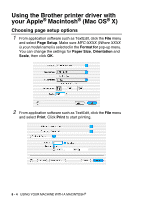
Scan to OCR When you select Scan to OCR your document will be scanned and sent directly to the PC you designated on your network. The ControlCenter2.0 will activate ScanSoft® OmniPage® OCR and convert your document into text for viewing and editing from a word processing application on the designated PC. You can change the Scan configuration. (See OCR (Word Processing program) on page 3-8.) For Network Scanning the ControlCenter2.0 selections are used only for configuring the Scan button. You will not be able to initiate a network scan from the ControlCenter2.0. 1 Load your document. 2 Press (Scan). 3 Press ▲ or ▼ to select Scan to OCR. Scan to OCR Press Menu/Set. 4 Press ▲ or ▼ to select the destination PC you want to send to. Press Menu/Set. If the LCD prompts you to enter a Pin number, enter the 4-digit Pin number for the destination PC on the control panel. Press Black Start or Color Start. The machine will start the scanning process. NETWORK SCANNING 7 - 7
-
 1
1 -
2
-
3
-
4
-
5
-
6
-
7
-
8
-
9
-
10
-
11
-
12
-
13
-
14
-
15
-
16
-
17
-
18
-
19
-
20
-
21
-
22
-
23
-
24
-
25
-
26
-
27
-
28
-
29
-
30
-
31
-
32
-
33
-
34
-
35
-
36
-
37
-
38
-
39
-
40
-
41
-
42
-
43
-
44
-
45
-
46
-
47
-
48
-
49
-
50
-
51
-
52
-
53
-
54
-
55
-
56
-
57
-
58
-
59
-
60
-
61
-
62
-
63
-
64
-
65
-
66
-
67
-
68
-
69
-
70
-
71
-
72
-
73
-
74
-
75
-
76
-
77
-
78
-
79
-
80
-
81
-
82
-
83
-
84
-
85
-
86
-
87
-
88
-
89
-
90
-
91
-
92
-
93
-
94
-
95
-
96
-
97
-
98
-
99
-
100
-
101
-
102
-
103
-
104
-
105
-
106
-
107
-
108
-
109
-
110
-
111
-
112
-
113
-
114
-
115
-
 116
116 -
 117
117 -
 118
118 -
 119
119 -
 120
120 -
 121
121 -
 122
122 -
 123
123 -
 124
124 -
 125
125 -
 126
126 -
127
-
128
-
129
-
130
-
131
-
132
-
133
-
134
-
135
-
136
-
137
-
138
-
139
-
140
-
141
-
142
-
143
-
144
-
145
-
146
-
147
-
148
-
149
-
150
-
151
-
152
-
153
-
154
-
155
-
156
-
157
-
158
-
159
-
160
-
161
-
162
-
163
-
164
-
165
-
166
-
167
-
168
-
169
-
170
 |
 |
