Brother International MFC 620CN Users Manual - English - Page 185
Connections, Recording outgoing message (OGM) on an external TAD, Set the Receive Mode
 |
UPC - 012502610854
View all Brother International MFC 620CN manuals
Add to My Manuals
Save this manual to your list of manuals |
Page 185 highlights
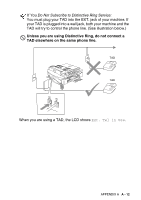
Connections The external TAD must be plugged into the back of the machine, into the jack labeled EXT. Your machine cannot work properly if you plug the TAD into a wall jack (unless you are using Distinctive Ring). 1 Plug the telephone line cord from the telephone wall jack into the back of the machine, in the jack labeled LINE. 2 Plug the telephone line cord from your external TAD into the back of the machine, in the jack labeled EXT. (Make sure this cord is connected to the TAD at the TAD's telephone line jack, and not its telephone jack.) 3 Set your external TAD to four rings or less. (The machine's Ring Delay setting does not apply.) 4 Record the outgoing message on your external TAD. 5 Set the TAD to answer calls. 6 Set the Receive Mode to Manual. (See Choosing the Receive Mode on page 4-1.) Recording outgoing message (OGM) on an external TAD Timing is important in recording this message. The message sets up the ways to handle both manual and automatic fax reception. 1 Record 5 seconds of silence at the beginning of your message. (This allows your machine time to listen for the fax CNG tones of automatic transmissions before they stop.) 2 Limit your speaking to 20 seconds. 3 End your 20-second message by giving your Fax Receive Code for people sending manual faxes. For example: "After the beep, leave a message or send a fax by pressing 51 and Start." We recommend beginning your OGM with an initial 5-second silence because the machine cannot hear fax tones over a resonant or loud voice. You may try omitting this pause, but if your machine has trouble receiving, then you must re-record the OGM to include it. A - 13 APPENDIX A
-
 1
1 -
2
-
3
-
4
-
5
-
6
-
7
-
8
-
9
-
10
-
11
-
12
-
13
-
14
-
15
-
16
-
17
-
18
-
19
-
20
-
21
-
22
-
23
-
24
-
25
-
26
-
27
-
28
-
29
-
30
-
31
-
32
-
33
-
34
-
35
-
36
-
37
-
38
-
39
-
40
-
41
-
42
-
43
-
44
-
45
-
46
-
47
-
48
-
49
-
50
-
51
-
52
-
53
-
54
-
55
-
56
-
57
-
58
-
59
-
60
-
61
-
62
-
63
-
64
-
65
-
66
-
67
-
68
-
69
-
70
-
71
-
72
-
73
-
74
-
75
-
76
-
77
-
78
-
79
-
80
-
81
-
82
-
83
-
84
-
85
-
86
-
87
-
88
-
89
-
90
-
91
-
92
-
93
-
94
-
95
-
96
-
97
-
98
-
99
-
100
-
101
-
102
-
103
-
104
-
105
-
106
-
107
-
108
-
109
-
110
-
111
-
112
-
113
-
114
-
115
-
116
-
117
-
118
-
119
-
120
-
121
-
122
-
123
-
124
-
125
-
126
-
127
-
128
-
129
-
130
-
131
-
132
-
133
-
134
-
135
-
136
-
137
-
138
-
139
-
140
-
141
-
142
-
143
-
144
-
145
-
146
-
147
-
148
-
149
-
150
-
151
-
152
-
153
-
154
-
155
-
156
-
157
-
158
-
159
-
160
-
161
-
162
-
163
-
164
-
165
-
166
-
167
-
168
-
169
-
170
-
171
-
172
-
173
-
174
-
175
-
176
-
177
-
178
-
179
-
 180
180 -
 181
181 -
 182
182 -
 183
183 -
 184
184 -
 185
185 -
 186
186 -
 187
187 -
 188
188 -
 189
189 -
 190
190 -
191
-
192
-
193
-
194
-
195
-
196
-
197
-
198
-
199
-
200
-
201
-
202
-
203
-
204
-
205
-
206
-
207
-
208
-
209
-
210
-
211
-
212
-
213
-
214
-
215
-
216
-
217
-
218
-
219
-
220
-
221
-
222
-
223
-
224
-
225
-
226
-
227
-
228
-
229
-
230
 |
 |