Brother International MFC-820CW Quick Setup Guide - English - Page 26
For USB Interface Users
 |
View all Brother International MFC-820CW manuals
Add to My Manuals
Save this manual to your list of manuals |
Page 26 highlights
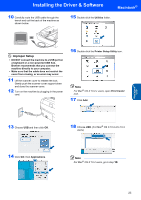
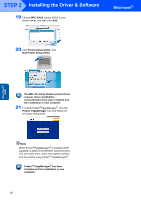
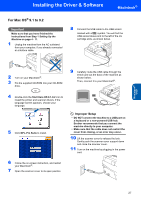
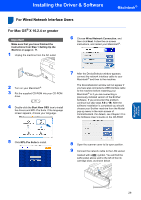
STEP 2 Installing the Driver & Software Macintosh® For USB Interface Users For Mac OS® X 10.2.4 or greater Important Make sure that you have finished the instructions from Step 1 Setting Up the Machine on page 4 - 11. Note For Mac OS® X 10.2.0 to 10.2.3 users, upgrade to Mac OS® X 10.2.4 or greater. (For the latest information for Mac OS® X, visit http://solutions.brother.com) 1 Unplug the machine from the AC outlet and from your computer, if you already connected an interface cable. 2 Turn on your Macintosh®. 3 Put the supplied CD-ROM into your CD-ROM drive. 6 Choose Local Connection, and then click Next. Follow the on-screen instructions, and restart your Macintosh®. 7 After the DeviceSelector window appears connect the USB interface cable to your Macintosh and then to the machine. The DeviceSelector window will not appear if you have connected a USB interface cable to the machine before restarting your Macintosh® or if you are overwriting a previously installed version of the Brother Software. If you encounter this problem continue with the installation but skip step 13. After the software installation is completed you should select your Brother machine from the Model pop-up menu in the main screen of ControlCenter2. For details, see chapter 10 in the Software User's Guide on the CD-ROM. 4 Double-click the Start Here OSX icon to install the drivers and MFL-Pro Suite. If the language screen appears, choose your language. 5 Click MFL-Pro Suite to install. 8 Open the scanner cover to its open position. 9 Connect the USB cable to the USB socket marked with a symbol. You will find the USB socket above and to the left of the ink cartridge slots, as shown below. Macintosh® USB 24
-
 1
1 -
2
-
3
-
4
-
5
-
6
-
7
-
8
-
9
-
10
-
11
-
12
-
13
-
14
-
15
-
16
-
17
-
18
-
19
-
20
-
 21
21 -
 22
22 -
 23
23 -
 24
24 -
 25
25 -
 26
26 -
 27
27 -
 28
28 -
 29
29 -
 30
30 -
 31
31 -
32
-
33
-
34
-
35
-
36
-
37
-
38
-
39
-
40
-
41
-
42
-
43
-
44
-
45
 |
 |
