Brother International MFC-J425W Users Manual - English - Page 40
Stop faxing, Setting scanner glass size for faxing, Color fax transmission - not printing black
 |
View all Brother International MFC-J425W manuals
Add to My Manuals
Save this manual to your list of manuals |
Page 40 highlights
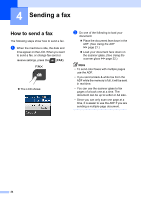
Chapter 4 Stop faxing 4 To stop faxing, press Stop/Exit. Setting scanner glass size for faxing 4 When documents are A4 size, you need to set the Scan Size to A4. If you do not, the bottom portion of the faxes will be missing. a Press (FAX). b Press a or b to choose Advanced Settings. Press OK. c Press a or b to choose Glass ScanSize. Press OK. d Press a or b to choose Letter or A4. Press OK. Note • You can save the setting you use most often by setting it as the default. (uuAdvanced User's Guide: Setting your changes as the new default) • This setting is only available for sending documents from the scanner glass. Color fax transmission 4 Your machine can send a color fax to machines that support this feature. Color faxes cannot be stored in the machine's memory. When you send a color fax, the machine will send it in real time (even if Real Time TX is set to Off). Canceling a fax in progress 4 If you want to cancel a fax while the machine is scanning, dialing or sending, press Stop/Exit. 26 Transmission Verification Report 4 You can use the Transmission Verification Report as proof that you sent a fax. This report lists the sender's name or fax number, the time and date of transmission, duration of transmission, number of pages sent, and whether or not the transmission was successful. There are several settings available for the Transmission Verification Report: On: Prints a report after every fax you send. On+Image: Prints a report after every fax you send. A portion of the fax's first page appears on the report. Off: Prints a report if your fax is unsuccessful due to a transmission error. The report will also print if you send a color fax that the receiving machine prints in black & white. Off is the default setting. Off+Image: Prints a report if your fax is unsuccessful due to a transmission error. The report will also print if you send a color fax that the receiving machine prints in black & white. A portion of the fax's first page appears on the report. a Press Menu. b Press a or b to choose Fax. Press OK. c Press a or b to choose Report Setting. Press OK. d Press a or b to choose Transmission. Press OK. e Press a or b to choose On, On+Image, Off or Off+Image. Press OK.
-
 1
1 -
2
-
3
-
4
-
5
-
6
-
7
-
8
-
9
-
10
-
11
-
12
-
13
-
14
-
15
-
16
-
17
-
18
-
19
-
20
-
21
-
22
-
23
-
24
-
25
-
26
-
27
-
28
-
29
-
30
-
31
-
32
-
33
-
34
-
 35
35 -
 36
36 -
 37
37 -
 38
38 -
 39
39 -
 40
40 -
 41
41 -
 42
42 -
 43
43 -
 44
44 -
 45
45 -
46
-
47
-
48
-
49
-
50
-
51
-
52
-
53
-
54
-
55
-
56
-
57
-
58
-
59
-
60
-
61
-
62
-
63
-
64
-
65
-
66
-
67
-
68
-
69
-
70
-
71
-
72
-
73
-
74
-
75
-
76
-
77
-
78
-
79
-
80
-
81
-
82
-
83
-
84
-
85
-
86
-
87
-
88
-
89
-
90
-
91
-
92
-
93
-
94
-
95
-
96
-
97
-
98
-
99
-
100
-
101
-
102
-
103
-
104
-
105
-
106
-
107
-
108
-
109
-
110
-
111
-
112
-
113
-
114
-
115
-
116
-
117
-
118
-
119
-
120
-
121
 |
 |