Brother International MFC-J425W Users Manual - English - Page 67
Cleaning the print head, Checking the print quality, Color Start - black ink
 |
View all Brother International MFC-J425W manuals
Add to My Manuals
Save this manual to your list of manuals |
Page 67 highlights
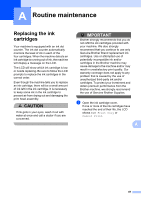
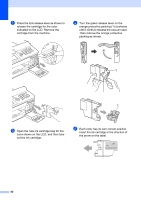
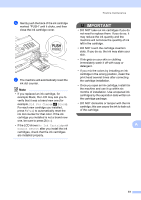
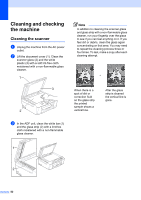
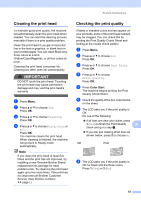
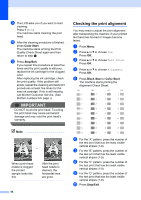
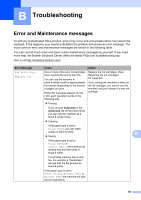
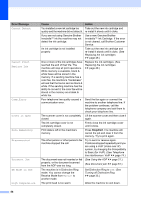
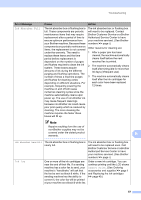
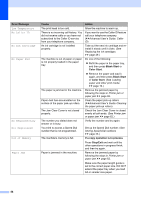
Routine maintenance Cleaning the print head A To maintain good print quality, the machine will automatically clean the print head when needed. You can start the cleaning process manually if there is a print quality problem. Clean the print head if you get a horizontal line in the text or graphics, or blank text on your printed pages. You can clean Black only, three colors at a time (Yellow/Cyan/Magenta), or all four colors at once. Cleaning the print head consumes ink. Cleaning too often uses ink unnecessarily. IMPORTANT DO NOT touch the print head. Touching the print head may cause permanent damage and may void the print head's warranty. a Press Menu. b Press a or b to choose Ink. Press OK. c Press a or b to choose Cleaning. Press OK. d Press a or b to choose Black, Color or All. Press OK. The machine cleans the print head. When cleaning is finished, the machine will go back to Ready mode automatically. Note If you clean the print head at least five times and the print has not improved, try installing a new Genuine Brother Brand replacement ink cartridge for each problem color. Try cleaning the print head again up to five more times. If the print has not improved call Brother Customer Service. (See Brother numbers uu page i.) Checking the print quality A If faded or streaked colors and text appear on your printouts, some of the print head nozzles may be clogged. You can check this by printing the Print Quality Check Sheet and looking at the nozzle check pattern. a Press Menu. b Press a or b to choose Ink. Press OK. c Press a or b to choose Test Print. Press OK. d Press a or b to choose Print Quality. Press OK. e Press Color Start. The machine begins printing the Print Quality Check Sheet. f Check the quality of the four color blocks on the sheet. g The LCD asks you if the print quality is OK. Do one of the following: If all lines are clear and visible, press 1 (Yes) to finish the Print Quality A check and go to step k. If you can see missing short lines as shown below, press 2 to choose No. OK Poor h The LCD asks you if the print quality is OK for black and the three colors. Press 1 (Yes) or 2 (No). 53
-
 1
1 -
2
-
3
-
4
-
5
-
6
-
7
-
8
-
9
-
10
-
11
-
12
-
13
-
14
-
15
-
16
-
17
-
18
-
19
-
20
-
21
-
22
-
23
-
24
-
25
-
26
-
27
-
28
-
29
-
30
-
31
-
32
-
33
-
34
-
35
-
36
-
37
-
38
-
39
-
40
-
41
-
42
-
43
-
44
-
45
-
46
-
47
-
48
-
49
-
50
-
51
-
52
-
53
-
54
-
55
-
56
-
57
-
58
-
59
-
60
-
61
-
 62
62 -
 63
63 -
 64
64 -
 65
65 -
 66
66 -
 67
67 -
 68
68 -
 69
69 -
 70
70 -
 71
71 -
 72
72 -
73
-
74
-
75
-
76
-
77
-
78
-
79
-
80
-
81
-
82
-
83
-
84
-
85
-
86
-
87
-
88
-
89
-
90
-
91
-
92
-
93
-
94
-
95
-
96
-
97
-
98
-
99
-
100
-
101
-
102
-
103
-
104
-
105
-
106
-
107
-
108
-
109
-
110
-
111
-
112
-
113
-
114
-
115
-
116
-
117
-
118
-
119
-
120
-
121
 |
 |