Brother International PC-6500 Users Manual - English - Page 19
Installing the optional side cutter
 |
View all Brother International PC-6500 manuals
Add to My Manuals
Save this manual to your list of manuals |
Page 19 highlights
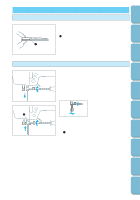
CONTENTS SETTING UP SEWING UTILITY STITCHES MY CUSTOM STITCHTM (CREATE YOUR OWN STITCH DESIGNS) Installing the optional side cutter By installing the side cutter, you can cut the fabric while sewing, for example when sewing an overcasting stitch. To use the side cutter, select a pattern that displays on the LCD, and then press so that it appears as . 1. Press the needle position button to raise the needle, and then turn off the sewing machine. 3 5 2. Raise the presser foot lever. 3. Remove the installed presser foot and the presser foot holder. 3 5 1 2 4. Securely hook the connecting fork of the side cutter onto the needle clamp screw. 1 Needle clamp screw 2 Connecting fork 3 5 5. While lifting the presser foot up, insert the screw (for securing presser foot) through the notch in the side cutter's bracket and into the hole in the presser foot bar, and then lightly tighten the screw. Lower the presser foot lever, and then firmly tighten the screw with the enclosed screwdriver or disc-shaped screwdriver. 6. Select a pattern, and then press so that it appears as . Other necessary adjustments for using the side cutter will be carried out automatically. Note Pressing so that it changes back to turns off the side cutter operation. EMBROIDERING MAINTENANCE ERROR MESSAGES SEWING CHART PATTERNS (PROGRAMMED IN MACHINE) 16
-
 1
1 -
2
-
3
-
4
-
5
-
6
-
7
-
8
-
9
-
10
-
11
-
12
-
13
-
 14
14 -
 15
15 -
 16
16 -
 17
17 -
 18
18 -
 19
19 -
 20
20 -
 21
21 -
 22
22 -
 23
23 -
 24
24 -
25
-
26
-
27
-
28
-
29
-
30
-
31
-
32
-
33
-
34
-
35
-
36
-
37
-
38
-
39
-
40
-
41
-
42
-
43
-
44
-
45
-
46
-
47
-
48
-
49
-
50
-
51
-
52
-
53
-
54
-
55
-
56
-
57
-
58
-
59
-
60
-
61
-
62
-
63
-
64
-
65
-
66
-
67
-
68
-
69
-
70
-
71
-
72
-
73
-
74
-
75
-
76
-
77
-
78
-
79
-
80
-
81
-
82
-
83
-
84
-
85
-
86
-
87
-
88
-
89
-
90
-
91
-
92
-
93
-
94
-
95
-
96
-
97
-
98
-
99
-
100
-
101
-
102
-
103
-
104
-
105
-
106
-
107
-
108
-
109
-
110
-
111
-
112
-
113
-
114
-
115
-
116
-
117
-
118
-
119
-
120
-
121
-
122
-
123
-
124
-
125
-
126
-
127
-
128
-
129
-
130
-
131
-
132
-
133
-
134
-
135
-
136
-
137
-
138
-
139
-
140
 |
 |
