Brother International PC-6500 Users Manual - English - Page 21
Raising/lowering the feed dogs, Installing the presser foot holder - thread tension
 |
View all Brother International PC-6500 manuals
Add to My Manuals
Save this manual to your list of manuals |
Page 21 highlights
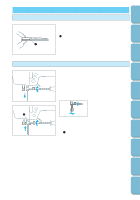
CONTENTS SETTING UP SEWING UTILITY STITCHES Installing the presser foot holder 5 1. Press the needle position button to raise the needle, and then turn off the sewing machine. 2. Raise the presser foot lever. 3. Remove the currently installed presser foot. 5 4. While pressing the black button on the left side of the presser foot holder, slide the holder as high as possible up the presser foot bar, and then release the button. 1 Presser foot holder CAUTION Be careful not to touch the tip of the needle, otherwise injuries may occur. Note If the presser foot holder is not installed correctly, the thread tension may not be tight enough due to an improper presser foot height. Raising/lowering the feed dogs With the accessory compartment removed, the feed dog position switch can be seen at the base of the machine. To lower the feed dogs, for example when sewing buttons, slide the lever to the right. To continue sewing while the feed dogs feed the fabric, slide the lever to the left. Note When the embroidery unit is attached to the sewing machine, the feed dogs are automatically lowered. MY CUSTOM STITCHTM (CREATE YOUR OWN STITCH DESIGNS) EMBROIDERING MAINTENANCE ERROR MESSAGES SEWING CHART PATTERNS (PROGRAMMED IN MACHINE) 18
-
 1
1 -
2
-
3
-
4
-
5
-
6
-
7
-
8
-
9
-
10
-
11
-
12
-
13
-
14
-
15
-
 16
16 -
 17
17 -
 18
18 -
 19
19 -
 20
20 -
 21
21 -
 22
22 -
 23
23 -
 24
24 -
 25
25 -
 26
26 -
27
-
28
-
29
-
30
-
31
-
32
-
33
-
34
-
35
-
36
-
37
-
38
-
39
-
40
-
41
-
42
-
43
-
44
-
45
-
46
-
47
-
48
-
49
-
50
-
51
-
52
-
53
-
54
-
55
-
56
-
57
-
58
-
59
-
60
-
61
-
62
-
63
-
64
-
65
-
66
-
67
-
68
-
69
-
70
-
71
-
72
-
73
-
74
-
75
-
76
-
77
-
78
-
79
-
80
-
81
-
82
-
83
-
84
-
85
-
86
-
87
-
88
-
89
-
90
-
91
-
92
-
93
-
94
-
95
-
96
-
97
-
98
-
99
-
100
-
101
-
102
-
103
-
104
-
105
-
106
-
107
-
108
-
109
-
110
-
111
-
112
-
113
-
114
-
115
-
116
-
117
-
118
-
119
-
120
-
121
-
122
-
123
-
124
-
125
-
126
-
127
-
128
-
129
-
130
-
131
-
132
-
133
-
134
-
135
-
136
-
137
-
138
-
139
-
140
 |
 |
