Brother International PC-6500 Users Manual - English - Page 52
Pintuck Sewing
 |
View all Brother International PC-6500 manuals
Add to My Manuals
Save this manual to your list of manuals |
Page 52 highlights
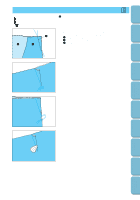
CONTENTS SETTING UP PINTUCK SEWING 1 I 1 Straight (Mid) [straight stitch (center needle position)] 1. Mark the positions of the folds on the wrong side of the fabric. 1 Wrong side of fabric 2. Fold over the fabric and iron only along the folds. 1 Right side of fabric SEWING UTILITY STITCHES MY CUSTOM STITCHTM (CREATE YOUR OWN STITCH DESIGNS) EMBROIDERING MAINTENANCE ERROR MESSAGES 3. Press [Straight (Mid)], and then press (presser foot I). The thread tension automatically adjusts for presser foot I. Note If you pressed then PINTUCK, the thread tension is automatically adjusted. 4. Attach the presser foot holder to the right pin of presser foot I, and sew a straight stitch along each fold. 1 Width of pintuck 2 Wrong side of fabric 3 Right side of fabric Note I If automatic thread cutting and automatic reverse/reinforcement stitching are turned on before you start sewing, pressing just the start/stop button automatically sews reverse stitches before sewing. In addition, pressing the reverse/reinforcement stitch button at the end of the stitching automatically sews reverse stitches, trims the threads and stops the machine. 5. Iron the folds toward the same direction. 49 SEWING CHART PATTERNS (PROGRAMMED IN MACHINE)
-
 1
1 -
2
-
3
-
4
-
5
-
6
-
7
-
8
-
9
-
10
-
11
-
12
-
13
-
14
-
15
-
16
-
17
-
18
-
19
-
20
-
21
-
22
-
23
-
24
-
25
-
26
-
27
-
28
-
29
-
30
-
31
-
32
-
33
-
34
-
35
-
36
-
37
-
38
-
39
-
40
-
41
-
42
-
43
-
44
-
45
-
46
-
 47
47 -
 48
48 -
 49
49 -
 50
50 -
 51
51 -
 52
52 -
 53
53 -
 54
54 -
 55
55 -
 56
56 -
 57
57 -
58
-
59
-
60
-
61
-
62
-
63
-
64
-
65
-
66
-
67
-
68
-
69
-
70
-
71
-
72
-
73
-
74
-
75
-
76
-
77
-
78
-
79
-
80
-
81
-
82
-
83
-
84
-
85
-
86
-
87
-
88
-
89
-
90
-
91
-
92
-
93
-
94
-
95
-
96
-
97
-
98
-
99
-
100
-
101
-
102
-
103
-
104
-
105
-
106
-
107
-
108
-
109
-
110
-
111
-
112
-
113
-
114
-
115
-
116
-
117
-
118
-
119
-
120
-
121
-
122
-
123
-
124
-
125
-
126
-
127
-
128
-
129
-
130
-
131
-
132
-
133
-
134
-
135
-
136
-
137
-
138
-
139
-
140
 |
 |
