Brother International PE-300S Users Manual - English - Page 9
Main Power Switch And, Connectors, Flatbed Attachment With, Accessory Compartment - parts
 |
View all Brother International PE-300S manuals
Add to My Manuals
Save this manual to your list of manuals |
Page 9 highlights
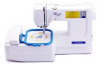
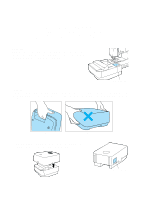
Contents Setting Up Basic Sewing Machine Operation Utility Stitches Embroidering Maintenance Troubleshooting 5 1 2 3 4 I II J1 III 5 6 74 1 2 3 A. MAIN POWER SWITCH AND CONNECTORS 1 Power socket Use to connect machine to power supply. 2 Main power switch Use to turn on/off the main power. 3 Air vents 4 Card slot Slot for memory card insertion. 5 Foot controller jack Use to connect the foot controller. CAUTION - When leaving the sewing machine unat- tended, the main switch of the machine must be switched off or the plug must be removed from the socket-outlet. - When servicing the sewing machine, or when removing covers or changing bulbs, the machine or the electrical set must be unplugged. - For U.S.A. only This appliance has a polarized plug (one blade wider than the other). To reduce the risk of electric shock, this plug is intended to fit in a polarized outlet only one way. If the plug does not fit fully in the outlet, reverse the plug. If it still does not fit, contact a qualified electrician to install the proper outlet. Do not modify the plug in any way. B. FLATBED ATTACHMENT WITH ACCESSORY COMPARTMENT I Slide accessory case to the left and out of the machine. II Each presser foot has a letter. 1 Presser foot letter III ACCESSORY LIST The location of each accessory is shown in figure III. No. Part Name 1 Buttonhole foot "A" 2 Overcasting foot "G" 3 Seam ripper 4 Bobbin 5 Needle set 6 Spool cap (Large) 7 Spool cap (Small) Part Code X57789-101 X51162-001 X54243-001 X80309-001 XA6627-001 130012-003 XA5752-001 * Always use BROTHER accessories with this machine. Error Messages Sewing Chart Patterns (Programmed in Machine) Patterns (Memory Card) 6
-
 1
1 -
2
-
3
-
 4
4 -
 5
5 -
 6
6 -
 7
7 -
 8
8 -
 9
9 -
 10
10 -
 11
11 -
 12
12 -
 13
13 -
 14
14 -
15
-
16
-
17
-
18
-
19
-
20
-
21
-
22
-
23
-
24
-
25
-
26
-
27
-
28
-
29
-
30
-
31
-
32
-
33
-
34
-
35
-
36
-
37
-
38
-
39
-
40
-
41
-
42
-
43
-
44
-
45
-
46
-
47
-
48
-
49
-
50
-
51
-
52
-
53
-
54
-
55
-
56
-
57
-
58
-
59
-
60
-
61
-
62
-
63
-
64
-
65
-
66
-
67
-
68
-
69
-
70
-
71
-
72
-
73
-
74
-
75
-
76
-
77
-
78
-
79
-
80
-
81
-
82
-
83
-
84
-
85
-
86
-
87
-
88
-
89
-
90
-
91
-
92
-
93
-
94
-
95
-
96
-
97
-
98
-
99
-
100
-
101
-
102
-
103
-
104
-
105
-
106
-
107
-
108
-
109
-
110
-
111
 |
 |
