Brother International PS 9000 User Manual - Page 25
If you click [Search Option], the TCP/IP, When setup is complete, the dialog box
 |
UPC - 012502607786
View all Brother International PS 9000 manuals
Add to My Manuals
Save this manual to your list of manuals |
Page 25 highlights
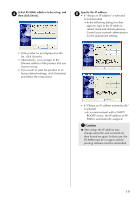
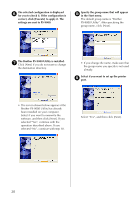
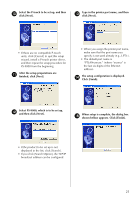
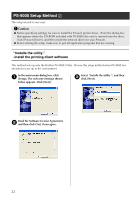
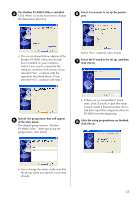
Select PS-9000, which is to be set up, and 9 then click [Next]. The setup configuration is displayed. a Click [Finish]. • If the product is not displayed in the list, click [Search]. • If you click [Search Option], the TCP/IP broadcast address can be configured. Type in the printer port name, and then 0 click [Next]. When setup is complete, the dialog box b shown bellow appears. Click [Finish]. • When you assign the printer port name, make sure that the port name you specify is not used already (e.g., LPT1:). • The default port name is "PTLANxxxxxx:" (where "xxxxxx" is the last six digits of the Ethernet address). 24
-
 1
1 -
2
-
3
-
4
-
5
-
6
-
7
-
8
-
9
-
10
-
11
-
12
-
13
-
14
-
15
-
16
-
17
-
18
-
19
-
 20
20 -
 21
21 -
 22
22 -
 23
23 -
 24
24 -
 25
25 -
 26
26 -
 27
27 -
 28
28 -
 29
29 -
 30
30 -
31
-
32
-
33
-
34
-
35
-
36
-
37
-
38
-
39
-
40
-
41
-
42
-
43
-
44
-
45
-
46
-
47
 |
 |

24
9
Select PS-9000, which is to be set up, and
then click [Next].
•
If the product is not displayed in the
list, click [Search].
•
If you click [Search Option], the TCP/IP
broadcast address can be configured.
0
Type in the printer port name, and then
click [Next].
•
When you assign the printer port name,
make sure that the port name you
specify is not used already (e.g., LPT1:).
•
The default port name is
“PTLANxxxxxx:” (where “xxxxxx” is
the last six digits of the Ethernet
address).
a
The setup configuration is displayed.
Click [Finish].
b
When setup is complete, the dialog box
shown bellow appears. Click [Finish].