Brother International PT1500PC Quick Setup Guide - Spanish - Page 18
Using P-touch Quick Editor, Specifying a label size, Entering text
 |
UPC - 012502600459
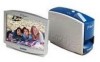
View all Brother International PT1500PC manuals
Add to My Manuals
Save this manual to your list of manuals |
Page 18 highlights
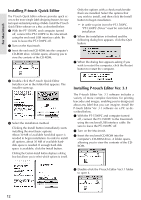
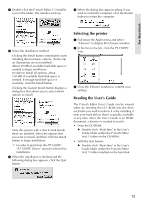
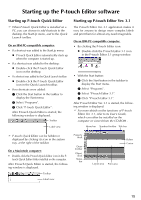
On a Macintosh computer: • Double-click the P-touch Editor Ver3.1.6 icon in the P-touch Editor Ver3.1 folder installed on the computer. After P-touch Editor Ver. 3.1 is started, the following window is displayed. For more details on the functions of P-touch Editor Ver. 3.1, refer to its User's Guide, which can either be installed on the computer or viewed from the CD-ROM . Rulers Layout area Print area Title bar Menu bar Draw toolbar Print toolbar Database toolbar Status bar Object dock Property dock Using P-touch Quick Editor The P-touch Quick Editor enables you to design a simple label layout quickly and easily. In addition to the various functions available through the buttons in the toolbar, right-clicking (Windows) or holding down the Control key and clicking (Macintosh) in the label view displays a pop-up menu containing more commands. Specifying a label size Before entering text, the label size must be set. A selection of preset layout sizes is available for a variety of needs. 1 Click the arrow beside the Properties button ( ) to display a drop-down menu. 2 Click [Tape Settings] to display various label format settings. Entering text The entire text can quickly be formatted by specifying the font, size, style and alignment. In addition, a frame can be drawn around the text. 1 Click the arrow beside the Properties button ( ) to display a drop-down menu. 2 Click [Text Settings] to display various text format settings. The Tape Settings can also be displayed by selecting [View Properties], then clicking [Tape Settings] in the pop-up menu, displayed by right-clicking (Windows) or holding down the Control key and clicking (Macintosh) in the label view. 3 In the Format list, click the desired label format. The size of the label layout can also be set by specifying the Length and Width settings or by dragging the edges of the label view until the layout is the desired size. The Text Settings can also be displayed by selecting [View Properties], then clicking [Text Settings] in the pop-up menu, displayed by right-clicking (Windows) or holding down the Control key and clicking (Macintosh) in the label view. 3 In the Text Settings, select the desired text formats. 4 Click in the label view, and then type or import the text. Typing in the label view shows the text as it will appear when it is printed. However, by clicking the Change View button ( ), the text is displayed in the text box, giving you a clearer view of the entered text. 16
-
 1
1 -
2
-
3
-
4
-
5
-
6
-
7
-
8
-
9
-
10
-
11
-
12
-
 13
13 -
 14
14 -
 15
15 -
 16
16 -
 17
17 -
 18
18 -
 19
19 -
 20
20 -
 21
21 -
 22
22 -
 23
23 -
24
-
25
-
26
-
27
-
28
-
29
-
30
-
31
-
32
-
33
-
34
-
35
-
36
-
37
-
38
-
39
-
40
-
41
-
42
-
43
-
44
-
45
-
46
-
47
-
48
-
49
-
50
-
51
-
52
-
53
-
54
-
55
 |
 |
