Brother International QL-1050N Setup & Operation Guide - English - Page 30
General Procedures
 |
UPC - 012502616764
View all Brother International QL-1050N manuals
Add to My Manuals
Save this manual to your list of manuals |
Page 30 highlights
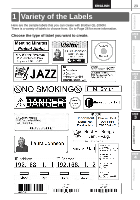
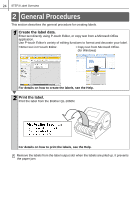
24 STEP3 Label Overview 2 General Procedures This section describes the general procedure for creating labels. 1 Create the label data. Enter text directly using P-touch Editor, or copy text from a Microsoft Office application. Use P-touch Editor's variety of editing functions to format and decorate your label. • Enter text in P-touch Editor. • Copy text from Microsoft Office. (for Windows) For details on how to create the labels, see the Help. 2 Print the label. Print the label from the Brother QL-1060N. For details on how to print the labels, see the Help. Remove the labels from the label output slot when the labels are piled up. It prevents the paper jam.
-
 1
1 -
2
-
3
-
4
-
5
-
6
-
7
-
8
-
9
-
10
-
11
-
12
-
13
-
14
-
15
-
16
-
17
-
18
-
19
-
20
-
21
-
22
-
23
-
24
-
 25
25 -
 26
26 -
 27
27 -
 28
28 -
 29
29 -
 30
30 -
 31
31 -
 32
32 -
 33
33 -
 34
34 -
 35
35 -
36
-
37
-
38
-
39
-
40
-
41
-
42
-
43
-
44
-
45
-
46
-
47
-
48
-
49
-
50
-
51
-
52
-
53
-
54
-
55
-
56
-
57
-
58
-
59
-
60
-
61
-
62
-
63
-
64
-
65
-
66
-
67
-
68
-
69
 |
 |

STEP3 Label Overview
24
This section describes the general procedure for creating labels.
Remove the labels from the label output slot when the labels are piled up. It prevents
the paper jam.
1
Create the label data.
Enter text directly using P-touch Editor, or copy text from a Microsoft Office
application.
Use P-touch Editor's variety of editing functions to format and decorate your label.
•
Enter text in P-touch Editor.
• Copy text from Microsoft Office.
(for Windows)
For details on how to create the labels, see the Help.
2
Print the label.
Print the label from the Brother QL-1060N.
For details on how to print the labels, see the Help.
2
General Procedures