Brother International ULT-2001 Users Manual - English - Page 304
due to the needle bar release mechanism. At these times, the machine will make a sound
 |
View all Brother International ULT-2001 manuals
Add to My Manuals
Save this manual to your list of manuals |
Page 304 highlights
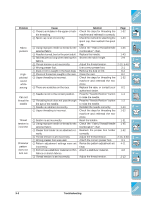
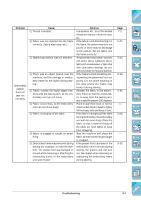
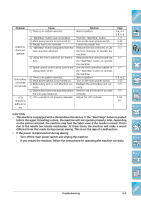
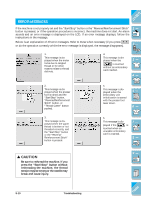
CONTENTS Problem Machine does not operate Embroidery unit does not operate LCD display is difficult to see Cause 1 There is no pattern selected. 2 "Start/Stop" button was not pushed. 3 Main power switch is not turned on. 4 Presser foot is not lowered. 5 "Start/Stop" button was pushed with the foot controller attached. 6 Using the foot controller for embroidery. 7 Speed control lever is set to control the zigzag stitch width. 1 There is no pattern selected. 2 Main power switch is not turned on. 3 Embroidery unit is not attached cor- rectly. 4 Embroidery frame was attached before the unit was initialized. 1 LCD contrast is not properly adjusted. Solution Select a pattern. Push the "Start/Stop" button. Turn on the main power switch. Lower the presser foot. Remove the foot controller, or use the foot controller to operate the machine. Remove the foot controller and use the "Start/Stop" button to operate the machine. Use the foot controller instead of the "Start/Stop" button to operate the machine. Select a pattern. Turn on the main power switch. Reattach the embroidery unit correctly. Perform the initialization process correctly. Adjust the LCD contrast. Page 3-9, 4-1 5-8, 6-2 1-3 1-12 1-4 1-7 1-7 1-7 5-8, 6-2 1-12 5-5 5-5 1-16, 8-1 CAUTION • This machine is equipped with a thread detection device. If the "Start/Stop" button is pushed before the upper threading is done, the machine will not operate properly. Also, depending on the pattern selected, the machine may feed the fabric even if the needle is raised. This is due to the needle bar release mechanism. At these times, the machine will make a sound different from that made during normal sewing. This is not the sign of a malfunction. • If the power is disconnected during sewing: - Turn off the main power switch and unplug the machine. - If you restart the machine, follow the instructions for operating the machine correctly. 1 - 2 - 3 - 4 - 5 - 6 - 7 - 8 - 9 - ?! Troubleshooting 9-9 Index
-
 1
1 -
2
-
3
-
4
-
5
-
6
-
7
-
8
-
9
-
10
-
11
-
12
-
13
-
14
-
15
-
16
-
17
-
18
-
19
-
20
-
21
-
22
-
23
-
24
-
25
-
26
-
27
-
28
-
29
-
30
-
31
-
32
-
33
-
34
-
35
-
36
-
37
-
38
-
39
-
40
-
41
-
42
-
43
-
44
-
45
-
46
-
47
-
48
-
49
-
50
-
51
-
52
-
53
-
54
-
55
-
56
-
57
-
58
-
59
-
60
-
61
-
62
-
63
-
64
-
65
-
66
-
67
-
68
-
69
-
70
-
71
-
72
-
73
-
74
-
75
-
76
-
77
-
78
-
79
-
80
-
81
-
82
-
83
-
84
-
85
-
86
-
87
-
88
-
89
-
90
-
91
-
92
-
93
-
94
-
95
-
96
-
97
-
98
-
99
-
100
-
101
-
102
-
103
-
104
-
105
-
106
-
107
-
108
-
109
-
110
-
111
-
112
-
113
-
114
-
115
-
116
-
117
-
118
-
119
-
120
-
121
-
122
-
123
-
124
-
125
-
126
-
127
-
128
-
129
-
130
-
131
-
132
-
133
-
134
-
135
-
136
-
137
-
138
-
139
-
140
-
141
-
142
-
143
-
144
-
145
-
146
-
147
-
148
-
149
-
150
-
151
-
152
-
153
-
154
-
155
-
156
-
157
-
158
-
159
-
160
-
161
-
162
-
163
-
164
-
165
-
166
-
167
-
168
-
169
-
170
-
171
-
172
-
173
-
174
-
175
-
176
-
177
-
178
-
179
-
180
-
181
-
182
-
183
-
184
-
185
-
186
-
187
-
188
-
189
-
190
-
191
-
192
-
193
-
194
-
195
-
196
-
197
-
198
-
199
-
200
-
201
-
202
-
203
-
204
-
205
-
206
-
207
-
208
-
209
-
210
-
211
-
212
-
213
-
214
-
215
-
216
-
217
-
218
-
219
-
220
-
221
-
222
-
223
-
224
-
225
-
226
-
227
-
228
-
229
-
230
-
231
-
232
-
233
-
234
-
235
-
236
-
237
-
238
-
239
-
240
-
241
-
242
-
243
-
244
-
245
-
246
-
247
-
248
-
249
-
250
-
251
-
252
-
253
-
254
-
255
-
256
-
257
-
258
-
259
-
260
-
261
-
262
-
263
-
264
-
265
-
266
-
267
-
268
-
269
-
270
-
271
-
272
-
273
-
274
-
275
-
276
-
277
-
278
-
279
-
280
-
281
-
282
-
283
-
284
-
285
-
286
-
287
-
288
-
289
-
290
-
291
-
292
-
293
-
294
-
295
-
296
-
297
-
298
-
 299
299 -
 300
300 -
 301
301 -
 302
302 -
 303
303 -
 304
304 -
 305
305 -
 306
306 -
 307
307 -
 308
308 -
 309
309 -
310
-
311
-
312
-
313
-
314
-
315
-
316
-
317
-
318
-
319
 |
 |
