Browning Gold 12 Owners Manual - Page 14
Disassembly Of The Barrel From The, Receiver - 26
 |
View all Browning Gold 12 manuals
Add to My Manuals
Save this manual to your list of manuals |
Page 14 highlights
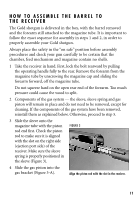
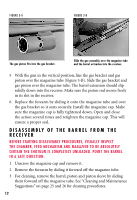
FIGURE 3-A FIGURE 3-B The gas piston fits into the gas bracket. Slide the gas assembly over the magazine tube and the barrel extension into the receiver. 5 With the gun in the vertical position, line the gas bracket and gas piston over the magazine tube (Figure 3-B). Slide the gas bracket and gas piston over the magazine tube. The barrel extension should slip solidly down into the receiver. Make sure the piston rod moves freely in its slot in the receiver. 6 Replace the forearm by sliding it onto the magazine tube and over the gas bracket so it seats securely. Install the magazine cap. Make sure the magazine cap is fully tightened down. Open and close the action several times and retighten the magazine cap. This will ensure a proper seal. DISASSEMBLY OF THE BARREL FROM THE RECEIVER BEFORE STARTING DISASSEMBLY PROCEDURES, VISUALLY INSPECT THE CHAMBER, FEED MECHANISM AND MAGAZINE TO BE ABSOLUTELY CERTAIN THE SHOTGUN IS COMPLETELY UNLOADED. POINT THE BARREL IN A SAFE DIRECTION. 1 Unscrew the magazine cap and remove it. 2 Remove the forearm by sliding it forward off the magazine tube. 3 For cleaning, remove the barrel, piston and piston sleeve by sliding them forward off the magazine tube. See "Cleaning and Maintenance Suggestions" on page 25 and 26 for cleaning procedures. 12
-
 1
1 -
2
-
3
-
4
-
5
-
6
-
7
-
8
-
 9
9 -
 10
10 -
 11
11 -
 12
12 -
 13
13 -
 14
14 -
 15
15 -
 16
16 -
 17
17 -
 18
18 -
 19
19 -
20
-
21
-
22
-
23
-
24
-
25
-
26
-
27
-
28
-
29
-
30
-
31
-
32
-
33
-
34
-
35
 |
 |
