Browning Gold 12 Owners Manual - Page 15
Disassembly Of The Trigger Group And, Bolt Assembly, Removing The Trigger Group - stock
 |
View all Browning Gold 12 manuals
Add to My Manuals
Save this manual to your list of manuals |
Page 15 highlights
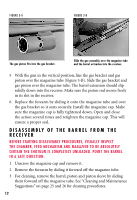
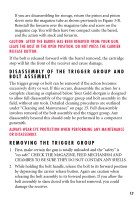
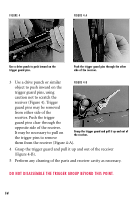
If you are disassembling for storage, return the piston and piston sleeve onto the magazine tube as shown previously in Figure 3-B. Reinstall the forearm over the magazine tube and screw on the magazine cap. You will then have two compact units: the barrel, and the action with stock and forearm. CAUTION: AFTER THE BARREL HAS BEEN REMOVED FROM YOUR GUN, LEAVE THE BOLT IN THE OPEN POSITION. DO NOT PRESS THE CARRIER RELEASE BUTTON. If the bolt is released forward with the barrel removed, the cartridge stop will hit the front of the receiver and cause damage. DISASSEMBLY OF THE TRIGGER GROUP AND BOLT ASSEMBLY The trigger group or bolt can be removed if the action becomes excessively dirty or wet. If this occurs, disassemble the action for a complete cleaning as explained below. Your Gold shotgun is designed to allow full disassembly of the trigger group and bolt assembly in the field, without any tools. Detailed cleaning procedures are outlined under "Cleaning and Maintenance" on page 25. Full disassembly involves removal of the bolt assembly and the trigger group. Any disassembly beyond this should only be performed by a competent gunsmith. ALWAYS WEAR EYE PROTECTION WHEN PERFORMING ANY MAINTENANCE OR DISASSEMBLY. REMOVING THE TRIGGER GROUP 1 First, make certain the gun is totally unloaded and the "safety" is "on safe." CHECK THE MAGAZINE, FEED MECHANISM AND CHAMBER TO BE SURE THEY DO NOT CONTAIN ANY SHELLS. 2 While holding the bolt handle, release the bolt to its forward position by depressing the carrier release button. Again use caution when releasing the bolt assembly to its forward position. If you allow the bolt assembly to slam closed with the barrel removed, you could damage the receiver. 13
-
 1
1 -
2
-
3
-
4
-
5
-
6
-
7
-
8
-
9
-
 10
10 -
 11
11 -
 12
12 -
 13
13 -
 14
14 -
 15
15 -
 16
16 -
 17
17 -
 18
18 -
 19
19 -
 20
20 -
21
-
22
-
23
-
24
-
25
-
26
-
27
-
28
-
29
-
30
-
31
-
32
-
33
-
34
-
35
 |
 |
