Browning Gold 12 Owners Manual - Page 16
receiver Trigger
 |
View all Browning Gold 12 manuals
Add to My Manuals
Save this manual to your list of manuals |
Page 16 highlights
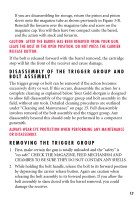
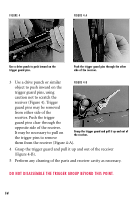
FIGURE 4 FIGURE 4-A Use a drive punch to push inward on the trigger guard pins. Push the trigger guard pins through the other side of the receiver. 3 Use a drive punch or similar FIGURE 4-B object to push inward on the trigger guard pins, using caution not to scratch the receiver (Figure 4). Trigger guard pins may be removed from either side of the receiver. Push the trigger guard pins clear through the opposite side of the receiver. It may be necessary to pull on the trigger pins to remove Grasp the trigger guard and pull it up and out of the receiver. them from the receiver (Figure 4-A). 4 Grasp the trigger guard and pull it up and out of the receiver (Figure 4-B). 5 Perform any cleaning of the parts and receiver cavity as necessary. DO NOT DISASSEMBLE THE TRIGGER GROUP BEYOND THIS POINT. 14
-
 1
1 -
2
-
3
-
4
-
5
-
6
-
7
-
8
-
9
-
10
-
 11
11 -
 12
12 -
 13
13 -
 14
14 -
 15
15 -
 16
16 -
 17
17 -
 18
18 -
 19
19 -
 20
20 -
 21
21 -
22
-
23
-
24
-
25
-
26
-
27
-
28
-
29
-
30
-
31
-
32
-
33
-
34
-
35
 |
 |
