Browning Gold 12 Owners Manual - Page 17
Reassembly, Removing The Bolt Assembly, Reinstalling The Bolt Assembly
 |
View all Browning Gold 12 manuals
Add to My Manuals
Save this manual to your list of manuals |
Page 17 highlights
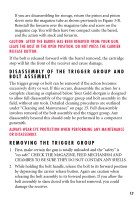
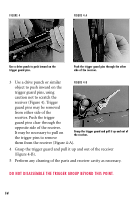
R E A S S E M B LY 1 Make sure the bolt is in the forward position. 2 Insert the trigger group back into the receiver. The holes in the trigger group should line up with the holes on each side of the receiver. 3 Reinsert the trigger guard pins and gently tap them into place with a plastic or wooden mallet, again using caution not to scratch the receiver. REMOVING THE BOLT ASSEMBLY To remove the bolt assembly it is preferred to first remove the trigger group, as explained previously. 1 With the gun inverted (trigger guard up position), push down on the cartridge stop while pulling outward on the bolt handle (Figure 5). Remove the bolt handle from the bolt. 2 While keeping the cartridge stop depressed, slide the bolt and bolt slide forward and out of the receiver (Figure 5-A). 3 The bolt and bolt slide can be separated for cleaning (Figure 5-B). Perform any cleaning of the bolt and receiver cavity as necessary. DO NOT DISASSEMBLE THE BOLT ASSEMBLY BEYOND THIS POINT. REINSTALLING THE BOLT ASSEMBLY 1 Reassemble the bolt and bolt slide. FIGURE 5 2 Place the bolt assembly back in the receiver, bolt slide link end first (Figure 5-C). Line the rails on the bolt slide with the slots in the bottom of the receiver. 3 Guide the bolt slide link into its socket in the recoil spring follower (Figure 5-D). Push down on the cartridge stop while pulling outward on the bolt handle. 15
-
 1
1 -
2
-
3
-
4
-
5
-
6
-
7
-
8
-
9
-
10
-
11
-
 12
12 -
 13
13 -
 14
14 -
 15
15 -
 16
16 -
 17
17 -
 18
18 -
 19
19 -
 20
20 -
 21
21 -
 22
22 -
23
-
24
-
25
-
26
-
27
-
28
-
29
-
30
-
31
-
32
-
33
-
34
-
35
 |
 |
