Bushnell Backtrack D-Tour Owner's Manual - Page 5
Fig. 2, Fig. 3, Fig. 4, Fig. 5 - gps
 |
View all Bushnell Backtrack D-Tour manuals
Add to My Manuals
Save this manual to your list of manuals |
Page 5 highlights
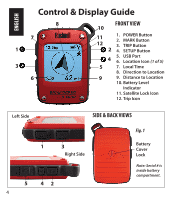
BASIC SETUP • Open battery cover and insert 3 AAA batteries (Fig 1, pg 4). Record the serial # inside-you'll need it later to register your D-Tour online. Close the cover. • Go outdoors. HOLD POWER (1) (keep the button pressed) until the display comes on. Wait for GPS satellite lock (icon stops blinking) (11). This may take a few minutes after the first power-up in a new area. • Press SETUP (4). Press MARK (2), then press the TRIP (3) or SETUP button to set the Hour for your area (Fig. 2). • Press MARK to return to the Setup screen. To set clock, distance or temperature units (change to 24 hr, meters, C) press SETUP to select, then press MARK to toggle between settings (Fig. 3). Press POWER to exit Setup screen. MARKING/RETURNING to a LOCATION • Press POWER to select one of five Location icons (6) (Home, Car, Star, Flag, Target). While standing at the Location you want to mark, HOLD MARK to save its position in the D-Tour's memory (the display will change as shown) (Fig. 4). You can now turn the power off (HOLD POWER) and leave the location. • To return to the location you marked, turn the D-Tour on. Make sure the same icon you used to mark the location is shown (if not, press POWER to select it). The display indicates the direction and distance back to the location (Fig. 5). Move in the direction of the arrow, watching for the distance to decrease. When you reach the location, the "Mark" icon will flash in the center of the display. Fig. 2 Fig. 3 Fig. 4 Fig. 5 5
-
 1
1 -
 2
2 -
 3
3 -
 4
4 -
 5
5 -
 6
6 -
 7
7 -
 8
8 -
 9
9 -
 10
10 -
 11
11 -
12
-
13
-
14
-
15
-
16
-
17
-
18
-
19
-
20
-
21
-
22
-
23
-
24
-
25
-
26
-
27
-
28
-
29
-
30
-
31
-
32
-
33
-
34
-
35
-
36
-
37
-
38
-
39
-
40
-
41
-
42
-
43
-
44
-
45
-
46
-
47
-
48
-
49
-
50
-
51
-
52
-
53
-
54
-
55
-
56
-
57
-
58
-
59
-
60
-
61
-
62
-
63
-
64
 |
 |
