Bushnell Backtrack D-Tour Owner's Manual - Page 6
Fig. 7, Fig. 6, Fig. 8, Fig. 9 - com
 |
View all Bushnell Backtrack D-Tour manuals
Add to My Manuals
Save this manual to your list of manuals |
Page 6 highlights
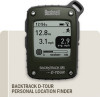
MARKING/RETURNING to a LOCATION (cont.) • You can use the five icons to mark five different locations of any kind (your car, tent, scenic area, etc.). Be sure you select a different icon to store each new location. If you hold down MARK with a previously used location icon still selected, you will replace that one with your current location. OTHER SCREENS • Press POWER once again after the "Target" location icon screen to view the temperature and altitude at your current location (Fig. 6). • Press POWER again to view the Compass screen, displaying the Latitude and Longitude of your current location, and a digital compass display including your heading (direction of travel) in degrees (Fig. 7). AUTO POWER OFF/BACKLIGHT • Power automatically turns off after 10 minutes if no buttons have been pressed (except in Trip mode, described next). HOLD POWER to turn the unit off manually. • Press the MARK button to turn the display backlight on. It automatically turns off after 30 seconds. COMPASS CALIBRATION • To ensure directional accuracy, hold the D-Tour out in front of you and move it in a "Figure 8" pattern a few times to re-calibrate the compass (Fig. 8). A compass calibration video is available at: http://www.bushnell. com/products/gps/instruction-videos/. • For best results, we recommend holding the D-Tour in a horizontal position (not tilted) during use (Fig. 9). 6 Fig. 6 Fig. 7 8Fig. 8 Fig. 9
-
 1
1 -
 2
2 -
 3
3 -
 4
4 -
 5
5 -
 6
6 -
 7
7 -
 8
8 -
 9
9 -
 10
10 -
 11
11 -
 12
12 -
13
-
14
-
15
-
16
-
17
-
18
-
19
-
20
-
21
-
22
-
23
-
24
-
25
-
26
-
27
-
28
-
29
-
30
-
31
-
32
-
33
-
34
-
35
-
36
-
37
-
38
-
39
-
40
-
41
-
42
-
43
-
44
-
45
-
46
-
47
-
48
-
49
-
50
-
51
-
52
-
53
-
54
-
55
-
56
-
57
-
58
-
59
-
60
-
61
-
62
-
63
-
64
 |
 |
