Canon 1191B001 XH G1 XH A1 Instruction Manual - Page 19
Using the LCD Display, Adjusting the LCD Panel
 |
View all Canon 1191B001 manuals
Add to My Manuals
Save this manual to your list of manuals |
Page 19 highlights
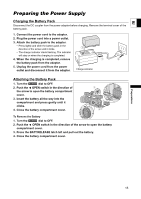
Using the LCD Display E Preparations 1. Slide the OPEN switch in the direction of the arrow to unlock the LCD panel. 2. Pull out the LCD panel. 3. Rotate the LCD panel and adjust it to the desired position. You can change the LCD panel to black & white display ( 20). By default, the viewfinder display is turned off while you use the LCD panel. However, you can change the settings to be able to use both displays simultaneously ( 20). Adjusting the LCD Panel You can adjust the brightness, contrast, color, sharpness and backlight of the LCD Panel. These adjustments will not affect your recording. MENU ( 25) DISPLAY SETUP/ LCD SETUP * The default value is [BRIGHT] while using the power adapter. BRIGHTNESS••• CONTRAST COLOR SHARPNESS•••• BACKLIGHT••••NORMAL* 1. Press the MENU button. 2. Turn the SELECT/SET dial to select [DISPLAY SETUP/ ] and press the dial. 3. Select [LCD SETUP] and then select [BRIGHTNESS], [CONTRAST], [COLOR], [SHARPNESS] or [BACKLIGHT]. 4. Adjust the setting with the SELECT/SET dial and press the dial. • After the adjustment you will return to the [LCD SETUP] submenu. Change additional settings in the same way as necessary. 5. Press the MENU button to close the menu. 19
-
 1
1 -
2
-
3
-
4
-
5
-
6
-
7
-
8
-
9
-
10
-
11
-
12
-
13
-
 14
14 -
 15
15 -
 16
16 -
 17
17 -
 18
18 -
 19
19 -
 20
20 -
 21
21 -
 22
22 -
 23
23 -
 24
24 -
25
-
26
-
27
-
28
-
29
-
30
-
31
-
32
-
33
-
34
-
35
-
36
-
37
-
38
-
39
-
40
-
41
-
42
-
43
-
44
-
45
-
46
-
47
-
48
-
49
-
50
-
51
-
52
-
53
-
54
-
55
-
56
-
57
-
58
-
59
-
60
-
61
-
62
-
63
-
64
-
65
-
66
-
67
-
68
-
69
-
70
-
71
-
72
-
73
-
74
-
75
-
76
-
77
-
78
-
79
-
80
-
81
-
82
-
83
-
84
-
85
-
86
-
87
-
88
-
89
-
90
-
91
-
92
-
93
-
94
-
95
-
96
-
97
-
98
-
99
-
100
-
101
-
102
-
103
-
104
-
105
-
106
-
107
-
108
-
109
-
110
-
111
-
112
-
113
-
114
-
115
-
116
-
117
-
118
-
119
-
120
-
121
-
122
-
123
-
124
-
125
-
126
-
127
-
128
-
129
-
130
-
131
-
132
-
133
-
134
-
135
-
136
-
137
-
138
-
139
-
140
-
141
-
142
-
143
-
144
-
145
-
146
-
147
-
148
-
149
-
150
-
151
-
152
-
153
-
154
-
155
-
156
-
157
-
158
-
159
-
160
-
161
-
162
-
163
-
164
 |
 |
