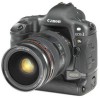
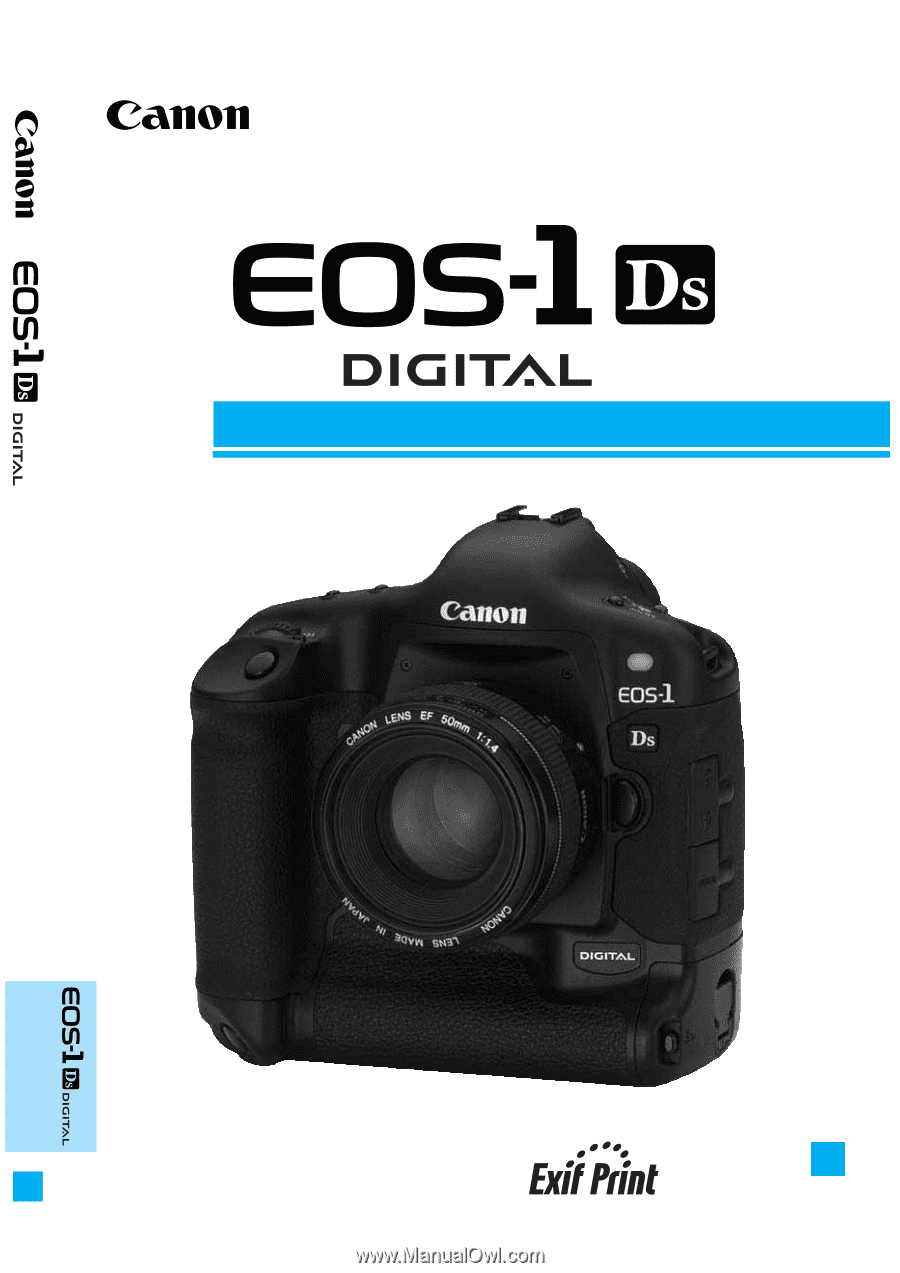
Canon 1Ds Instruction Manual
Canon 1Ds - 11.1MP Digital SLR Camera Manual
 |
UPC - 013803021820
View all Canon 1Ds manuals
Add to My Manuals
Save this manual to your list of manuals |
Canon 1Ds manual content summary:
- Canon 1Ds | Instruction Manual - Page 1
INSTRUCTION MANUAL INSTRUCTION MANUAL Be sure to read these Instruction Manual before using your camera for the first time. Keep this E booklet handy for easy reference. E English Edition - Canon 1Ds | Instruction Manual - Page 2
Thank you for purchasing a Canon product. The EOS-1Ds is a high-performance, digital AF SLR camera with a large, 36x24mm (approx.), 11.1-megapixel CMOS sensor and high-precision Area AF. The camera is compatible with all Canon EF lenses and has many features for all types of photography, from fully - Canon 1Ds | Instruction Manual - Page 3
-II ¢ Ni-MH Pack NP-E3 (with protective cover) ¢ Ni-MH Charger NC-E2 ¢ DC Coupler Kit DCK-E1 ¢ Neck Strap L4 ¢ Hand Strap E1 ¢ Interface Cable IFC-450D6 ¢ EOS DIGITAL Solution Disk ¢ Adobe Photoshop LE Disk ¢ EOS-1Ds Instruction Manual (which you are reading now) This describes how to use the camera - Canon 1Ds | Instruction Manual - Page 4
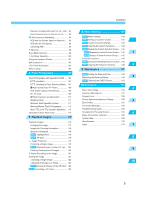
Start Guide 12 Nomenclature 14 Conventions Used in this Manual 20 1 Before You Start 21 Recharging the Battery 22 Installing and Removing the Battery 23 Installing the Battery 23 Checking the Battery Level 23 Removing the Battery 24 Using an AC Outlet 25 Mounting and Detaching a Lens 26 - Canon 1Ds | Instruction Manual - Page 5
the Back-up Battery 149 3 MENU Cleaning the CMOS Sensor 150 10 Reference 153 4 Basic Terminology 154 Exposure Warning List 157 Program Line 158 Shutter Speed and Aperture Display 159 5 Error Codes 160 On-screen Message 160 Troubleshooting Guide 162 Changing the Focusing - Canon 1Ds | Instruction Manual - Page 6
EOS-1Ds with the digital camera must be used with this manual. If such changes or modifications should be made, you could be required to stop operation of the equipment. Canon U.S.A. Inc. One Canon Plaza, Lake Success, NY 11042, U.S.A. Tel No. (516)328-5600 The Mark is a directive conformity mark - Canon 1Ds | Instruction Manual - Page 7
the OFF position and remove the camera battery or unplug the power cord immediately. Continued use of the equipment may result in fire or electrical shock. Please consult your camera distributor or the closest Canon Customer Support. • Do not use substances containing alcohol, benzene, thinners or - Canon 1Ds | Instruction Manual - Page 8
-E2 from electrical outlet after recharging and when the camera is not in use to avoid fires and other hazards. • The camera terminal of the DC Coupler Kit DCK-E1 is designed for exclusive use with the EOS-1Ds. Do not use it with other products or batteries. There is a risk of fire and other hazards - Canon 1Ds | Instruction Manual - Page 9
or DC Coupler Kit (if connected) from the camera and wait until the moisture evaporates completely before resuming use. Extended Storage When not using the camera for extended periods of time, remove the battery (except the lithium battery CR2025) and store the equipment in a safe place. Storing - Canon 1Ds | Instruction Manual - Page 10
Never attempt to disassemble the camera. (6) Use only a blower brush to blow away dust on the lens, viewfinder eyepiece, mirror, focusing screen, etc. Do not use any organic solvents to clean the camera body or lens. For stubborn dirt, consult your nearest Canon Service Center. (7) Do not touch the - Canon 1Ds | Instruction Manual - Page 11
data it contains. (2) Do not store or use a CF card near anything having a strong magnetic with the camera will not be able to record or display any images. Be sure to use only compatible CF Lens Electrical Contacts After detaching the lens from the camera, attach the lens caps or put down the lens - Canon 1Ds | Instruction Manual - Page 12
the release handle as shown by the arrow while pushing in the battery. (→p.23) 5 Attach a lens. Align the red dots on the lens and camera and turn the lens as shown by the arrow until it snaps in place. (→p.26) 6 On the lens, set the focus mode switch to < >. (→p.26) 9 Focus the subject. Aim the - Canon 1Ds | Instruction Manual - Page 13
(→p.29) 8 Set the camera to the default settings. (→34) Press the < > and < > buttons simultaneously for 2 sec. • To review previous images, see "Playback Images" on page 116. • To erase an image, see "Erasing an Image" on page 122. 11 Review the - Canon 1Ds | Instruction Manual - Page 14
grip operation on/off switch (→31) 〈 〉 Vertical grip FE lock / Multi-spot metering button (→31,109/78) Vertical grip Main Dial (→31,30) Vertical grip shutter button (→31,29) Strap mount (→36) 14 Lens mount Tripod socket Contacts (→11) Body number Body cap (→26) - Canon 1Ds | Instruction Manual - Page 15
99) 〈 〉 ISO speed set button (→49) 〈 〉 AEB set button (→94) Strap mount (→36) 〈〉 PC terminal (→114) 〈〉 Remote control terminal (N3 type) Battery release button (→24) Battery release handle (→23) Battery 〉 AF point selection button (→64) Eyepiece shutter lever (→101) Quick Control Dial switch (→20 - Canon 1Ds | Instruction Manual - Page 16
LCD monitor (→32,34) Eyecup (→35) CF card slot (→27) CF card slot cover (→27) 〈 〉 Digital terminal 〈 〉 Display button (→54,116) 〈 〉 Erase button (→122) Rear LCD panel (→18) 〈 〉 ) White balance bracketing button 〈 〉 White balance selection button (→41) Battery compartment cap (→23) 16 - Canon 1Ds | Instruction Manual - Page 17
number ( , ) AEB amount ( - ) AF point selection mode (, , ) Shooting mode : Program AE : Manual exposure : Shutter ( - ) ISO Error code AF mode One-Shot AF AI Servo AF Exposure level scale Battery level PF Flash exposure use, only the relevant icons and indicators are displayed. 17 - Canon 1Ds | Instruction Manual - Page 18
Cloudy Tungsten light Fluorescent light Flash Manual Color temperature CF card icon Recording image quality Large/Fine Large/Normal Small/Fine Raw White balance bracketing level Folder number ( - ) Date transfer mark* File number ( - ) Color temperature value ( - ) Personal white balance - Canon 1Ds | Instruction Manual - Page 19
error warning ( ) Shutter speed ( - ) Bulb ( ) Depth-of-field AE ( ) AF point selection mode ( , ) FE lock ( ) Busy ( , ) Aperture ( - ) DEP point number ( , ) AF point selection mode ( , , ) Exposure compensation Flash exposure compensation Exposure level indicator Maximum burst count - Canon 1Ds | Instruction Manual - Page 20
to the actual icons and markings found on the camera. See "Nomenclature" on page 14. • For more information, reference page numbers are provided in parentheses (→p.00). • The Canon EF 50mm f/1.4 USM lens is used as the demonstration lens in these Instruction Manual. • The procedures assume that the - Canon 1Ds | Instruction Manual - Page 21
Before You Start 11 Before You Start This chapter explains a few preliminary steps and the basic operation of the EOS-1Ds camera. 21 - Canon 1Ds | Instruction Manual - Page 22
For details on how to recharge and discharge the battery, refer to the instructions for the Nickel-Hydride Charger NC-E2. Connect the protective cover. Attach the cover to the battery compartment cap and retain it. • Whenever the battery is out of the camera, be sure to attach the protective cover to - Canon 1Ds | Instruction Manual - Page 23
to wipe it clean. Rubber lining Checking the Battery Level After replacing the battery or before using the camera, check the battery level. Turn the < > switch to < >. s When the < > switch is turned on, the battery check is executed automatically and the battery level is displayed on the top LCD - Canon 1Ds | Instruction Manual - Page 24
on Canon's testing conditions (w/EF 50mm f/1.4 USM lens, review turned on, reviewing time of 2 sec., and " + " image quality). The actual number of shots will vary depending on your shooting conditions. • Using the LCD monitor more frequently will reduce the number of shots. •• Pressing the shutter - Canon 1Ds | Instruction Manual - Page 25
Before You Start Using an AC Outlet With the DC Coupler Kit, you can connect the camera to an AC outlet to supply power. Then you do not have to worry about exhausting the battery. 1 •Insert the DC Coupler. Insert the coupler and while pushing it in, turn the release handle as shown by - Canon 1Ds | Instruction Manual - Page 26
and the body cap by turning them as shown by the arrow. 2 •Attach the lens. Align the red dots on the lens and camera and turn the lens as shown by the arrow until it snaps in place. 3 On the lens, set the focus mode switch to < >. • If the focus mode switch is set to - Canon 1Ds | Instruction Manual - Page 27
CF Card The pictures you take are recorded on the CF card. The camera is compatible with Type I and Type II CompactFlash (CF) cards. If you want to capture images in the Large/ >, the top LCD panel and viewfinder will show the number of remaining shots. The rear LCD panel will also display the file - Canon 1Ds | Instruction Manual - Page 28
a hard disk. It has a large capacity and the price per megabyte is low. However, compared to a CF card equipped with a flash memory, it is vulnerable to vibration and physical shock. If you use a microdrive, be careful not to subject the camera to vibration, shake, or physical shock while it is - Canon 1Ds | Instruction Manual - Page 29
< > : The camera does not operate. Set to this position when not using the camera. < > : To turn on the camera, set to this manual focus. • To save battery power, the camera turns off automatically after 1 minute of nonoperation. (→p.130) To turn on the camera again, just press the shutter - Canon 1Ds | Instruction Manual - Page 30
. During this time, you can turn the < > dial to set the desired setting. After the timer turns off or when you press the shutter button halfway, the camera can be used to take pictures. • In this way, you can set select the AF point or press the < > button and set the exposure compensation - Canon 1Ds | Instruction Manual - Page 31
effect. • In this way, you can set the review and select images on the LCD monitor. (2) After turns off or when you press the shutter button halfway, the camera can be used to take pictures. • In this manually. Vertical Shooting For vertical shooting, the vertical grip (camera bottom) has a shutter - Canon 1Ds | Instruction Manual - Page 32
in both the RAW and JPEG formats, set the date and time, set Custom Functions, etc. While looking at the LCD monitor, you use the < > button, < > button, and < > dial as explained below. For details on the various menu settings, see "Menu Settings" on page 127. < > button < > button - Canon 1Ds | Instruction Manual - Page 33
take effect immediately. s s Press the < > button to exit the menu. The LCD monitor will turn off. 5 •• You can also exit the menu by pressing the shutter button halfway. • In step 1, you can also hold down the < > button and when the menu appears, you can turn the < > dial to select a menu - Canon 1Ds | Instruction Manual - Page 34
The color LCD monitor on the back of the camera enables you to review and select recorded images and set various menu settings. • With the LCD monitor, you can use the < > dial even while the < > switch is < >. • The LCD monitor cannot be used as a viewfinder to take pictures. You can change the - Canon 1Ds | Instruction Manual - Page 35
cannot provide a clear viewfinder image, using Dioptric Adjustment Lens E (10 types) is recommended. (→p.167) Holding the Camera To obtain sharp pictures, hold the camera still to minimize camera shake. Horizontal shooting Vertical shooting • Firmly grasp the camera grip with your right hand, and - Canon 1Ds | Instruction Manual - Page 36
Attaching the Neck Strap and Hand Strap Attaching the Hand Strap 1 4 2 5 Attaching the Neck Strap 3 6 After attaching the strap, pull it to make sure it does not loosen at the buckle. 36 - Canon 1Ds | Instruction Manual - Page 37
Settings for Images 22 Settings for Images This chapter explains the specific settings for shooting with a digital camera: Image-recording quality, white balance, ISO speed, and image-processing parameters. You will also learn how to review and organize the recorded images. 37 - Canon 1Ds | Instruction Manual - Page 38
JPEG after conversion to a 2.7-megapixel image. It maximizes the number of images that can be recorded on the CF card. RAW Records the image with lossless compression resulting in about 11 megapixels. Use this mode when you want to use a personal computer to process the image afterward. Due to the - Canon 1Ds | Instruction Manual - Page 39
and JPEG formats simultaneously. (→p.40) • To open images recorded in the RAW format, you must use the dedicated driver software that came with the camera. For details, see "EOS DIGITAL Software User's Manual." • With higher ISO speeds (→p.49), the image will contain more noise and the file size - Canon 1Ds | Instruction Manual - Page 40
image can undergo optimal processing, while the JPEG image enables you to use the image as is without any processing. 1 •Select RAW on the • The RAW and JPEG images captured simultaneously will have the same image file number but a different extension. The JPEG image will have the .JPG extension and - Canon 1Ds | Instruction Manual - Page 41
, you can attach a color correction filter to the lens or use tungsten film to compensate for the color cast caused by the light source's color temperature. With a digital camera's white balance setting, you can digitally compensate (based on a standard white color) the color temperature so that - Canon 1Ds | Instruction Manual - Page 42
White Balance Settings Icon Application The camera sets the white balance automatically. Color Temperature ( to be used as the standard for the white balance setting. By using the white balance data from this image, you can set the optimum white balance. (→p.43) You can manually set white - Canon 1Ds | Instruction Manual - Page 43
•Select an image. While pressing the < > button, turn the < > dial to select an image. Then let go of the < > button. • Images not taken with the EOS-1Ds cannot be selected. 4 •Import the white balance data. While pressing the < > button, turn the < > dial to select "OK." Then let go of the - Canon 1Ds | Instruction Manual - Page 44
MENU Custom White Balance / MENU Setting the Color Temperature 5 •Select the custom white balance. While pressing the < > button, turn the < > dial to select < >. Then let go of the < > button. s The custom white balance will be set. For the standard white object, a sheet of plain, white paper is - Canon 1Ds | Instruction Manual - Page 45
software provided with the camera. You can thereby obtain a more accurate white balance in the image. It is ideal when you have to take many pictures under the same lighting conditions such as in a photo studio. For details, see the "EOS DIGITAL Software User's Manual." Select a registerd personal - Canon 1Ds | Instruction Manual - Page 46
+/-3 stops in full-stop increments. For each shot, the camera changes the color temperature automatically vis-à-vis the current white balance temperature, bluish (minus), and reddish (plus). The current drive mode (→p.99) is used during the bracketing sequence. 1 Press the < > and < > buttons - Canon 1Ds | Instruction Manual - Page 47
drive mode is used when you take the bracketed shots. (→p.99) • If continuous shooting is used, holding down the shutter button fully will white balance auto bracketing from being canceled when you change the lens, replace the CF card, replace the battery, or set the < > switch to < >. (→p.135 - Canon 1Ds | Instruction Manual - Page 48
button, turn the < > dial to select the desired color matrix setting number. Then let go of the < > button. A description of each RGB color space is created. It is useful for profile conversion to Adobe RGB or attached to the images shot by this camera. Also, chroma adjustment is required as - Canon 1Ds | Instruction Manual - Page 49
of the sensitivity to light. (→p.154) A higher ISO speed number indicates a higher sensitivity to light. Therefore, a high ISO camera is used under higher temperature, more noise will appear in the image. In this case, image file size will grow and fewer images will be recorded on the CD card. Number - Canon 1Ds | Instruction Manual - Page 50
use the dedicated software to set it in the camera beforehand. The setting procedure is described in the "EOS DIGITAL Software User's Manual quality of the (Normal) mode. 6 7 8 9 10 1 2 3 4 5 A higher number will result in a higher image quality. On the menu, select "Parameters." Press the < > - Canon 1Ds | Instruction Manual - Page 51
Settings for Images MENU Selecting the Processing Parameters 3 •Select the set No. While pressing the < > button, turn the < > dial to select Set 1, 2, or 3. Then let go of the < > button. 4 •Select the parameter to be set. While pressing the < > button, turn the < > 2 dial to select the - Canon 1Ds | Instruction Manual - Page 52
a picture. s The picture will be displayed on the LCD monitor. Review "On" setting Review "On (Info)" setting (→p.118) Shooting information Histogram • You can also change the number of seconds the image is displayed (review time). (→p.53) • After continuous shooting, only the last shot will - Canon 1Ds | Instruction Manual - Page 53
Time You can change the number of seconds the image is displayed on the LCD monitor after it is captured. On the menu, select "Review time". Press the < > button. CF card slot cover or remove the battery while the access lamp is blinking. • If the selection mark is positioned under the < > icon - Canon 1Ds | Instruction Manual - Page 54
Creating a Folder with the Camera 1 •Set the folder mode. While pressing the < > button, turn the < > dial to select < > on the rear LCD panel. s The LCD monitor will switch to the folder mode. Folder name Shot count Folder mode Image display formats Selection mark 2 •Display the "Create - Canon 1Ds | Instruction Manual - Page 55
monitor, press the < > button. A folder cannot be created beyond number 999. 2 Selecting a Folder You can select the folder where subsequent ) 1 •Set the folder mode. Follow step 1 in "Creating a Folder with the Camera" on the previous page. 2 •Select a folder. While pressing the < > button, - Canon 1Ds | Instruction Manual - Page 56
menu will reappear. • To exit the menu and turn off the LCD monitor, press the < > button. Auto Reset This resets the file numbering to XXX-0001 whenever you use a new folder to store images you capture or whenever you replace the CF card with a new one. Thus, the images in each folder - Canon 1Ds | Instruction Manual - Page 57
into a another folder or CF card which already contains images captured with the camera, the file numbering will start after the highest file number in that folder or CF card. File numbering after changing the folder File numbering after changing the CF card CF card 1 100 101 CF card 1 CF card - Canon 1Ds | Instruction Manual - Page 58
from A to Z and an underbar. There can be no space. • The camera will not recognize folder names such as "100ABC" (insufficient letters) or "001ABC_F" (the number must be 100 to 999). Also, folder names cannot have the same three-digit number such as "100ABC_C" and "100ABC_D" even if the letters are - Canon 1Ds | Instruction Manual - Page 59
, autofocusing can be executed while you maintain the desired subject framing. You can also set the AF mode to suit the subject or intended effect. Using Autofocus (AF) First set the < > switch and < > switch to < >. 59 - Canon 1Ds | Instruction Manual - Page 60
subjects. (AI is an abbreviation for Artificial Intelligence.) Select the AF mode that suits the subject. 1 Set the lens focus mode switch to < >. 2 •Set the AF mode. While pressing the camera's < > button, turn the < > dial until the desired AF mode is displayed on the LCD panel. Then release the - Canon 1Ds | Instruction Manual - Page 61
Using Autofocus (AF) Area AF ellipse AF point Focus confirmation light Pressing the shutter exposure setting (shutter speed and aperture the shutter button press the shutter button halfway to focus. 2 Keep pressing the shutter button halfway shutter button is pressed fully. Reframe the shot and focus - Canon 1Ds | Instruction Manual - Page 62
a manually selected AF point, the AF point will flash in red and focus track the subject. When the AF point selection is automatic, the camera first uses the the AI Servo AF is active. (→p.133) • Custom Function C.Fn-11-2 enables you turn the < > dial to change the AF point to track the subject in the - Canon 1Ds | Instruction Manual - Page 63
and AF Points The Area AF ellipse is the area where the camera can focus the subject. The Area AF ellipse has 45 AF is covering the subject. As long as the subject is within the Area AF ellipse, the camera will focus the subject automatically. AF points in the Area AF ellipse Area AF ellipse AF - Canon 1Ds | Instruction Manual - Page 64
manually. • Automatic Selection From among the 45 AF points, the camera selects the AF point automatically to suit the subject. • Manual Selection (One of three groups of selectable AF points can be used Selection The camera will be ready for picture-taking when Manual Selection the shutter button is - Canon 1Ds | Instruction Manual - Page 65
You can also turn the < > dial instead. • While in the manual selection mode, shifting the AF point beyond the peripheral AF point will set point selected. Double AF points selected. Using Autofocus (AF) If double AF points are selected, both AF points will be used for shooting. If you then select - Canon 1Ds | Instruction Manual - Page 66
AF Point (2) Manual selection limited to 11 AF points C.Fn-13-1, 2 (→p.136) Since the selectable AF points are limited to 11, you can better 13-1 enables spot metering linked to the selected AF point. (→p.77, 136) (3) Manual selection limited to 9 AF points C.Fn-13-3 (→p.136) The center AF point and - Canon 1Ds | Instruction Manual - Page 67
point by pressing or during holding down the < > button. (→p.138) 3 Using Autofocus (AF) The manual selection method can be altered as follows: (→p.136) (1) C.Fn-11-1 gives the < > button the function of the < > button. (2) C.Fn-11-2 gives the < > button the function of the < > button. The < can - Canon 1Ds | Instruction Manual - Page 68
registered AF point is selected. Off-center AF point Center AF point When using a Speedlite and spot metering, first press the < > button. If you -1/2 has been set to limit the selectable AF points to 11. (→p.66) • When C.Fn-13-3 has been used to limit the selectable AF points to 9, an AF point - Canon 1Ds | Instruction Manual - Page 69
the registered AF point only while pressing the < > button. C.Fn-18-2 (→138) • When the < > button is released, it will return to the original AF point. Using Autofocus (AF) • If no AF point has been registered, the above steps will switch it to the center AF point. • If you set or cancel - Canon 1Ds | Instruction Manual - Page 70
7 or 13 points automatically C.Fn-17-2 (→p.137) As shown below, the AF point activation area expands automatically to 7 or 13 points depending on the lens focal length, AF mode, and the subject's speed in the AI Servo AF mode. This is effective when the subject's movement is unpredictable. AF Mode - Canon 1Ds | Instruction Manual - Page 71
the Lens' Maximum Aperture The EOS-1Ds's AF points are all horizontal-line sensitive. However, bright lenses with a large maximum aperture enable certain AF points to work as cross-type sensors for higher AF precision. (1) With lenses whose maximum aperture is f/2.8 or faster (lower f/number), the - Canon 1Ds | Instruction Manual - Page 72
used for AF. • With Extender EF 1.4x or EF 1.4x II: EF 400mm f/5.6L USM EF 500mm f/4.5L USM EF 100-400mm f/4.5-5.6L IS USM • With Extender EF 2x or EF 2x II panel. The EF 70-200mm f/2.8L USM lens (without IS) used together with Extender EF 1.4x or EF 1.4x II will enable the center AF point to work - Canon 1Ds | Instruction Manual - Page 73
Using Autofocus (AF) When Autofocus Fails (Manual Focusing) Autofocus can fail to achieve focus ( as the subject and lock the focus before recomposing. 2. Set the lens focus mode switch to < > (or < > on older lenses) and focus manually. (→p.26) If focus cannot be achieved with the AF-assist light - Canon 1Ds | Instruction Manual - Page 74
lens focusing ring until the subject is in focus in the viewfinder. • Select the desired AF point and press the shutter button halfway while manual scale), you can use the focusing ring to fine focus after focus is achieved in the One-Shot AF mode (full-time manual focusing). For USM lenses - Canon 1Ds | Instruction Manual - Page 75
4Evaluative metering Partial metering Spot metering Centerweighted average metering 4 Metering Modes Evaluative, partial, spot, and centerweighted average metering modes are provided. Center spot metering, AF point-linked spot metering, and multi-spot metering can also be set. Select the metering - Canon 1Ds | Instruction Manual - Page 76
evaluative metering. After detecting the main subject's size, position, brightness, background, front and back lighting, etc., the camera sets the proper exposure. • During manual focusing, evaluative metering is based on the center AF point. • If the subject brightness and background light level - Canon 1Ds | Instruction Manual - Page 77
Linked Spot Metering To make AF point selection faster, the selectable AF points can be limited to 11 (C.Fn-13-1) or 9 (C.Fn-133). When C.Fn-13-1 or C.Fn-13-3 has been set, the manually-selected AF point is linked to 2.4% spot metering. (→p.66, 136) Metering Modes During continuous shooting in the - Canon 1Ds | Instruction Manual - Page 78
Metering Modes Multi-Spot Metering With multiple spot meter readings, you can see the relative exposure levels of multiple areas in the picture and set the exposure to obtain the desired result. 1 Set the metering mode to spot metering. (→p.76) 2 Aim the AF point over the midtone area (the ceiling - Canon 1Ds | Instruction Manual - Page 79
4 • While referring to the exposure level indicator's three spot metering marks, you can set exposure compensation to obtain the desired result. Metering button. 3. After taking the picture, you let go of the shutter button. • Multi-spot metering can be fixed at the center or linked to the active AF - Canon 1Ds | Instruction Manual - Page 80
80 - Canon 1Ds | Instruction Manual - Page 81
: Program AE (→82) : Manual (→90) : Shutter-priority AE (→84) 5: Depth-of-field AE (→88) : Aperture-priority AE (→86) bulb (→102) AEB (→94) : Drive modes (→99) : self-timer (→100) Exposure compensation (→92) Exposure Control 5 You can set the shooting mode which best suits the subject or situation. - Canon 1Ds | Instruction Manual - Page 82
in the viewfinder. • If the focus confirmation light < > in the viewfinder blinks, the shutter will lock and a picture cannot be taken. See "When Autofocus Fails (Manual Focusing)" on page 73. Shutter speed Exposure setting Aperture 3 Make sure the exposure setting is not blinking, then press - Canon 1Ds | Instruction Manual - Page 83
AF point which achieves focus flashes briefly. If the AF point has been selected manually (→p.65), it will light dimly while it is active for ( ). • If > mode, you can freely change the shutter speed and aperture combination (program) set by the camera while retaining the same exposure value. This - Canon 1Ds | Instruction Manual - Page 84
set the desired shutter speed and the camera sets the aperture automatically to suit the subject brightness. A fast shutter speed can freeze motion, and a slow shutter speed can blur it. ∗ Tv is an abbreviation for Time value. With a fast shutter speed With a slow shutter speed 1 While pressing - Canon 1Ds | Instruction Manual - Page 85
-Priority AE Exposure Warnings • If the lens' maximum aperture (lowest f/number like f/1.4) blinks, it indicates underexposure. Turn the < > dial to set a slower shutter speed until the aperture display stops blinking. • If the lens' minimum aperture (highest f/number like f/22) blinks, it indicates - Canon 1Ds | Instruction Manual - Page 86
Aperture-Priority AE In this mode, you set the desired aperture and the camera sets the shutter speed automatically to suit the subject brightness. The larger or brighter the aperture (lower f/number) the more blurred the background will become. This effect is ideal for portraits. The smaller or - Canon 1Ds | Instruction Manual - Page 87
number) until the shutter speed stops blinking. • C.Fn-16 enables the safety shift feature. (→p.137) If a correct exposure cannot be obtained in the aperture-priority AE mode with any shutter speed set by the camera, the camera to be set with the camera even while the lens is detached. (→p.134) - Canon 1Ds | Instruction Manual - Page 88
"depth of field." • This mode will not work if the lens focus mode switch is set to < > (or < >). First set the lens focus mode switch to < >. 1 •Select < > on > and " " is displayed. 4 Compose the picture, press the shutter button halfway and check the exposure setting, then take the picture. s - Canon 1Ds | Instruction Manual - Page 89
8000 shutter speed and the lens' minimum aperture (highest f/ number) blink, underexposure will number) blink, overexposure will result and depth-of-field AE will not result. Use a neutral density (ND) work. filter to reduce the amount of light entering the camera. • When using a zoom lens - Canon 1Ds | Instruction Manual - Page 90
Manual Exposure In this mode, you set both the shutter speed and aperture for total exposure control. You can refer to the exposure level indicator in the viewfinder or use a handheld exposure meter to determine the shutter speed and aperture. Using the Built-in Exposure Meter 1 While pressing the < - Canon 1Ds | Instruction Manual - Page 91
reverse the functions of the < > dial and < > dial. (→p.134) •• C.Fn-06 can set the shutter speed and/or aperture increments to full stops or half stops instead of the standard 1/3 stops. (→p.134) • C.Fn-05-2/3 enables the aperture to be set manually even when the lens has been detached. (→p.134) 91 - Canon 1Ds | Instruction Manual - Page 92
manually. To cancel the exposure compensation amount, turn the < > to set the exposure compensation amount to 0, according to procedure 3 on this page. Exposure compensation is used to alter the camera while pressing the shutter button halfway or within ( ) after releasing the shutter button. • On - Canon 1Ds | Instruction Manual - Page 93
Setting Exposure Compensation 4 Take the picture. Custom Function C.Fn-06-2 enables the exposure compensation amount to be set in 1/2-stop increments. (→p.134) The exposure compensation amount's 1/2-stop increments enabled with C.Fn-06 are indicated in the viewfinder and on the LCD panel as shown - Canon 1Ds | Instruction Manual - Page 94
Bracketing With auto exposure bracketing, the camera brackets the exposure automatically up to +/-3 stops in 1/3-stop increments for three successive frames. You can bracket the exposures by changing the shutter speed or aperture. Or you can use a fixed shutter speed and aperture and change the ISO - Canon 1Ds | Instruction Manual - Page 95
indicator will indicate the respective bracketing amount as each shot is taken. s The current drive mode will be used. (→p.99) • In the continuous shooting mode, holding down the shutter button will take all three bracketed shots continuously. The shooting will then stop automatically. • When AEB is - Canon 1Ds | Instruction Manual - Page 96
shooting mode. • The AEB range possible by changing the shutter speed is 30 sec. to 1/8000 sec. By changing the aperture, the AEB range ranges from the lens' maximum aperture (lowest f/number) to the lens' minimum aperture (highest f/number). • The AEB range possible by changing the ISO speed - Canon 1Ds | Instruction Manual - Page 97
with the shutter speed or aperture. (→p.134) Also, C.Fn-05-1 enables a manual exposure to be set with a fixed shutter speed and AEB will also be canceled if you change lenses, replace the CF card, replace the battery, set a bulb exposure, have a flash-ready Speedlite, press the < > button, - Canon 1Ds | Instruction Manual - Page 98
, you can recompose the shot while maintaining the desired exposure level. This feature is useful for backlit and spotlighted subjects. 1 Focus at the point where you want to lock the exposure reading. s The exposure setting (shutter speed and aperture) will be displayed on the LCD panel and in the - Canon 1Ds | Instruction Manual - Page 99
: Continuous shots are taken while you press the shutter button fully. The maximum number of continuous shots in a single burst depends on shots per burst in the above table are based on Canon's testing standards (1/250 sec. or faster shutter speed, at ISO 100). • The maximum shots per . delay) 99 - Canon 1Ds | Instruction Manual - Page 100
count displayed in the viewfinder on the lower right corner. This is the number of continuous shots that you can take before the camera must can be set to either a 2-second or 10-second delay. When using the self-timer, you should mount the camera on a tripod. 1 While pressing the < > button and < - Canon 1Ds | Instruction Manual - Page 101
you will be. The 2-second delay is effective for close-ups or photo duplicating work to prevent camera shake (camera movement while the shutter button is pressed). 5 Using the Eyepiece Shutter If you take a picture without looking through the viewfinder, stray light may enter the eyepiece and affect - Canon 1Ds | Instruction Manual - Page 102
time you keep pressing the shutter button completely. Bulb is useful when a long exposure is The bulb exposure will continue while you keep pressing the shutter button fully. If the exposure is 1 sec. bulb exposures). (→p.129) • With a fully charged battery, a single bulb exposure can last as long - Canon 1Ds | Instruction Manual - Page 103
LCD Panel Illumination The top and rear LCD panels are provided with illumination so you can read the panels in the dark. The < > button turns the illumination of both panels on or off. The illumination stays on for 6 sec. If you take a picture while the panel is illuminated, the illumination will - Canon 1Ds | Instruction Manual - Page 104
as at the beach or ski ground on a sunny day, take the picture promptly after mirror lockup. • During mirror lockup, do not point the camera lens at the sun. The sun's heat can scorch and damage the shutter curtains. • If you use mirror lockup with the self-timer for a bulb exposure, there will be - Canon 1Ds | Instruction Manual - Page 105
as E-TTL wireless autoflash photog- raphy with multiple Speedlites. Speedlite 550EX will be used to explain the flash photography features possible with the EOS-1Ds. For details on Speedlite 550EX, see the instructions booklet that came with it. Flash Photography First set the < > switch to - Canon 1Ds | Instruction Manual - Page 106
plane flash) enables flash synchronization with all shutter speeds from 30 sec. to 1/8000 using a Speedlite directly attached to the camera. E-TTL is an abbreviation for Evaluative-Through-The-Lens. •• With autofocus, the flash exposure is always based on the aperture (set automatically or manually - Canon 1Ds | Instruction Manual - Page 107
on using Speedlite 550EX, see the instructions booklet that came with it. 1 Set the camera's Manual (Manual) Manual (30 sec. - 1/250 sec.) Manual ∗ Since using the < > mode in low light will result in a slow shutter speed, use a tripod to prevent camera shake. (2) When you press the shutter - Canon 1Ds | Instruction Manual - Page 108
), it can synchronize at all shutter speeds, even those faster than 1/ use daylight sync to eliminate shadows FEB (Flash Exposure Bracketing) With the Canon Instructions booklet. • The flash exposure bracketing amount set with the 550EX is indicated by the flash exposure level indicator in the camera - Canon 1Ds | Instruction Manual - Page 109
blink. In such a case, increase the ISO speed or get closer to the subject and repeat steps 3 and 4. C.Fn-13-1/3 enables FE lock with the manually-selected AF point. (→p.136) 109 - Canon 1Ds | Instruction Manual - Page 110
exposure compensation. 2 •Take the picture. Press the shutter button halfway to display the flash exposure compensation amount on exposure compensation with certain EOS-dedicated Speedlites. If you set flash exposure compensation with both the Speedlite and camera, the flash exposure compensation - Canon 1Ds | Instruction Manual - Page 111
the camera's depth-of-field preview button. s The Speedlite 550EX fires at 70 Hz for 1 second. Wireless, Multi-Speedlite System Speedlite 550EX has the following three features: (1) E-TTL autoflash (2) Slave unit feature (3) Master unit feature for wireless control of 550EX slave units By using - Canon 1Ds | Instruction Manual - Page 112
level indicator in the viewfinder. This is useful for close-up flash photography. You will need a standard 18% gray card and an E-TTL autoflash Speedlite (such as the MR14EX) capable of manual flash exposures. Spot metering circle 1 •Set the camera and Speedlite settings. Set the shooting mode - Canon 1Ds | Instruction Manual - Page 113
-, TL-series) set in the TTL or ATTL autoflash mode, the flash will be fired only at full output. If you set the camera's shooting mode to manual or aperture-priority AE, you can adjust the aperture and fire the flash at full output. Meanwhile, the Speedlite will remain in the TTL - Canon 1Ds | Instruction Manual - Page 114
Using Non-Canon Flash Units Sync Speed The EOS-1Ds can synchronize with compact, non-Canon flash units at 1/250 sec. or slower shutter speeds. With large studio flash, the sync speed is 1/125 sec. or slower. Be sure to test the flash to see if it synchronizes properly with the camera. PC Terminal - Canon 1Ds | Instruction Manual - Page 115
view or erase the images you capture with the camera. You can even make a sound recording for an image. 7 When playback images not taken with the camera: The camera might not be able to properly display images captured with a different camera or edited with a personal computer for image processing - Canon 1Ds | Instruction Manual - Page 116
turn the < > dial clockwise. 3 •Change the display format. While pressing the < > button, turn the < > dial. s On the rear LCD panel, the selection mark will move under the display format icons and the LCD monitor's display format will change accordingly. • When the desired display format - Canon 1Ds | Instruction Manual - Page 117
and then go away without operating or turning off the camera, the LCD monitor will turn off automatically after half is ON, you can view an enlarged portion of the image. For details, see "EOS DIGITAL Software User's Manual." To enable this feature, set P.Fn-30 to ON for both shooting and playback. - Canon 1Ds | Instruction Manual - Page 118
Shutter speed Shooting mode ISO speed ISO speed bracketing Exposure compensation Image protection Sound recording Image-recording quality Add original decision data AF point White balance White balance bracketing amount < > Color temperature in mode File number the AF point used to achieve focus - Canon 1Ds | Instruction Manual - Page 119
. • You can also protect all the images in a folder or in the CF card all at once. (→p.120) • A protected image cannot be erased with the camera. To erase a protected image, cancel the protection first. You can also erase all images at once while retaining the protected ones. (→p.123, 125) 119 - Canon 1Ds | Instruction Manual - Page 120
While pressing the < > button, turn the < > dial to select "OK." Then let go of the < > button. Protected images cannot be erased with the camera. To erase a protected image, first cancel the image protection. Clearing Protection for All Images • In step 2 above, select "Clear all in folder" or - Canon 1Ds | Instruction Manual - Page 121
Sound Recording for an Image With the camera's built-in microphone, you can record your voice for any image. The sound data is attached to the image file and can be played with - Canon 1Ds | Instruction Manual - Page 122
recording is not possible on a protected image. •• The EOS-1Ds camera itself cannot play back the sound recording. The EOS-1Ds camera itself cannot play back the sound recording. You must transfer the image to a personal computer and use the dedicated software to play the sound recording. • The - Canon 1Ds | Instruction Manual - Page 123
. 2 •• If the folder mode is displayed, hold down the < > button and turn the < > dial to switch to the playback mode. Any display format can be used. 3 •Display the erase menu. Press the < > button. s The erase menu will appear at the bottom of the LCD monitor. 7 Playback Images 123 - Canon 1Ds | Instruction Manual - Page 124
Erasing an Image 4 •On the erase menu, select "ALL." While pressing the < > button, turn the < > dial to select "ALL." Then let go of the < > button. s A confirmation dialog will appear. 5 •Erase the images. While pressing the < > button, turn the < > dial to select "OK." Then let go of the < > - Canon 1Ds | Instruction Manual - Page 125
7 Once an image is erased, it cannot be recovered. Make sure you are erasing the right images. Protected images cannot be erased with the camera. To erase protected images, first cancel the image protection. (→p.119) This procedure is convenient for erasing all unprotected images at one time while - Canon 1Ds | Instruction Manual - Page 126
. • A non-Canon CF card or a CF card formatted with another camera or personal computer might not work with the EOS-1Ds camera. In such a case, format the CF card with the camera first. Then it might work with the camera. • If you insert the CF card and the CF card error message " " appears, use - Canon 1Ds | Instruction Manual - Page 127
On-screen menus enable you to customize the camera's various settings and functions. The mark you see in these Instruction Manual gives just a brief description of the relevant Custom Func- tion. This section explains all of the camera's menu settings, Custom Functions, and Personal Functions - Canon 1Ds | Instruction Manual - Page 128
MENU Menu Settings Custom WB Select the image to be used for the custom white balance setting. (→p.43) Color temp. ". (→p.40) Review You can display the picture on the LCD monitor immediately after you take it. Set it to "On," "On (Info)," or "Off." (→p.52) The number of seconds (review time) the - Canon 1Ds | Instruction Manual - Page 129
MENU Menu Settings Review time When "Review" is set to "On" or "On (Info)," you can set the number of seconds the image is displayed on the LCD monitor. (→p.53) Noise reduction When turned on, noise reduction can reduce noise in the image that - Canon 1Ds | Instruction Manual - Page 130
Auto power off To avoid exhausting the battery, "Auto power off" turns off the camera automatically after the camera is left unused for a set time period. You can set this time to 1, 2, 4, 8, 15, or 30 min. "Off" will disable this feature. File numbering Each picture you take is assigned a file - Canon 1Ds | Instruction Manual - Page 131
firmware update and installation instructions, see Canon's Web site. Language Select your preferred language for the menu. It can be displayed in English, German, French, Spanish, or Japanese. Custom Functions This is for setting the camera use "Personal Functions (P.Fn)" to set the - Canon 1Ds | Instruction Manual - Page 132
set any other Custom Functions. 3 •Exit. Press the < > button. s The Custom/Personal Function menu will reappear. s The respective Custom Function setting (number) will be displayed in the Custom Function list. • To exit the menu and turn off the LCD monitor, press the < > button. Custom - Canon 1Ds | Instruction Manual - Page 133
number of remaining shots during continuous shooting. C.Fn-02 C.Fn-03 Shutter release without CF card 1: With C.Fn-02-1, the shutter button will not work if there is no CF card in the camera between the camera and subject. The exposure is set when the picture is taken. 3: This is useful for - Canon 1Ds | Instruction Manual - Page 134
C.Fn-11-1/2 is set) and turn the < > dial. 2: You set the shutter speed and aperture in the same way as with C.Fn-05-0. And you can still set the aperture even while the lens is detached from the camera. Convenient especially if you want to use a super telephoto lens with more than one EOS-1Ds body - Canon 1Ds | Instruction Manual - Page 135
of the digits indicating the number of remaining shots. Images recorded in the RAW+JPEG mode are counted as 1 per AEB sequence when you bracket automatically with the shutter speed, aperture, or ISO speed. You bracketing will be canceled after you change the lens, or turn off the Main Switch. 1: - Canon 1Ds | Instruction Manual - Page 136
you are pressing the shutter button halfway. The AF camera shake caused by the mirror's reflex action. See page 104 for Instruction Manual. C.Fn-13 Number of AF points/Spot metering 1: The selectable AF points are limited to 11 mode besides spot metering can be used. •• With C.Fn-13-1/2/3, all - Canon 1Ds | Instruction Manual - Page 137
sunset. C.Fn-15 C.Fn-16 C.Fn-17 Shutter curtain synchronization 1: By using a slow sync speed, you can create a manually-selected AF point is unable to focus track a subject moving erratically. 2: The camera automatically sets the AF point activation area 8 to 7 or 13 points to suit the lens - Canon 1Ds | Instruction Manual - Page 138
the button is pressed, AF operation with the camera is disabled. 2: When the button is pressed while focus and meter separately. 3: In the manual AF point selection mode, holding down the subject which keeps moving and stopping. 5: With the lens' IS switch already ON, the Image Stabilizer operates - Canon 1Ds | Instruction Manual - Page 139
Function Settings / MENU Clearing All Custom Function C.Fn-00 Focusing screen 0: For New Laser-matte screens. 1: For Laser-matte screens. Since the EOS-1Ds's standard focusing screen is the EcCIII, C.Fn-00-1 is already set upon factory shipment. For C.Fn-00 when you change the focusing screen - Canon 1Ds | Instruction Manual - Page 140
You can register up to three groups of Custom Function settings. A group of Custom Function settings can be used for a specific shooting situation such as sports, snapshooting, and landscapes. Note that C.Fn-00 "Focusing screen" cannot be registered in any Custom Function 1 Set the desired Custom - Canon 1Ds | Instruction Manual - Page 141
that group will be displayed. 6 Register the Custom Function settings under the selected group number. • While pressing the < > button, turn the < > dial to select group's Custom Function settings into the camera, follow "Using a Custom Function Group" on the next page. 8 Menu Settings 141 - Canon 1Ds | Instruction Manual - Page 142
Using a Custom Function Group After following the procedure on the preceding page to register a Custom Function group, follow the procedure below to apply the Custom Function group's settings to the camera Function Groups." (→p.140) 4 •Select the group number to be applied. While pressing the < > - Canon 1Ds | Instruction Manual - Page 143
< > button, turn the < > dial to select "OK." Then let go of the < > button. 6 Check the registered group's Custom Function settings. s The group number of the Custom Functions that were applied is displayed in green, and the settings are also displayed. Check the applied Custom Function - Canon 1Ds | Instruction Manual - Page 144
Custom Functions, Personal Functions enable you to further customize your camera settings. They are set with the dedicated software while the EOS-1Ds is connected to a personal computer. For details, see "EOS DIGITAL Software User's Manual." P.Fn-00 for Custom Function group registration can be set - Canon 1Ds | Instruction Manual - Page 145
modified only with the driver software. For details, see "EOS DIGITAL Software User's Manual." 1 On the menu, select "Personal Functions (P.Fn)." pressing the < > button, turn the < > dial to select the Personal Function number. Then let go of the < > button. 3 •Clear or reset the setting. - Canon 1Ds | Instruction Manual - Page 146
exit the menu and turn off the LCD monitor, press the < > button. After all the Personal Functions are cleared, you can set them again by using "Personal Functions (P.Fn)." (→p.145) 146 - Canon 1Ds | Instruction Manual - Page 147
9Maintenance Learn how to set the camera's date and time, back-up battery and clean the CMOS sensor. 9 147 Maintenance - Canon 1Ds | Instruction Manual - Page 148
the Date and Time To set or correct the camera's date and time, follow the procedure below. The press the < > button. • While pressing the < > button, turn the < > dial to select the correct number. Then let go of the < > button. s After setting one item, select the next item to be set - Canon 1Ds | Instruction Manual - Page 149
Replacing the Back-up Battery The back-up battery maintains the camera's date and time. The battery's service life is about 10 years. If the date/time is reset upon battery pack replacement, replace the back-up battery with a new CR2025 lithium battery as described below. 1 Set the < > switch to < > - Canon 1Ds | Instruction Manual - Page 150
have it cleaned by a Canon Service Center. While you clean the CMOS, the camera's power must remain on the whole time. To make sure the power will not turn off while you clean the CMOS sensor, connect the camera to a power outlet with the DC Coupler Kit or use the battery pack that has enough power - Canon 1Ds | Instruction Manual - Page 151
brush can scratch the CMOS sensor. •• Do not insert the blower tip inside the camera beyond the lens mount. If the power goes out, the shutter curtain will close and the blower tip may damage it. • Do not use a high-pressure blower or compressed, canned air. The air's extra pressure may damage the - Canon 1Ds | Instruction Manual - Page 152
152 - Canon 1Ds | Instruction Manual - Page 153
10Reference This section will help you understand your camera better. It covers basic photography concepts, camera specifications, system accessories, and other reference information. 10 153 Reference - Canon 1Ds | Instruction Manual - Page 154
small, card-shaped storage media used to record images taken by the EOS1Ds. ISO speed This indicates the film's sensitivity to light. It is expressed as a number following "ISO" such as "ISO 200." The higher the number, the higher the sensitivity to light. Digital cameras also use the same ISO speed - Canon 1Ds | Instruction Manual - Page 155
you Extension File number Camera code selected (→p.56). The extension will be "JPG" for JPEG images or "TIF" for RAW images. For sound files, the extension will be "WAV." Firmware This is software containing various camera control instructions. The EOS-1Ds uses the firmware for shooting and - Canon 1Ds | Instruction Manual - Page 156
f/number) increases the depth of field. For example, stopping down to f/8 obtains a deeper depth of field than f/4.5. (2) A lens with a shorter focal length increases the depth of field. A wide-angle lens obtains a deeper depth of field than a telephoto lens. (3) A longer distance between the camera - Canon 1Ds | Instruction Manual - Page 157
shutter speed. 2) Decrease the ISO speed. The picture will be underexposed. 1) Turn the < > to set a larger aperture (smaller f/number). number). 2) Decrease the ISO speed. The desired depth of field cannot be obtained. 1) Move away from the subject and try again. 2) If a zoom lens is used, use - Canon 1Ds | Instruction Manual - Page 158
Aperture Program Line The program line below applies when the camera is used in the Program AE < > mode with an EF 50mm f/1.4 USM lens. EV Shutter speed Program Line Description The bottom horizontal axis represents the shutter speed and the right vertical axis represents the aperture. On the left - Canon 1Ds | Instruction Manual - Page 159
aperture opening. The range of aperture numbers (f/numbers) displayed depends on the lens used. 1/3-stop Increments Shutter Speed Aperture 1/2-stop Increments Shutter Speed Aperture Full-stop Increments Shutter Speed Aperture Reference 10 C.Fn-06 enables the shutter speed and aperture to be set - Canon 1Ds | Instruction Manual - Page 160
(see list of service centers on the back cover). If an error occurs after you take a picture, the camera might have missed the shot. Press the < > button to see if the image appears on the LCD monitor. Error code Countermeasures Clean the lens contacts. (→p.11) There is a problem on the CF - Canon 1Ds | Instruction Manual - Page 161
with the EOS-1Ds. enlarged Or, P.Fn-30 was not ON when the image was taken. Set P.Fn-30 to ON P.Fn-30 was OFF. To enable image magnification, turn on P.Fn-30 before shooting. Set enlargement mode of P.Fn-30 on the camera P.Fn-30 has not been set in the camera. Use the - Canon 1Ds | Instruction Manual - Page 162
a problem, first refer to this Troubleshooting Guide. Power Source The battery cannot be recharged. You are using the wrong battery. s Use the dedicated Ni-MH Pack. (→p.22) The battery is not properly attached to the charger. s Attach the battery properly to the charger. (→p.22) The camera does - Canon 1Ds | Instruction Manual - Page 163
. s Contact your dealer or Canon Service Center. The image is out of focus. The lens focus mode switch is set to < > or < >. s Set the lens focus mode switch to < >. (→p.26) Camera shake occured when you pressed the shutter button. s To prevent camera shake, hold the camera still and press the - Canon 1Ds | Instruction Manual - Page 164
group to be registered. • If you do not replace the focusing screen that came with the camera, you need not change C.Fn-00-1 factory setting. • To change the focusing screen, refer to the instructions that came with the focusing screen. • The Ec-A, Ec-B, Ec-I, and Ec-L focusing screens have a prism - Canon 1Ds | Instruction Manual - Page 165
(higher f/number) than f/5.6 will not cause the focusing screen's microprism to darken. Ec-I: Laser-matte with cross hair Use the cross higher f/number) than f/5.6 will cause the focusing screen's split portion to darken. Ec-CIII: Laser-matte Ec-N: New Laser-matte EOS-1Ds, EOS-1D and EOS-1V's - Canon 1Ds | Instruction Manual - Page 166
-E3 Dedicated, high-performance power pack with a rated voltage of 12 V. It can be recharged up to 500 times. When fully charged, it enables the camera to take up to about 600 shots at normal temperature. Ni-MH Charger NC-E2 Quick charger dedicated to the Ni-MH Pack NP-E3 - Canon 1Ds | Instruction Manual - Page 167
Shutter-release count setting. The time can be set anywhere from 1 sec. to 99 hours, 59 min., 59 sec. Its connection plug for the EOS-1Ds has a quick-lock feature. Wireless Controller LC-4 Wireless controller effective up to 100 meters. It comes with a transmitter and receiver. The receiver's camera - Canon 1Ds | Instruction Manual - Page 168
Lite MT-24EX Rubber Frame Ec Ec-Series Dioptric Adjustment Lenses Anti-Fog Eyepiece Ec Bundled Accessories Strap L4 Eyecup Ec-II Angle Finder C Hand Strap E1 CR2025 lithium battery EOS DIGITAL Solution Disk Photoshop LE Disk Focusing screen Ec 168 DC Coupler Kit DCK-E1 Ni-MH Pack NP-E3 Ni - Canon 1Ds | Instruction Manual - Page 169
System Map Canon EF lenses Timer Remote Controller TC-80N3 Remote Switch RS-80N3 Wireless Controller LC-4 Interface Cable IFC-450D6 Interface Cable IEEE 1394 port USB port PC card slot Macintosh computer IEEE 1394 port USB port PC card slot PC/AT-compatible computer 10 Reference 169 - Canon 1Ds | Instruction Manual - Page 170
Specifications • Type Type Recording medium Image size Compatible lenses Lens mount Digital AF/AE SLR Type I or II CF card 35.8 x 23.8 mm (1.4 x 1 in) Canon EF lenses (effective focal length is as marked on the lens) Canon EF mount • Imaging Element Type Pixels Aspect ratio Color filter system - Canon 1Ds | Instruction Manual - Page 171
f/5.6 or shorter lens) AF information (AF points, focus confirmation light), exposure information (shutter speed, aperture, manual exposure, metering range, ISO speed, exposure level, exposure warning), flash information (flash ready, FP flash, FE lock, flash exposure level), JPEG format, number of - Canon 1Ds | Instruction Manual - Page 172
One-Shot AF mode with evaluative metering when focus is achieved. Manual: By AE lock button in all metering modes. • Shutter Type Shutter speeds Shutter release Self-timer Remote control Electronically-controlled, focal-plane shutter 1/8000 to 30 sec. (1/3-stop increments), bulb, X-sync at 1/250 - Canon 1Ds | Instruction Manual - Page 173
Menu categories LCD monitor language Firmware update 1. Recording menu, 2. battery: 335 g/11.8 oz.) • Working Conditions Working temperature range Working humidity 0 - 45˚C / 32 - 113˚F 85% or lower All the specifications above are based on Canon's testing and measuring standards. •• The camera - Canon 1Ds | Instruction Manual - Page 174
alert 118 high-speed sync (FP flash 108 histogram 118 holding the camera 35 I image file number 56 - auto reset 56 - continuous numbering 57 - manual reset 58 image playback 52 - playback 115 - review 52 - review time 53 - enlargement 117 image protection 119 - canceling of all images - Canon 1Ds | Instruction Manual - Page 175
JPEG image simultaneous recording ..... 40 S self-timer 100 shutter button 29 shutter speed and aperture display ....... 159 shutter-priority AE 84 sound recording 121 specifications 170 strap 36 system map 168 T troubleshooting guide 162 Tv shutter speed-priority AE 84 W white balance 41 - Canon 1Ds | Instruction Manual - Page 176
CANON SALES CO., INC. 16-6, Kohnan 2-chome, Minato-ku, Tokyo 108-8011, Japan This Instruction Manual booklet is current as of September 2002. For information on using the camera with system accessories introduced after this date, contact your nearest Canon Service Center. CT1-1237-001 © CANON
-
 1
1 -
 2
2 -
 3
3 -
 4
4 -
 5
5 -
 6
6 -
 7
7 -
8
-
9
-
10
-
11
-
12
-
13
-
14
-
15
-
16
-
17
-
18
-
19
-
20
-
21
-
22
-
23
-
24
-
25
-
26
-
27
-
28
-
29
-
30
-
31
-
32
-
33
-
34
-
35
-
36
-
37
-
38
-
39
-
40
-
41
-
42
-
43
-
44
-
45
-
46
-
47
-
48
-
49
-
50
-
51
-
52
-
53
-
54
-
55
-
56
-
57
-
58
-
59
-
60
-
61
-
62
-
63
-
64
-
65
-
66
-
67
-
68
-
69
-
70
-
71
-
72
-
73
-
74
-
75
-
76
-
77
-
78
-
79
-
80
-
81
-
82
-
83
-
84
-
85
-
86
-
87
-
88
-
89
-
90
-
91
-
92
-
93
-
94
-
95
-
96
-
97
-
98
-
99
-
100
-
101
-
102
-
103
-
104
-
105
-
106
-
107
-
108
-
109
-
110
-
111
-
112
-
113
-
114
-
115
-
116
-
117
-
118
-
119
-
120
-
121
-
122
-
123
-
124
-
125
-
126
-
127
-
128
-
129
-
130
-
131
-
132
-
133
-
134
-
135
-
136
-
137
-
138
-
139
-
140
-
141
-
142
-
143
-
144
-
145
-
146
-
147
-
148
-
149
-
150
-
151
-
152
-
153
-
154
-
155
-
156
-
157
-
158
-
159
-
160
-
161
-
162
-
163
-
164
-
165
-
166
-
167
-
168
-
169
-
170
-
171
-
172
-
173
-
174
-
175
-
176
 |
 |
English Edition
INSTRUCTION MANUAL
INSTRUCTION MANUAL
E
E
Be sure to read these Instruction Manual before
using your camera for the first time. Keep this
booklet handy for easy reference.