Canon 2083B001 PowerShot SD950 IS DIGITAL ELPH / DIGITAL IXUS 960 IS Camera Us - Page 43
Using the Touch Control Dial
 |
View all Canon 2083B001 manuals
Add to My Manuals
Save this manual to your list of manuals |
Page 43 highlights
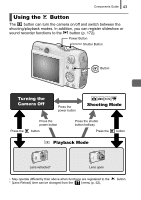
Components Guide 41 Using the Touch Control Dial „ Touching the Dial An enlarged icon of the touch control dial will display on the LCD monitor when you place a finger on the touch control dial and the icon of the currently selected item will be enlarged. By holding down the touch control dial in the position of the enlarged icon, you can determine the item to set. Touch Icons Sample in shooting mode „ Circling Your Finger on the Dial You can select shooting modes, categories or images by circling your finger on the dial. Circling counterclockwise works the same as the button and circling clockwise the same as the button. (It may also work as the / buttons with some functions.) Screen shot of selecting a Screen shot of selecting shooting mode images in playback mode z Functions that cannot be configured are shown in gray. z The dial display (Touch Icons) can be turned On/Off in the [ ] menu (p. 51). z When Touch Icons is set to [Off], the icon of the function being touched appears in green on the LCD monitor.
-
 1
1 -
2
-
3
-
4
-
5
-
6
-
7
-
8
-
9
-
10
-
11
-
12
-
13
-
14
-
15
-
16
-
17
-
18
-
19
-
20
-
21
-
22
-
23
-
24
-
25
-
26
-
27
-
28
-
29
-
30
-
31
-
32
-
33
-
34
-
35
-
36
-
37
-
 38
38 -
 39
39 -
 40
40 -
 41
41 -
 42
42 -
 43
43 -
 44
44 -
 45
45 -
 46
46 -
 47
47 -
 48
48 -
49
-
50
-
51
-
52
-
53
-
54
-
55
-
56
-
57
-
58
-
59
-
60
-
61
-
62
-
63
-
64
-
65
-
66
-
67
-
68
-
69
-
70
-
71
-
72
-
73
-
74
-
75
-
76
-
77
-
78
-
79
-
80
-
81
-
82
-
83
-
84
-
85
-
86
-
87
-
88
-
89
-
90
-
91
-
92
-
93
-
94
-
95
-
96
-
97
-
98
-
99
-
100
-
101
-
102
-
103
-
104
-
105
-
106
-
107
-
108
-
109
-
110
-
111
-
112
-
113
-
114
-
115
-
116
-
117
-
118
-
119
-
120
-
121
-
122
-
123
-
124
-
125
-
126
-
127
-
128
-
129
-
130
-
131
-
132
-
133
-
134
-
135
-
136
-
137
-
138
-
139
-
140
-
141
-
142
-
143
-
144
-
145
-
146
-
147
-
148
-
149
-
150
-
151
-
152
-
153
-
154
-
155
-
156
-
157
-
158
-
159
-
160
-
161
-
162
-
163
-
164
-
165
-
166
-
167
-
168
-
169
-
170
-
171
-
172
-
173
-
174
-
175
-
176
-
177
-
178
-
179
-
180
-
181
-
182
-
183
-
184
-
185
-
186
-
187
-
188
-
189
-
190
-
191
-
192
-
193
-
194
-
195
-
196
-
197
-
198
-
199
-
200
-
201
-
202
-
203
-
204
-
205
-
206
-
207
-
208
-
209
-
210
-
211
-
212
-
213
-
214
-
215
-
216
-
217
-
218
-
219
-
220
-
221
-
222
-
223
-
224
-
225
-
226
-
227
-
228
-
229
-
230
-
231
-
232
-
233
-
234
-
235
-
236
-
237
-
238
-
239
-
240
-
241
-
242
-
243
 |
 |
