Canon 2554B002 PowerShot SD790 IS / DIGITAL IXUS 90 IS Camera User Guide - Page 22
Embedding the Date in the Image Data
 |
View all Canon 2554B002 manuals
Add to My Manuals
Save this manual to your list of manuals |
Page 22 highlights
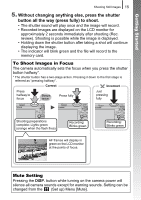
20 Embedding the Date in the Image Data Embedding the Date in the Image Data Getting Started Control Dial ( Buttons) Mode Switch Button Button This section explains how to embed date information on images as they are recorded (Date Stamp). • The date stamp cannot be deleted from the image data once it has been embedded. Ensure that the camera's date/time is set correctly beforehand (p. 12). • The image size is fixed to 2M (1600 x 1200) setting and the compression to (Fine) (appropriate for printing L-size or postcardsize prints). 1. Select a shooting mode. 1. Set the mode switch to (Shooting). 2. Turn the control dial to select (Auto). • Shooting modes other than can be selected (except for (Digital Macro), (Stitch Assist), and ).
-
 1
1 -
2
-
3
-
4
-
5
-
6
-
7
-
8
-
9
-
10
-
11
-
12
-
13
-
14
-
15
-
16
-
 17
17 -
 18
18 -
 19
19 -
 20
20 -
 21
21 -
 22
22 -
 23
23 -
 24
24 -
 25
25 -
 26
26 -
 27
27 -
28
-
29
-
30
-
31
-
32
-
33
-
34
-
35
-
36
-
37
-
38
-
39
-
40
-
41
-
42
-
43
-
44
-
45
-
46
-
47
-
48
-
49
-
50
-
51
-
52
-
53
-
54
-
55
-
56
-
57
-
58
-
59
-
60
-
61
-
62
-
63
-
64
-
65
-
66
-
67
-
68
-
69
-
70
-
71
-
72
-
73
-
74
-
75
-
76
-
77
-
78
-
79
-
80
-
81
-
82
-
83
-
84
-
85
-
86
-
87
-
88
-
89
-
90
-
91
-
92
-
93
-
94
-
95
-
96
-
97
-
98
-
99
-
100
-
101
-
102
-
103
-
104
-
105
-
106
-
107
-
108
-
109
-
110
-
111
-
112
-
113
-
114
-
115
-
116
-
117
-
118
-
119
-
120
-
121
-
122
-
123
-
124
-
125
-
126
-
127
-
128
-
129
-
130
-
131
-
132
-
133
-
134
-
135
-
136
-
137
-
138
-
139
-
140
-
141
-
142
-
143
-
144
-
145
-
146
-
147
-
148
-
149
-
150
-
151
-
152
-
153
-
154
-
155
-
156
-
157
-
158
-
159
-
160
-
161
-
162
-
163
-
164
-
165
-
166
-
167
-
168
-
169
-
170
-
171
-
172
-
173
-
174
-
175
-
176
-
177
-
178
-
179
-
180
-
181
-
182
-
183
-
184
-
185
-
186
-
187
-
188
-
189
-
190
-
191
-
192
-
193
-
194
-
195
-
196
-
197
-
198
-
199
-
200
-
201
-
202
-
203
-
204
-
205
-
206
-
207
-
208
-
209
-
210
-
211
-
212
-
213
-
214
-
215
-
216
-
217
-
218
-
219
-
220
-
221
-
222
-
223
-
224
-
225
-
226
-
227
 |
 |

Getting Started
Embedding the Date in the Image Data
20
Embedding the Date in the Image Data
This section explains how to embed date information on images as
they are recorded (Date Stamp).
• The date stamp cannot be deleted from the image data once it has
been embedded. Ensure that the camera’s date/time is set correctly
beforehand (p. 12).
• The image size is fixed to 2M (1600 x 1200) setting and the
compression to
(Fine) (appropriate for printing L-size or postcard-
size prints).
1.
Select a shooting mode.
1. Set the mode switch to
(Shooting).
2. Turn the control dial to select
(Auto).
•
Shooting modes other than
can be selected (except for
(Digital Macro),
(Stitch Assist), and
).
Button
Button
(
Buttons)
Mode Switch
Control Dial