Canon 2554B002 PowerShot SD790 IS / DIGITAL IXUS 90 IS Camera User Guide - Page 70
Changing the Recording Pixels, Still Images
 |
View all Canon 2554B002 manuals
Add to My Manuals
Save this manual to your list of manuals |
Page 70 highlights
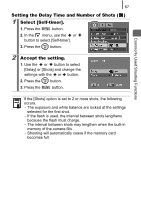
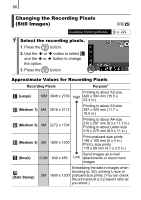
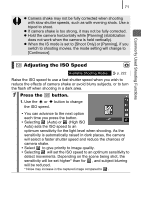
68 Changing the Recording Pixels (Still Images) Available Shooting Modes 1 Select the recording pixels. 1. Press the button. 2. Use the or and the or the option. button to select button to change 3. Press the button. p. 222 Approximate Values for Recording Pixels Recording Pixels Purpose* (Large) Printing to about A2-size 10M 3648 x 2736 High 420 x 594 mm (16.5 x 23.4 in.) (Medium 1) 6M 2816 x 2112 Printing to about A3-size 297 x 420 mm (11.7 x 16.5 in.) (Medium 2) 4M 2272 x 1704 Printing to about A4-size 210 x 297 mm (8.3 x 11.7 in.) Printing to about Letter-size 216 x 279 mm (8.5 x 11 in.) (Medium 3) 2M 1600 x 1200 Print postcard-size prints 148 x 100 mm (6 x 4 in.) Print L-size prints 119 x 89 mm (4.7 x 3.5 in.) (Small) 0.3M 640 x 480 Send images as e-mail Low attachments or shoot more images (Date Stamp) Embedding the date in images when shooting (p. 20), printing L-size or 2M 1600 x 1200 postcard-size prints. (You can check the print area at a 3:2 aspect ratio as you shoot.)
-
 1
1 -
2
-
3
-
4
-
5
-
6
-
7
-
8
-
9
-
10
-
11
-
12
-
13
-
14
-
15
-
16
-
17
-
18
-
19
-
20
-
21
-
22
-
23
-
24
-
25
-
26
-
27
-
28
-
29
-
30
-
31
-
32
-
33
-
34
-
35
-
36
-
37
-
38
-
39
-
40
-
41
-
42
-
43
-
44
-
45
-
46
-
47
-
48
-
49
-
50
-
51
-
52
-
53
-
54
-
55
-
56
-
57
-
58
-
59
-
60
-
61
-
62
-
63
-
64
-
 65
65 -
 66
66 -
 67
67 -
 68
68 -
 69
69 -
 70
70 -
 71
71 -
 72
72 -
 73
73 -
 74
74 -
 75
75 -
76
-
77
-
78
-
79
-
80
-
81
-
82
-
83
-
84
-
85
-
86
-
87
-
88
-
89
-
90
-
91
-
92
-
93
-
94
-
95
-
96
-
97
-
98
-
99
-
100
-
101
-
102
-
103
-
104
-
105
-
106
-
107
-
108
-
109
-
110
-
111
-
112
-
113
-
114
-
115
-
116
-
117
-
118
-
119
-
120
-
121
-
122
-
123
-
124
-
125
-
126
-
127
-
128
-
129
-
130
-
131
-
132
-
133
-
134
-
135
-
136
-
137
-
138
-
139
-
140
-
141
-
142
-
143
-
144
-
145
-
146
-
147
-
148
-
149
-
150
-
151
-
152
-
153
-
154
-
155
-
156
-
157
-
158
-
159
-
160
-
161
-
162
-
163
-
164
-
165
-
166
-
167
-
168
-
169
-
170
-
171
-
172
-
173
-
174
-
175
-
176
-
177
-
178
-
179
-
180
-
181
-
182
-
183
-
184
-
185
-
186
-
187
-
188
-
189
-
190
-
191
-
192
-
193
-
194
-
195
-
196
-
197
-
198
-
199
-
200
-
201
-
202
-
203
-
204
-
205
-
206
-
207
-
208
-
209
-
210
-
211
-
212
-
213
-
214
-
215
-
216
-
217
-
218
-
219
-
220
-
221
-
222
-
223
-
224
-
225
-
226
-
227
 |
 |
