Canon CanoScan D646U CanoScan D646U Quick Start Guide - Page 8
Try Scanning
 |
View all Canon CanoScan D646U manuals
Add to My Manuals
Save this manual to your list of manuals |
Page 8 highlights
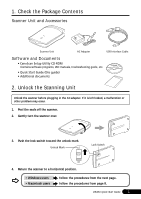
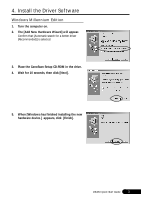
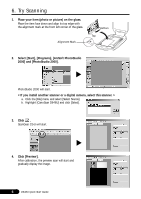
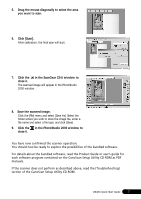
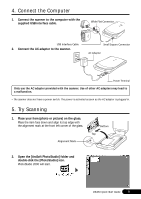
6. Try Scanning 1. Place your item (photo or picture) on the glass. Place the item face down and align its top edge with the alignment mark at the front left corner of the glass. Alignment Mark Bottom Top 2. Select [Start], [Programs], [ArcSoft PhotoStudio 2000] and [PhotoStudio 2000]. PhotoStudio 2000 will start. < If you install another scanner or a digital camera, select this scanner. > a. Click the [File] menu and select [Select Source]. b. Highlight [CanoScan D646U] and click [Select]. 3. Click . ScanGear CS-U will start. 4. Click [Preview]. After calibration, the preview scan will start and gradually display the image. 6 D646U Quick Start Guide
-
 1
1 -
2
-
 3
3 -
 4
4 -
 5
5 -
 6
6 -
 7
7 -
 8
8 -
 9
9 -
 10
10 -
 11
11 -
 12
12 -
 13
13 -
14
 |
 |

D646U Quick Start Guide
6
6.
Try Scanning
1.
Place your item (photo or picture) on the glass.
Place the item face down and align its top edge with
the alignment mark at the front left corner of the glass.
2.
Select [Start], [Programs], [ArcSoft PhotoStudio
2000] and [PhotoStudio 2000].
PhotoStudio 2000 will start.
< If you install another scanner or a digital camera, select this scanner. >
a.
Click the [File] menu and select [Select Source].
b.
Highlight [CanoScan D646U] and click [Select].
3.
Click
.
ScanGear CS-U will start.
4.
Click [Preview].
After calibration, the preview scan will start and
gradually display the image.
Top
Bottom
Alignment Mark