Canon CanoScan N650U Getting Started Guide - Page 2
Unpacking, Unlocking the, Scanning Unit, Connecting the Scanner - driver windows 7
 |
View all Canon CanoScan N650U manuals
Add to My Manuals
Save this manual to your list of manuals |
Page 2 highlights
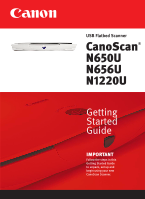
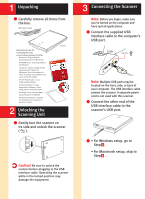
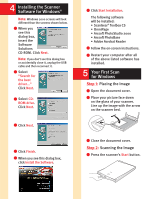
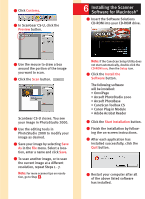
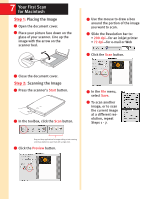
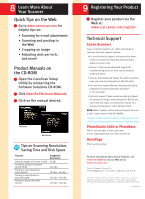
1 Unpacking 1 Carefully remove all items from the box. USB Interface Cable Getting Started Guide Kit: • Getting Started Guide • Canon Software Solutions CD-ROM- s Macintosh® Plug-in Module: Scanning software for Macintosh s PC TWAIN driver: Scanning software for Windows® s CanoScan® Toolbox CS (Macintosh) and ScanGear® Toolbox CS (Windows): One-click software for easier scanning; loads software and scans and prints images s ArcSoft PhotoStudio™ 2000: Image editing software s ArcSoft PhotoBase™: Image organization software; create image albums and slide shows s OmniPage: Text scanning software (optical character recognition) s Adobe Acrobat Reader: Software for viewing scanner manuals in electronic format 2 Unlocking the Scanning Unit Scanner 1 Gently turn the scanner on its side and unlock the scanner ( ). Caution! Be sure to unlock the scanner before plugging in the USB interface cable. Operating the scanner while in the locked position may damage the equipment. 3 Connecting the Scanner Note: Before you begin, make sure you've turned on the computer and have quit all applications. 1 Connect the supplied USB interface cable to the computer's USB port. USB Port Note: Multiple USB ports may be located on the front, side, or back of your computer. The USB interface cable powers the scanner. A separate power cord is not used with this scanner. 2 Connect the other end of the USB interface cable to the scanner's USB port. 3 • For Windows setup, go to Step 4 . • For Macintosh setup, skip to Step 6 .
-
 1
1 -
 2
2 -
 3
3 -
 4
4 -
 5
5 -
 6
6
 |
 |