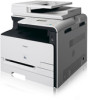
Canon Color imageCLASS MF8050Cn Color imageCLASS MF8350Cdn/MF8050Cn Basic Oper - Page 116
Canon Color imageCLASS MF8050Cn Manual
 |
View all Canon Color imageCLASS MF8050Cn manuals
Add to My Manuals
Save this manual to your list of manuals |
Page 116 highlights
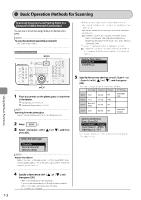
5 Specify the scan settings depending on the types of documents or use. The following settings can be changed. For details on each item, see "Scan" in the e-Manual. • Scanning size • Density • Original orientation • Original type • Sharpness • Data Size (Color Only) The settings specified here are effective only for the current operation. To make the settings effective for all the transmitting operations to a USB memory, see "Scan" in the e-Manual. When removing a USB memory (1) Press [ ] (Status Monitor/Cancel). (2) Select with [ press [OK]. ] or [ ], and then 6 Press [ ] (Color) or [ ] (B&W). Press [ Press [ ] (Color). ] (B&W). Status Monitor/Cancel Device Status Copy Job Status Fax Job Status/Hist...Print Job Status/Hi...(3) Select with [ and then press [OK]. ] or [ ], For Color Scan For Black and White Scan Device Status Paper Information Toner Gauge Remove Memory Media Check Counter (4) Remove the USB memory. Scanning operation starts. The scanned data is sent to the USB memory when scanning is complete. (5) Press [ ] (Status Monitor/Cancel) to close the screen. Names of the folders and files where data is saved Folder name The "SCAN_00" folder is created in the uppermost hierarchy (root directory) in the USB memory, and the file is saved in this folder. When the "SCAN_00" folder is full, the "SCAN_01" folder is created, and folders (up to "SCAN_99") will be created in order. A file name between "SCAN0000.PDF" and "SCAN9999.PDF" is provided. The two-digit number of the folder is provided in the fifth and sixth characters from the left. Up to 100 files can be saved in a folder. Using the Scan Functions File name 7-4
-
 1
1 -
2
-
3
-
4
-
5
-
6
-
7
-
8
-
9
-
10
-
11
-
12
-
13
-
14
-
15
-
16
-
17
-
18
-
19
-
20
-
21
-
22
-
23
-
24
-
25
-
26
-
27
-
28
-
29
-
30
-
31
-
32
-
33
-
34
-
35
-
36
-
37
-
38
-
39
-
40
-
41
-
42
-
43
-
44
-
45
-
46
-
47
-
48
-
49
-
50
-
51
-
52
-
53
-
54
-
55
-
56
-
57
-
58
-
59
-
60
-
61
-
62
-
63
-
64
-
65
-
66
-
67
-
68
-
69
-
70
-
71
-
72
-
73
-
74
-
75
-
76
-
77
-
78
-
79
-
80
-
81
-
82
-
83
-
84
-
85
-
86
-
87
-
88
-
89
-
90
-
91
-
92
-
93
-
94
-
95
-
96
-
97
-
98
-
99
-
100
-
101
-
102
-
103
-
104
-
105
-
106
-
107
-
108
-
109
-
110
-
 111
111 -
 112
112 -
 113
113 -
 114
114 -
 115
115 -
 116
116 -
 117
117 -
 118
118 -
 119
119 -
 120
120 -
 121
121 -
122
-
123
-
124
-
125
-
126
-
127
-
128
-
129
-
130
-
131
-
132
-
133
-
134
-
135
-
136
-
137
-
138
-
139
-
140
-
141
-
142
-
143
-
144
-
145
-
146
-
147
-
148
-
149
-
150
-
151
-
152
-
153
-
154
-
155
-
156
-
157
-
158
-
159
 |
 |
