Canon Color imageCLASS MF8180c imageCLASS MF8180c Quick Start Guide - Page 11
Congratulations! You have now completed the machine setup, TEL NUMBER> - driver
 |
View all Canon Color imageCLASS MF8180c manuals
Add to My Manuals
Save this manual to your list of manuals |
Page 11 highlights
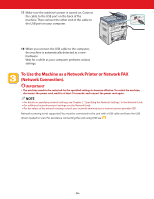
DRPD: To distinguish between fax and voice calls by using Distinctive Ring Pattern Detection. 8 Press or (arrow keys) to select ➝ press [Set]. NOTE ● The DRPD mode requires subscription to a DRPD service. For more information, contact your local telephone company. Manual: When an extension telephone is connected to the machine, you can receive faxes by pressing [B&W Start] before hanging up the extension telephone. 4 Press or (arrow keys) to select ➝ press [Set]. 9 Press or (arrow keys) to select or ➝ press [Set]. 10Press [Menu] to go back one level ➝ or (arrow keys) to select ➝ press [Set]. 5 Press or (arrow keys) to select ➝ press [Set]. 6 Press or (arrow keys) to select ➝ press [Set]. 11Enter the unit name using the numeric keys max. 24 characters, including spaces➝ press [Set]. NOTE ● For details on how to input characters, see P 2-1, "Guidelines for Entering Numbers, Letters, and Symbols," in the Facsimile Guide. 7 Enter your fax number using the numeric keys 12Press [Stop/Reset] to return to the standby ➝ press [Set]. display. Congratulations! You have now completed the machine setup. Where to go from here... Once you have completed all steps in this document, see the next chapter "Printing, PC Faxing, Scanning, and Networking" to set up the machine for use in a network and to install driver software. • For basic operations of all functions of your machine, see the Basic Guide. • For details on sending and receiving faxes, see the Facsimile Guide. • For information on the driver software, see the Software Guide (included in the User Software CD). • For details on the network function of the machine, see the Network Guide (included in the User Software CD). • For information on remotely monitoring and controlling machine functions through a network, see the Remote UI Guide (included in the User Software CD). NOTE • Remember to register your machine to ensure product support.The serial number is located on the back of the machine. - 11 -
-
 1
1 -
2
-
3
-
4
-
5
-
 6
6 -
 7
7 -
 8
8 -
 9
9 -
 10
10 -
 11
11 -
 12
12 -
 13
13 -
 14
14 -
 15
15 -
 16
16 -
17
-
18
-
19
-
20
-
21
-
22
-
23
-
24
 |
 |
