Canon Color imageCLASS MF9220Cdn imageCLASS MF9280Cdn/MF9220Cdn Starter Guide - Page 52
Check Installation, Setting the ScanGear Tool, Open the [Printers], [Printers and Faxes]
 |
View all Canon Color imageCLASS MF9220Cdn manuals
Add to My Manuals
Save this manual to your list of manuals |
Page 52 highlights
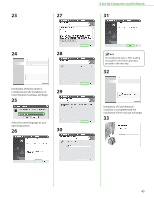
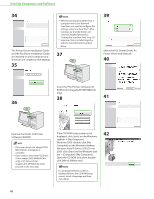
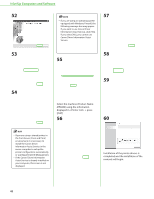
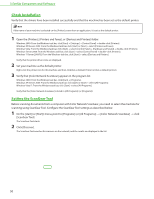
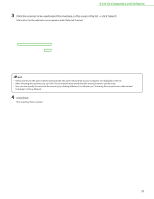
3 Set Up Computers and Software Check Installation Verify that the drivers have been installed successfully and that the machine has been set as the default printer. If the name of your machine is selected on the [Printer] screen from an application, it is set as the default printer. 1 Open the [Printers], [Printers and Faxes], or [Devices and Printers] folder. Windows 2000: From the Windows task bar, click [Start] → [Settings] → [Control Panel] → double-click [Printers]. Windows XP/Server 2003: From the Windows task bar, click [start] or [Start] → select [Printers and Faxes]. Windows Vista: From the Windows task bar, click [Start] → select [Control Panel] → [Hardware and Sound] → double-click [Printers]. Windows Server 2008: From the Windows task bar, click [Start] → select [Control Panel] → double-click [Printers]. Windows 7/Server 2008 R2: From the Windows task bar, click [Start] → select [Devices and Printers]. Verify that the printer driver icons are displayed. 2 Set your machine as the default printer. Right-click the printer icon for this machine and then click [Set as Default Printer] or [Set as default printer]. 3 Verify that [Color Network ScanGear] appears in the program list. Windows 2000: From the Windows task bar, click [Start] → [Programs]. Windows XP/Server 2003: From the Windows task bar, click [start] or [Start] → select [All Programs]. Windows Vista/7: From the Windows task bar, click [Start] → select [All Programs]. Verify that the [Color Network ScanGear] is listed in [All Programs] (or [Programs]). Setting the ScanGear Tool Before scanning documents from a computer with Color Network ScanGear, you need to select the machine for scanning using ScanGear Tool. Configure the ScanGear Tool settings as described below. 1 On the [start] (or [Start]) menu, point to [Programs] (or [All Programs]) → [Color Network ScanGear] → click [ScanGear Tool]. The ScanGear Tool starts. 2 Click [Discover]. The ScanGear Tool searches for scanners on the network, and the results are displayed in the list. 50
-
 1
1 -
2
-
3
-
4
-
5
-
6
-
7
-
8
-
9
-
10
-
11
-
12
-
13
-
14
-
15
-
16
-
17
-
18
-
19
-
20
-
21
-
22
-
23
-
24
-
25
-
26
-
27
-
28
-
29
-
30
-
31
-
32
-
33
-
34
-
35
-
36
-
37
-
38
-
39
-
40
-
41
-
42
-
43
-
44
-
45
-
46
-
 47
47 -
 48
48 -
 49
49 -
 50
50 -
 51
51 -
 52
52 -
 53
53 -
 54
54 -
 55
55 -
 56
56 -
 57
57 -
58
-
59
-
60
-
61
-
62
-
63
-
64
 |
 |