Canon Digital Rebel Pict-Bridge¿Instruction Book - Page 3
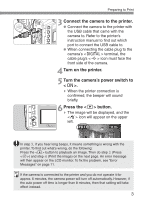
Turn on the printer., Turn the camera's power switch to, >., Connect the camera to the printer.,
 |
UPC - 013803028997
View all Canon Digital Rebel manuals
Add to My Manuals
Save this manual to your list of manuals |
Page 3 highlights
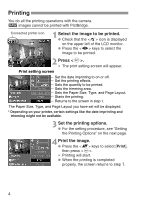
Preparing to Print Connect the camera to the printer. 3 • Connect the camera to the printer with the USB cable that came with the camera to. Refer to the printer's instruction manual to find out which port to connect the USB cable to. • When connecting the cable plug to the camera's terminal, the cable plug's < ∂ > icon must face the front side of the camera. 4 Turn on the printer. 5 Turn the camera's power switch to . s When the printer connection is confirmed, the beeper will sound briefly. 6 Press the button. s The image will be displayed, and the icon will appear on the upper left. In step 5, if you hear long beeps, it means something is wrong with the printer. To find out what's wrong, do the following: Press the button to playback an image. Then do step 2 (Press ) and step 4 (Print the image) on the next page. An error message will then appear on the LCD monitor. To fix the problem, see "Error Messages" on page 11. If the camera is connected to the printer and you do not operate it for approx. 6 minutes, the camera power will turn off automatically. However, if the auto power off time is longer than 8 minutes, then that setting will take effect instead. 3
-
 1
1 -
 2
2 -
 3
3 -
 4
4 -
 5
5 -
 6
6 -
 7
7 -
 8
8 -
 9
9 -
10
-
11
-
12
 |
 |
