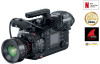
Canon EOS C700 FF EOS C700 EOS C700 PL EOS C700 GS PL EOS C700 FF EOS C700 FF - Page 222
Recording Media and Accessories, REMOTE Term.] is set to [RC-V100 REMOTE A] or [RC-V100 REMOTE
 |
View all Canon EOS C700 FF manuals
Add to My Manuals
Save this manual to your list of manuals |
Page 222 highlights
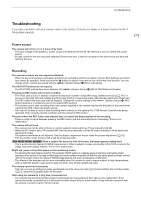
Troubleshooting 222 Audio cannot be recorded. - The audio input selection switch of the INPUT terminal is in the AES/EBU position but an analog audio source is connected, or it is set to the ANALOG position and a digital audio source is connected. Set the audio related switches correctly according to the audio source you wish to use (A 110). - The external analog microphone connected to the INPUT 1/INPUT 2 terminal requires phantom power. Set the corresponding INPUT terminal's ANALOG (analog audio source selection) switch to MIC+48V (A 110). Audio is recorded at an extremely low level. - The audio recording level mode for the audio channels selected is set to manual (M or [Manual]) and the audio recording level is set too low. Check the audio level meter on the HOME screen, [AUDIO] screen or on the monitoring screen and adjust the audio level correctly (A 111). - The microphone attenuator is on. Turn off the microphone attenuator (A 113, 113). Sound is distorted or is recorded at lower levels. - When recording near loud sounds (such as fireworks, shows or concerts), sound may become distorted or it may not be recorded at the actual levels. Activate the microphone attenuator (A 113, 113), or adjust the audio recording level manually. Recording Media and Accessories Cannot insert the recording media. - The CFast card or SD card you are trying to insert is not facing the correct direction. Turn it over and insert it. Cannot record on the CFast card. - A compatible CFast card must be used (A 48). - Initialize the CFast card (A 51) when you use it with the camera for the first time. - The CFast card is full or it already contains the maximum number of clips (999 clips). Delete some clips (A 147) to free some space or replace the CFast card. Cannot record on the SD card. - A compatible SD card must be used (A 48). - Initialize the SD card (A 51) when you use it with the camera for the first time. - The LOCK switch on the SD card is set to prevent accidental erasure. Change the position of the LOCK switch. - The SD card is full. Delete some recordings (A 147) to free some space or replace the SD card. - The folder and photo numbers have reached their maximum value. Set the [Rec/Media Setup] > [Photo Numbering] setting to [Reset] and insert a new SD card. Recording to and playing back from a CFast card is slow. - This may occur as video is recorded/deleted over time. Save your clips (A 161) and initialize the CFast card (A 51). Recording to and playing back from an SD card is slow. - This may occur as clips and photos are recorded/deleted over time. Save your recordings (A 161) and initialize the SD card using the [Complete] option (A 51). The optional RC-V100 Remote Controller or commercially available remote control does not work. - Make sure that [System Setup] > [REMOTE Term.] is set to [RC-V100 (REMOTE A)] or [RC-V100 (REMOTE B)] (depending on the connection used) when using the optional RC-V100 Remote Controller or to [Standard] when using a commercially available remote control. - Turn off the camera, reconnect the remote controller and then turn the camera back on again. - When editing of the custom picture file's detailed settings ([Other Settings] > [Activate]) is not enabled or the currently selected custom picture file is protected, detailed custom picture settings cannot be adjusted using the RC-V100. Select a custom picture file that is not protected (A 131) and enable the editing of the custom picture file's detailed settings (A 131).
-
 1
1 -
2
-
3
-
4
-
5
-
6
-
7
-
8
-
9
-
10
-
11
-
12
-
13
-
14
-
15
-
16
-
17
-
18
-
19
-
20
-
21
-
22
-
23
-
24
-
25
-
26
-
27
-
28
-
29
-
30
-
31
-
32
-
33
-
34
-
35
-
36
-
37
-
38
-
39
-
40
-
41
-
42
-
43
-
44
-
45
-
46
-
47
-
48
-
49
-
50
-
51
-
52
-
53
-
54
-
55
-
56
-
57
-
58
-
59
-
60
-
61
-
62
-
63
-
64
-
65
-
66
-
67
-
68
-
69
-
70
-
71
-
72
-
73
-
74
-
75
-
76
-
77
-
78
-
79
-
80
-
81
-
82
-
83
-
84
-
85
-
86
-
87
-
88
-
89
-
90
-
91
-
92
-
93
-
94
-
95
-
96
-
97
-
98
-
99
-
100
-
101
-
102
-
103
-
104
-
105
-
106
-
107
-
108
-
109
-
110
-
111
-
112
-
113
-
114
-
115
-
116
-
117
-
118
-
119
-
120
-
121
-
122
-
123
-
124
-
125
-
126
-
127
-
128
-
129
-
130
-
131
-
132
-
133
-
134
-
135
-
136
-
137
-
138
-
139
-
140
-
141
-
142
-
143
-
144
-
145
-
146
-
147
-
148
-
149
-
150
-
151
-
152
-
153
-
154
-
155
-
156
-
157
-
158
-
159
-
160
-
161
-
162
-
163
-
164
-
165
-
166
-
167
-
168
-
169
-
170
-
171
-
172
-
173
-
174
-
175
-
176
-
177
-
178
-
179
-
180
-
181
-
182
-
183
-
184
-
185
-
186
-
187
-
188
-
189
-
190
-
191
-
192
-
193
-
194
-
195
-
196
-
197
-
198
-
199
-
200
-
201
-
202
-
203
-
204
-
205
-
206
-
207
-
208
-
209
-
210
-
211
-
212
-
213
-
214
-
215
-
216
-
 217
217 -
 218
218 -
 219
219 -
 220
220 -
 221
221 -
 222
222 -
 223
223 -
 224
224 -
 225
225 -
 226
226 -
 227
227 -
228
-
229
-
230
-
231
-
232
-
233
-
234
-
235
-
236
-
237
-
238
-
239
-
240
-
241
-
242
-
243
-
244
-
245
-
246
-
247
-
248
-
249
-
250
-
251
-
252
-
253
-
254
-
255
 |
 |
