Canon EOS Digital Rebel XT EF-S 18-55 Kit EOS DIGITAL Rebel XT / EOS 350D Inst - Page 130
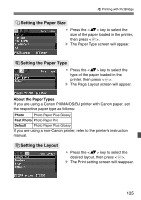
Set the trimming., Start printing.
 |
View all Canon EOS Digital Rebel XT EF-S 18-55 Kit manuals
Add to My Manuals
Save this manual to your list of manuals |
Page 130 highlights
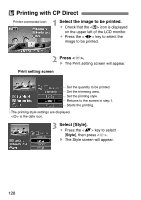
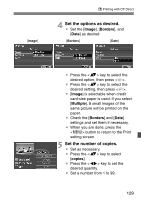
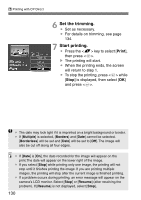
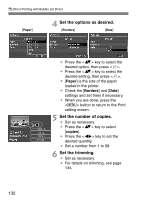
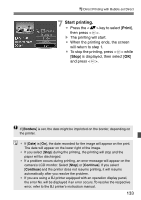
A Printing with CP Direct 6 Set the trimming. ¡ Set as necessary. ¡ For details on trimming, see page 134. 7 Start printing. ¡ Press the key to select [Print], then press . s The printing will start. ¡ When the printing ends, the screen will return to step 1. ¡ To stop the printing, press while [Stop] is displayed, then select [OK] and press . ¡ The date may look light if it is imprinted on a bright background or border. ¡ If [Multiple] is selected, [Borders] and [Date] cannot be selected. [Borderless] will be set and [Date] will be set to [Off]. The image will also be cut off along all four edges. ¡ If [Date] is [On], the date recorded for the image will appear on the print.The date will appear on the lower right of the image. ¡ If you select [Stop] while printing only one image, the printing will not stop until it finishes printing the image. If you are printing multiple images, the printing will stop after the current image is finished printing. ¡ If a problem occurs during printing, an error message will appear on the camera's LCD monitor. Select [Stop] or [Resume] (after resolving the problem). If [Resume] is not displayed, select [Stop]. 130
-
 1
1 -
2
-
3
-
4
-
5
-
6
-
7
-
8
-
9
-
10
-
11
-
12
-
13
-
14
-
15
-
16
-
17
-
18
-
19
-
20
-
21
-
22
-
23
-
24
-
25
-
26
-
27
-
28
-
29
-
30
-
31
-
32
-
33
-
34
-
35
-
36
-
37
-
38
-
39
-
40
-
41
-
42
-
43
-
44
-
45
-
46
-
47
-
48
-
49
-
50
-
51
-
52
-
53
-
54
-
55
-
56
-
57
-
58
-
59
-
60
-
61
-
62
-
63
-
64
-
65
-
66
-
67
-
68
-
69
-
70
-
71
-
72
-
73
-
74
-
75
-
76
-
77
-
78
-
79
-
80
-
81
-
82
-
83
-
84
-
85
-
86
-
87
-
88
-
89
-
90
-
91
-
92
-
93
-
94
-
95
-
96
-
97
-
98
-
99
-
100
-
101
-
102
-
103
-
104
-
105
-
106
-
107
-
108
-
109
-
110
-
111
-
112
-
113
-
114
-
115
-
116
-
117
-
118
-
119
-
120
-
121
-
122
-
123
-
124
-
 125
125 -
 126
126 -
 127
127 -
 128
128 -
 129
129 -
 130
130 -
 131
131 -
 132
132 -
 133
133 -
 134
134 -
 135
135 -
136
-
137
-
138
-
139
-
140
-
141
-
142
-
143
-
144
-
145
-
146
-
147
-
148
-
149
-
150
-
151
-
152
-
153
-
154
-
155
-
156
-
157
-
158
-
159
-
160
-
161
-
162
-
163
-
164
-
165
-
166
-
167
-
168
-
169
-
170
-
171
-
172
 |
 |