Canon EOS Rebel T3i EOS REBEL T3i / EOS 600D Instruction Manual - Page 222
Protecting Images
 |
View all Canon EOS Rebel T3i manuals
Add to My Manuals
Save this manual to your list of manuals |
Page 222 highlights
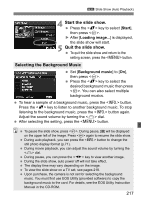
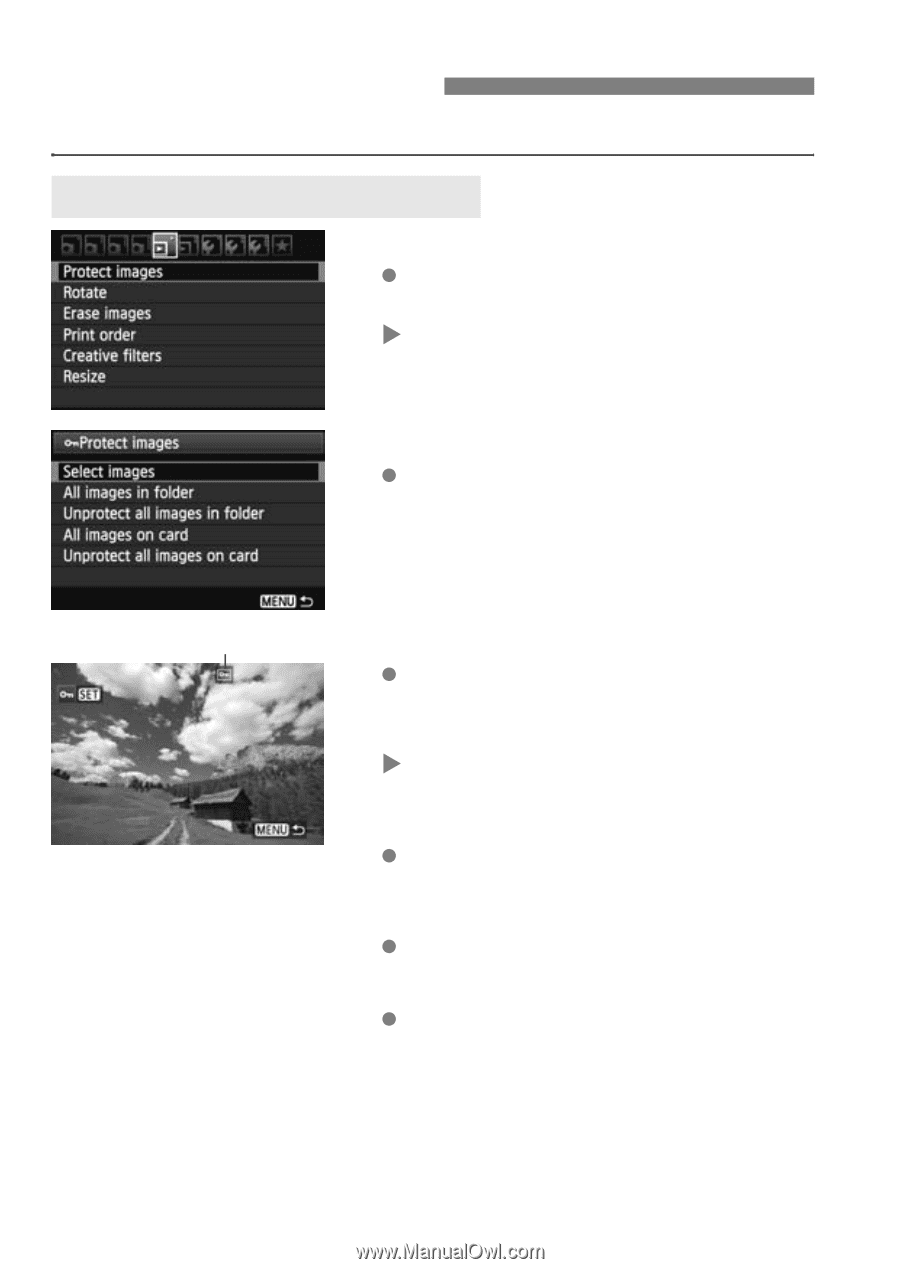
K Protecting Images Protecting an image prevents it from being erased accidentally. 3 Protecting a Single Image 1 Select [Protect images]. Under the [3] tab, select [Protect images], then press . X The protect setting screen will appear. 2 Select [Select images]. Select [Select images], then press . Image protect icon 3 Protect the image. Press the key to select the image to be protected, then press . X When an image is protected, the icon will appear on the top of the screen. To cancel the image protection, press again. The icon will disappear. To protect another image, repeat step 3. To exit the image protection, press the button. The menu will reappear. 222
-
 1
1 -
2
-
3
-
4
-
5
-
6
-
7
-
8
-
9
-
10
-
11
-
12
-
13
-
14
-
15
-
16
-
17
-
18
-
19
-
20
-
21
-
22
-
23
-
24
-
25
-
26
-
27
-
28
-
29
-
30
-
31
-
32
-
33
-
34
-
35
-
36
-
37
-
38
-
39
-
40
-
41
-
42
-
43
-
44
-
45
-
46
-
47
-
48
-
49
-
50
-
51
-
52
-
53
-
54
-
55
-
56
-
57
-
58
-
59
-
60
-
61
-
62
-
63
-
64
-
65
-
66
-
67
-
68
-
69
-
70
-
71
-
72
-
73
-
74
-
75
-
76
-
77
-
78
-
79
-
80
-
81
-
82
-
83
-
84
-
85
-
86
-
87
-
88
-
89
-
90
-
91
-
92
-
93
-
94
-
95
-
96
-
97
-
98
-
99
-
100
-
101
-
102
-
103
-
104
-
105
-
106
-
107
-
108
-
109
-
110
-
111
-
112
-
113
-
114
-
115
-
116
-
117
-
118
-
119
-
120
-
121
-
122
-
123
-
124
-
125
-
126
-
127
-
128
-
129
-
130
-
131
-
132
-
133
-
134
-
135
-
136
-
137
-
138
-
139
-
140
-
141
-
142
-
143
-
144
-
145
-
146
-
147
-
148
-
149
-
150
-
151
-
152
-
153
-
154
-
155
-
156
-
157
-
158
-
159
-
160
-
161
-
162
-
163
-
164
-
165
-
166
-
167
-
168
-
169
-
170
-
171
-
172
-
173
-
174
-
175
-
176
-
177
-
178
-
179
-
180
-
181
-
182
-
183
-
184
-
185
-
186
-
187
-
188
-
189
-
190
-
191
-
192
-
193
-
194
-
195
-
196
-
197
-
198
-
199
-
200
-
201
-
202
-
203
-
204
-
205
-
206
-
207
-
208
-
209
-
210
-
211
-
212
-
213
-
214
-
215
-
216
-
 217
217 -
 218
218 -
 219
219 -
 220
220 -
 221
221 -
 222
222 -
 223
223 -
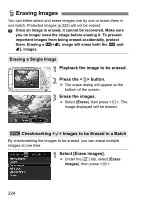 224
224 -
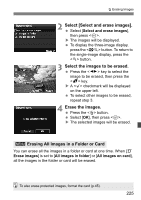 225
225 -
 226
226 -
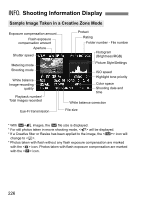
 227
227 -
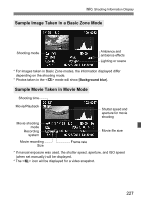
228
-
229
-
230
-
231
-
232
-
233
-
234
-
235
-
236
-
237
-
238
-
239
-
240
-
241
-
242
-
243
-
244
-
245
-
246
-
247
-
248
-
249
-
250
-
251
-
252
-
253
-
254
-
255
-
256
-
257
-
258
-
259
-
260
-
261
-
262
-
263
-
264
-
265
-
266
-
267
-
268
-
269
-
270
-
271
-
272
-
273
-
274
-
275
-
276
-
277
-
278
-
279
-
280
-
281
-
282
-
283
-
284
-
285
-
286
-
287
-
288
-
289
-
290
-
291
-
292
-
293
-
294
-
295
-
296
-
297
-
298
-
299
-
300
-
301
-
302
-
303
-
304
-
305
-
306
-
307
-
308
-
309
-
310
-
311
-
312
-
313
-
314
-
315
-
316
-
317
-
318
-
319
-
320
-
321
-
322
-
323
-
324
 |
 |
222
Protecting an image prevents it from being erased accidentally.
1
Select [Protect images].
Under the [
3
] tab, select [
Protect
images
], then press <
0
>.
The protect setting screen will
appear.
2
Select [Select images].
Select [
Select images
], then press
<
0
>.
3
Protect the image.
Press the <
U
> key to select the
image to be protected, then press
<
0
>.
When an image is protected, the
<
K
> icon will appear on the top of
the screen.
To cancel the image protection, press
<
0
> again. The <
K
> icon will
disappear.
To protect another image, repeat step
3.
To exit the image protection, press
the <
M
> button. The menu will
reappear.
K
Protecting Images
3
Protecting a Single Image
Image protect icon