Canon ES8600 ES8600 8mm Video Camcorder NTSC-E Instruction Manual - Page 15
Basic Recording - camcorder manual
 |
UPC - 013803027174
View all Canon ES8600 manuals
Add to My Manuals
Save this manual to your list of manuals |
Page 15 highlights
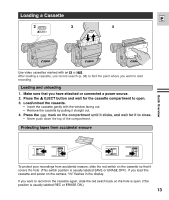
Basic Recording 1 POWER E 2,3 Quick Overview Safe cassette operation When you turn the power off or remove the power source, be sure to set the camcorder first to record pause, stop or still pause mode. Turning the power off or removing the power source while the tape is moving (during recording, play, rewind for example), will make the counter display appear wrong or may cause tape damage. Before you start recording Have you completed the following steps? • Attach a power source (p. 10). • Load a cassette (p. 13). • Adjusted the LCD screen (p. 19) or viewfinder, fastened the grip belt and taken off the lens cap (p. 54). You may also want to install the backup battery (p. 58) in order to set date and time display (p. 32). To record 1. Turn the program selector to the a position. • This selects the camera's Automatic recording program. It allows you to simply point and shoot without making any manual adjustments. 2. Turn the STANDBY lever to STANDBY. • PAUSE appears in the display - the camera is now in "record pause mode." 3. Press the start/stop button to begin recording. • REC appears in the display. 4. Press the start/stop button again to pause recording. • The camera returns to record pause mode and PAUSE reappears in the display. • You can stop and restart recording as often as you like by pressing the start/stop button. • The camera will turn itself off if you leave it in record pause mode for more than about 5 minutes. To return to record pause mode, turn the STANDBY lever to LOCK and back to STANDBY, or set the program selector to OFF and then back to camera mode. 15
-
 1
1 -
2
-
3
-
4
-
5
-
6
-
7
-
8
-
9
-
 10
10 -
 11
11 -
 12
12 -
 13
13 -
 14
14 -
 15
15 -
 16
16 -
 17
17 -
 18
18 -
 19
19 -
 20
20 -
21
-
22
-
23
-
24
-
25
-
26
-
27
-
28
-
29
-
30
-
31
-
32
-
33
-
34
-
35
-
36
-
37
-
38
-
39
-
40
-
41
-
42
-
43
-
44
-
45
-
46
-
47
-
48
-
49
-
50
-
51
-
52
-
53
-
54
-
55
-
56
-
57
-
58
-
59
-
60
-
61
-
62
-
63
-
64
-
65
-
66
-
67
-
68
-
69
-
70
-
71
-
72
-
73
-
74
-
75
 |
 |
