Canon Elura 40MC DIGITAL VIDEO SOLUTION DISK Ver.2 Software Instruction Manual - Page 80
Notes, About the other buttons, How to Check and Change Various Camera Settings - memory card maximum
 |
View all Canon Elura 40MC manuals
Add to My Manuals
Save this manual to your list of manuals |
Page 80 highlights
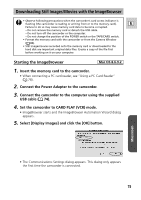
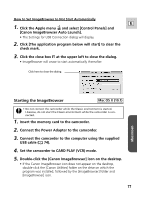
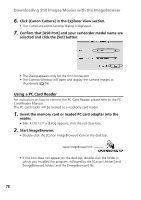
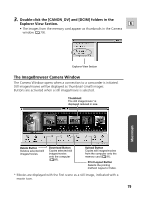
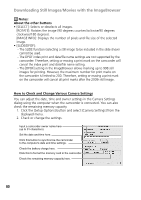
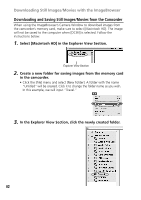
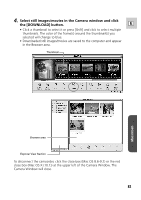
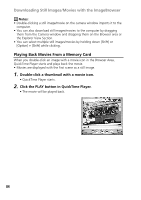
Downloading Still Images/Movies with the ImageBrowser Notes: About the other buttons • [SELECT]: Selects or deselects all images. [ROTATE]: Rotates the image (90 degrees counterclockwise/90 degrees clockwise/180 degrees). [IMAGE INFO]: Displays the number of pixels and file size of the selected image. • [SLIDE/DPOF]: - The SLIDE function (selecting a still image to be included in the slide show) cannot be used. - The DPOF index print and date/file name settings are not supported by the camcorder. Therefore, setting or erasing a print mark on the camcorder will cancel the index print and date/file name setting. - The [DPOF] setting in the ImageBrowser allows marking up to 998 still images for printing. However, the maximum number for print marks on the camcorder is limited to 200. Therefore, setting or erasing a print mark on the camcorder will cancel all print marks after the 200th still image. How to Check and Change Various Camera Settings You can adjust the date, time and owner settings in the Camera Settings dialog using the computer when the camcorder is connected. You can also check the remaining memory capacity. 1. Click the [Setup Options] button and select [Camera Settings] from the displayed menu. 2. Check or change the settings. Input a camcorder owner name here (up to 31 characters). Set the date and time here. Click this button to synchronize the camcorder to the computer's date and time settings. Check the battery charge here. Click this to format the memory card in the camcorder. Check the remaining memory capacity here. 80
-
 1
1 -
2
-
3
-
4
-
5
-
6
-
7
-
8
-
9
-
10
-
11
-
12
-
13
-
14
-
15
-
16
-
17
-
18
-
19
-
20
-
21
-
22
-
23
-
24
-
25
-
26
-
27
-
28
-
29
-
30
-
31
-
32
-
33
-
34
-
35
-
36
-
37
-
38
-
39
-
40
-
41
-
42
-
43
-
44
-
45
-
46
-
47
-
48
-
49
-
50
-
51
-
52
-
53
-
54
-
55
-
56
-
57
-
58
-
59
-
60
-
61
-
62
-
63
-
64
-
65
-
66
-
67
-
68
-
69
-
70
-
71
-
72
-
73
-
74
-
 75
75 -
 76
76 -
 77
77 -
 78
78 -
 79
79 -
 80
80 -
 81
81 -
 82
82 -
 83
83 -
 84
84 -
 85
85 -
86
-
87
-
88
-
89
-
90
-
91
-
92
-
93
-
94
 |
 |