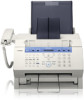
Canon FAXPHONE L80 FAXPHONE L80 Set-Up Instructions
Canon FAXPHONE L80 Manual
 |
UPC - 013803023145
View all Canon FAXPHONE L80 manuals
Add to My Manuals
Save this manual to your list of manuals |
Canon FAXPHONE L80 manual content summary:
- Canon FAXPHONE L80 | FAXPHONE L80 Set-Up Instructions - Page 1
● Handset ● Handset cradle ● Plugs with pins (2) ● Document support ● Paper loading warning label ● Power cord ● Telephone line cord ● Documentation Set-Up Instructions Basic Guide Warranty Registration card (for USA only) ● FAXPHONE L80 Software CD-ROM ● Destination labels NOTE • You need a USB - Canon FAXPHONE L80 | FAXPHONE L80 Set-Up Instructions - Page 2
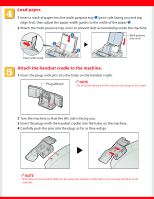
the multi-purpose tray into the slots on the machine. Paper loading warning label Multi-purpose tray cover Multi-purpose tray 5 Insert the document support into the slots on the machine. Support tray Document support 4 Insert the other support tray into the slots above the ADF. 3 Insert one - Canon FAXPHONE L80 | FAXPHONE L80 Set-Up Instructions - Page 3
Load paper. 1 Insert a stack of paper into the multi-purpose tray ➊ (print side facing you and top edge first), then adjust the paper width guides to the width of the paper ➋. 2 Attach the multi-purpose tray cover to prevent dust accumulating inside the machine. Ë Ë Multi-purpose tray cover Paper - Canon FAXPHONE L80 | FAXPHONE L80 Set-Up Instructions - Page 4
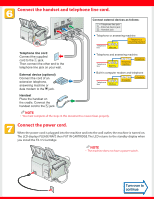
jack. NOTE • You must complete all the steps in this document to receive faxes properly. Connect the power cord. When the power cord is plugged into the machine then PUT IN CARTRIDGE. The LCD returns to the standby display when you install the FX-3 S Cartridge. NOTE • The machine does not have a - Canon FAXPHONE L80 | FAXPHONE L80 Set-Up Instructions - Page 5
are aligned with the guides inside the machine. NOTE • Always hold the cartridge by its handle. 6 Use both hands to close the front cover. NOTE • The FX-3 S Cartridge is a starter cartridge supplied with the machine. The replacement cartridge is the FX-3 Cartridge separately available from Canon. - Canon FAXPHONE L80 | FAXPHONE L80 Set-Up Instructions - Page 6
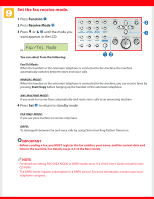
following: 01 02 03 04 05 06 07 08 Data Delayed Memory Registration Transmission Reference Receive Mode 09 10 11 12 Polling Report Space Function 13 14 15 Clear Set ™ Hook Start/Copy Stop/Reset ˜ — Fax/Tel Mode: When the handset or the extension telephone is connected - Canon FAXPHONE L80 | FAXPHONE L80 Set-Up Instructions - Page 7
Install the Printer Driver. (Windows 98/Me/2000/XP) IMPORTANT • DO NOT connect the USB cable before installing the software. NOTE • When installing the software in Windows XP or Windows 2000, log onto the system as a member of the Administrator group. • If the Found New Hardware Wizard appears, - Canon FAXPHONE L80 | FAXPHONE L80 Set-Up Instructions - Page 8
disk. (Click CD-ROM drives only, and clear the other options.) For Windows XP: When the Found New Hardware Wizard appears during the setup, choose the following: • Select Install the software automatically (Recommended). 7 When the printer driver is installed, click Finish to close the Found
-
 1
1 -
 2
2 -
 3
3 -
 4
4 -
 5
5 -
 6
6 -
 7
7 -
8
 |
 |

Set-Up Instructions
Set-Up Instructions
Thank you for purchasing the Canon FAXPHONE L80.
To get your machine ready for use, please follow the instructions in this document before
referring to any other documentation.
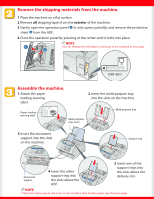
Unpack the machine and its components.
Check that you have the following:
NOTE
•
You need a USB cable (less than 16.4 ft./5 m) to connect your machine to a computer.
•
To lift the machine, hold it firmly and level as illustrated.
●
Machine
●
FX-3 S Cartridge
●
Support trays (2)
●
Multi-purpose
tray
●
Multi-purpose tray
cover
●
Document support
●
Handset
●
Handset cradle
●
Plugs with
pins (2)
●
Paper loading warning label
●
Power cord
●
Telephone line cord
●
Documentation
Set-Up Instructions
Basic Guide
Warranty
Registration card (for USA only)
●
FAXPHONE L80 Software CD-ROM
●
Destination labels