Canon FAXPHONE L80 FAXPHONE L80 Set-Up Instructions - Page 3
Load paper., Attach the handset cradle to the machine.
 |
UPC - 013803023145
View all Canon FAXPHONE L80 manuals
Add to My Manuals
Save this manual to your list of manuals |
Page 3 highlights
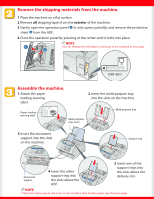
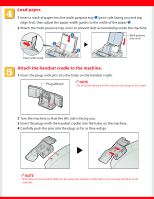
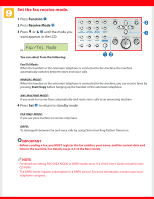
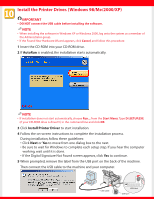
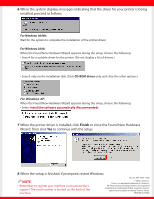
Load paper. 1 Insert a stack of paper into the multi-purpose tray ➊ (print side facing you and top edge first), then adjust the paper width guides to the width of the paper ➋. 2 Attach the multi-purpose tray cover to prevent dust accumulating inside the machine. Ë Ë Multi-purpose tray cover Paper width guide Attach the handset cradle to the machine. 1 Insert the plugs with pins into the holes on the handset cradle. Plug with pin NOTE • Do not push the pins all the way into the plugs at this stage. 2 Turn the machine so that the left side is facing you. 3 Insert the plugs (with the handset cradle) into the holes on the machine. 4 Carefully push the pins into the plugs as far as they will go. NOTE • If the pins are not pushed fully into the plugs, the handset cradle will not be securely attached to the machine.
-
 1
1 -
 2
2 -
 3
3 -
 4
4 -
 5
5 -
 6
6 -
 7
7 -
 8
8
 |
 |
