Canon LK-51B User Guide - Page 9
Charging the Battery
 |
UPC - 013803047653
View all Canon LK-51B manuals
Add to My Manuals
Save this manual to your list of manuals |
Page 9 highlights
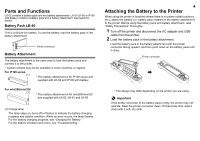
3 Unload the battery pack from the battery attachment. Unlock the lever on the battery attachment as illustrated below, and unload the battery pack from the battery attachment. Lever 1 Plug the power cord into the AC adapter, and then connect the AC adapter to the printer. iP100 series mini260/mini320 * The design may differ depending on the printer you are using. 4 Attach the battery connector cover (s) to the printer. Charging the Battery To operate the printer from the battery, the battery pack must be charged fully. Since the battery pack is not charged when it is purchased, charge it following the procedure explained below. To charge the battery, load the battery pack in the battery attachment, and attach it to the printer. For procedures, see "Attaching the Battery to the Printer." Important Do not connect the AC adapter to the printer before attaching the battery to the printer. If you attach or remove the battery with the AC adapter connected, charging may not start. In this case, disconnect the AC adapter from the printer and then reconnect it. * The design may differ depending on the printer you are using. 2 Plug the power cord into a power outlet. The charge lamp starts flashing red, and charging of the battery pack starts. The charging progress is indicated by the charge lamp. When the lamp turns off, charging of the battery pack is complete. See below. Charge lamp Progress Insufficiently charged. The lamp flashes red. Fully charged. The lamp turns off. Notes z Charge the battery pack at a place where the ambient temperature is between 5°C and 35°C/41°F and 95°F. If the temperature is outside this range, charging of the battery pack may not progress or the performance may be degraded. If the ambient temperature is low, the charging time may become longer. If charging still takes a long time (about 5 to 6 hours) even though printing is not activated while the battery is being charged, the ambient temperature may not be between 5°C and 35°C/41°F and 95°F. z While the battery pack is being charged, the charge lamp flashes or turns off to indicate the charging progress even if the printer is turned off. z You can use the printer while charging the battery. In this case, the charging time becomes longer because charging is interrupted during printing. The charge lamp flashes red. 7
-
 1
1 -
2
-
3
-
 4
4 -
 5
5 -
 6
6 -
 7
7 -
 8
8 -
 9
9 -
 10
10
 |
 |
