Canon LR1 User Manual - Page 15
Names and Functions of the Printer's Parts, Front View
 |
View all Canon LR1 manuals
Add to My Manuals
Save this manual to your list of manuals |
Page 15 highlights
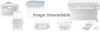
Names and Functions of the Printer's Parts Introduction Front View 1 BJ Cartridge Access Cover Open to install and replace BJ cartridges and ink tanks. 2 Access Cover Release Button Press this button to open the BJ cartridge access cover. 3 Paper Guide When setting paper, slide this guide to align it with the left edge of the paper. 4 Manual Feed Slot Use this slot for loading single sheets of paper to be printed. 5 Manual Feed Support Extension When using the Manual Feed Support, you can also raise this extension guide. 6 Manual Feed Support Open this support when you want to feed paper one sheet at a time. 10 Paper Output Cover Protects printed documents. 11 Paper Output Tray Printed documents come out here. 12 Paper Output Tray Extension Press PUSH and pull out the extension. 13 Paper Supply Tray Holds plain paper and High Resolution Paper (letter size and A4 size only). Maximum Capacity Plain paper: 50 sheets High Resolution Paper: 40 sheets 7 Ink Light Reset Buttons Press these buttons after replacing old (empty) ink tanks with new ink tanks. Pressing either of these buttons informs the printer that an ink tank has been replaced and the corresponding LOW INK light goes out. BLACK Button Press this button after replacing the black ink tank. COLOR Button Press this button after replacing the color ink tank. 8 Mode Switch At this time, this switch is not used. 9 Paper Indicator Shows the amount of paper remaining in the paper supply tray. Chapter 1 Introduction 1-9
-
 1
1 -
2
-
3
-
4
-
5
-
6
-
7
-
8
-
9
-
 10
10 -
 11
11 -
 12
12 -
 13
13 -
 14
14 -
 15
15 -
 16
16 -
 17
17 -
 18
18 -
 19
19 -
 20
20 -
21
-
22
-
23
-
24
-
25
-
26
-
27
-
28
-
29
-
30
-
31
-
32
-
33
-
34
-
35
-
36
-
37
-
38
-
39
-
40
-
41
-
42
-
43
-
44
-
45
-
46
-
47
-
48
-
49
-
50
-
51
-
52
-
53
-
54
-
55
-
56
-
57
-
58
-
59
-
60
-
61
-
62
-
63
-
64
-
65
-
66
-
67
-
68
-
69
-
70
-
71
-
72
 |
 |
