Canon MultiPASS C755 Service Manual - Page 63
Head Gap Adjustment 2
 |
View all Canon MultiPASS C755 manuals
Add to My Manuals
Save this manual to your list of manuals |
Page 63 highlights
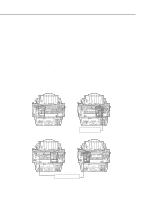
MultiPASS C755 Chapter 3: Maintenance & Service Adjustment Procedures 1) Place the gap gauge (QY9-0054) in Position A1. 2) Move the carriage belt manually to bring the carriage to Position A2. Align the right edge of the carriage with the bottom case's rib. 3) Install a black BJ cartridge with no ink tank in the carriage. 4) Move the paper selector lever up and down 2 or 3 times, and then, with the lever raised in the plain paper position, tighten the right fixing screw. 5) Remove the black BJ cartridge. 6) Set the gap gauge in Position B1. 7) Lower the paper selector lever to the thick paper position. (down) 8) Move the carriage belt manually and bring the carriage to Position B2. Align the left edge of the carriage with the edge of the ink sensor's cover. 9) Install a black BJ cartridge with no ink tank in the carriage. 10) Move the paper selector lever up and down 2 or 3 times, and then, with the lever raised in the plain paper position, tighten the left fixing screw. 11) Remove the black BJ cartridge. 12) Loosen the right fixing screw by a half-turn, and execute procedures 1 through 5 again to complete the adjustment. Remove the bottom case again to attach the paper separator lever spring and the shaft clips on both sides. Position A1 Position A2 QY9-0054 Position B1 Align the carriage's right edge with the bottom case's rib. Position B2 QY9-0054 Align the carriage's left edge with the ink sensor's cover Figure 3-9 Head Gap Adjustment 2 3-12
-
 1
1 -
2
-
3
-
4
-
5
-
6
-
7
-
8
-
9
-
10
-
11
-
12
-
13
-
14
-
15
-
16
-
17
-
18
-
19
-
20
-
21
-
22
-
23
-
24
-
25
-
26
-
27
-
28
-
29
-
30
-
31
-
32
-
33
-
34
-
35
-
36
-
37
-
38
-
39
-
40
-
41
-
42
-
43
-
44
-
45
-
46
-
47
-
48
-
49
-
50
-
51
-
52
-
53
-
54
-
55
-
56
-
57
-
 58
58 -
 59
59 -
 60
60 -
 61
61 -
 62
62 -
 63
63 -
 64
64 -
 65
65 -
 66
66 -
 67
67 -
 68
68 -
69
-
70
-
71
-
72
-
73
-
74
-
75
-
76
-
77
-
78
-
79
-
80
-
81
-
82
-
83
-
84
-
85
-
86
-
87
-
88
-
89
-
90
-
91
-
92
-
93
-
94
-
95
-
96
-
97
-
98
-
99
-
100
-
101
-
102
-
103
-
104
-
105
-
106
-
107
-
108
-
109
-
110
-
111
-
112
-
113
-
114
-
115
-
116
-
117
-
118
-
119
-
120
-
121
-
122
-
123
-
124
-
125
-
126
-
127
-
128
-
129
-
130
-
131
-
132
-
133
-
134
-
135
-
136
-
137
-
138
-
139
-
140
-
141
-
142
-
143
 |
 |
