Canon PIXMA MX7600 Quick Start Guide - Page 32
size, Media, Media Type, Insert the Cassette into the machine., Open the Paper Output Tray. - printer driver
 |
View all Canon PIXMA MX7600 manuals
Add to My Manuals
Save this manual to your list of manuals |
Page 32 highlights
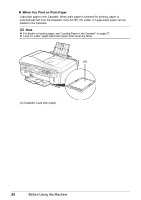
4 Insert the Cassette into the machine. Push the Cassette all the way into the machine. Important If Legal-sized paper is loaded in the Cassette, the Cassette will protrude slightly. 5 Open the Paper Output Tray. (1) Open the Paper Output Tray. Press the Open button to open the Paper Output Tray. (2) Open the Output Tray Extension. (1) (2) 6 Specify the page size and media type settings according to the loaded paper. When Plain paper is selected for Media type, the paper source will switch to the Cassette. Note z When using the Operation Panel on the machine to perform copying or printing operation without using a computer, select the size and type of the loaded paper in Page size and Media type in each mode. For details on settings in each mode, see "Setting Items" on page 33 for the copy mode and "Setting Items" on page 41 for the memory card mode. z When using the machine connected to a computer, select the size and type of the loaded paper in Page Size (or Paper Size) and Media Type in the printer driver. For details on printer driver settings, see "Printing with Windows" on page 44 or "Printing with Macintosh" on page 45. 28 Before Using the Machine
-
 1
1 -
2
-
3
-
4
-
5
-
6
-
7
-
8
-
9
-
10
-
11
-
12
-
13
-
14
-
15
-
16
-
17
-
18
-
19
-
20
-
21
-
22
-
23
-
24
-
25
-
26
-
 27
27 -
 28
28 -
 29
29 -
 30
30 -
 31
31 -
 32
32 -
 33
33 -
 34
34 -
 35
35 -
 36
36 -
 37
37 -
38
-
39
-
40
-
41
-
42
-
43
-
44
-
45
-
46
-
47
-
48
-
49
-
50
-
51
-
52
-
53
-
54
-
55
-
56
-
57
-
58
-
59
-
60
-
61
-
62
-
63
-
64
-
65
-
66
-
67
-
68
-
69
-
70
-
71
-
72
-
73
-
74
-
75
-
76
-
77
-
78
-
79
-
80
-
81
-
82
-
83
-
84
-
85
-
86
-
87
-
88
-
89
-
90
-
91
-
92
-
93
-
94
-
95
-
96
-
97
-
98
-
99
-
100
-
101
-
102
-
103
-
104
-
105
-
106
-
107
-
108
-
109
-
110
-
111
-
112
-
113
-
114
-
115
-
116
-
117
-
118
-
119
-
120
-
121
-
122
-
123
-
124
-
125
-
126
-
127
-
128
-
129
-
130
-
131
-
132
-
133
-
134
-
135
-
136
-
137
-
138
-
139
-
140
-
141
-
142
-
143
-
144
-
145
-
146
-
147
-
148
-
149
-
150
-
151
-
152
-
153
-
154
-
155
-
156
-
157
-
158
-
159
-
160
-
161
-
162
-
163
-
164
-
165
-
166
-
167
-
168
-
169
-
170
-
171
-
172
-
173
-
174
-
175
-
176
-
177
-
178
-
179
-
180
-
181
-
182
-
183
-
184
-
185
-
186
-
187
-
188
-
189
-
190
-
191
-
192
 |
 |
