Canon PowerShot SD430 Wireless Setup Guide - Page 9
Registering the Target Device with the Camera
 |
View all Canon PowerShot SD430 manuals
Add to My Manuals
Save this manual to your list of manuals |
Page 9 highlights
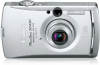
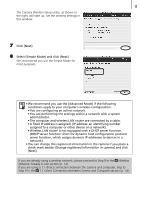
9 Registering the Target Device with the Camera Attach the camera to the computer using the interface cable and register the target device (computer to be connected wirelessly) with the camera. Register the target device using the Camera Wireless Setup program (a wireless configuration utility). This step is only required the first time you register a target device. Before you register the target device, update the camera firmware (software inside the camera) to the latest version. Download the firmware upgrade from the same website you downloaded this guide from. Also refer to the website for instructions on updating the camera's firmware. • The camera cannot connect wirelessly to computers that have not been registered as target devices. • The camera can register up to 7 devices. A Wireless Network Already in Use B 1:1 Direct Connection between Camera and Computer For Step 9 onward go to A Wireless Network Already in Use (p. 12) or B 1:1 Direct Connection between Camera and Computer (p. 14). 1 A If your wireless network is already in use, confirm that the computer and router are correctly connected and that the router's wireless settings are correctly configured. B If there is a 1:1 direct connection between the camera and computer, confirm that the computer's wireless networking function is working. 2 Attach the supplied interface cable to the computer's USB port and the camera's DIGITAL terminal. 3 Turn on the camera and set it to the playback mode. The camera's (Print/Share) button will light blue. It will not light up if the memory card in the camera does not contain any images. Power Button Playback Mode
-
 1
1 -
2
-
3
-
 4
4 -
 5
5 -
 6
6 -
 7
7 -
 8
8 -
 9
9 -
 10
10 -
 11
11 -
 12
12 -
 13
13 -
 14
14 -
15
-
16
-
17
-
18
-
19
-
20
-
21
-
22
-
23
 |
 |
