Canon PowerShot SD630 ZoomBrowser EX 5.6 Software User Guide - Page 104
Editing Images 9/10
 |
View all Canon PowerShot SD630 manuals
Add to My Manuals
Save this manual to your list of manuals |
Page 104 highlights
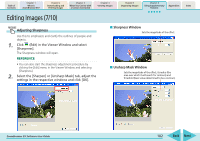
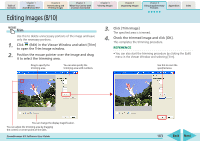
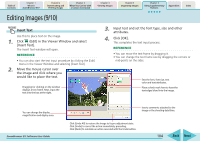
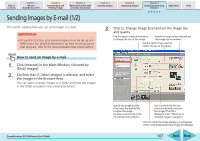
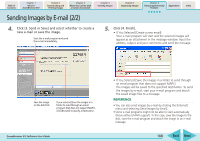
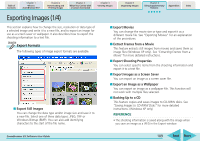
Table of Contents Chapter 1 What is ZoomBrowser EX? Chapter 2 Downloading and Printing Images Chapter 3 What You Can Do with a Camera Connected Chapter 4 Viewing Images Chapter 5 Organizing Images Chapter 6 Using Supplementary Features Appendices Index Editing Images (9/10) Insert Text Use this to place text on the image. 1. Click (Edit) in the Viewer Window and select [Insert Text]. The Insert Text window will open. REFERENCE • You can also start the text input procedure by clicking the [Edit] menu in the Viewer Window and selecting [Insert Text]. 2. Move the mouse cursor over the image and click where you would like to place the text. Dragging (or clicking) on the window displays a text frame. Next, input the text into the box at the right. 3. Input text and set the font type, size and other attributes. 4. Click [OK]. This completes the text input process. REFERENCE • You can move the text frame by dragging it. • You can change the text frame size by dragging the corners or mid-points on the sides. Sets the font, font size, text color and text attributes. Place a check mark here to have the text edges blend into the image. You can change the display magnification and display area. ZoomBrowser EX Software User Guide Inserts comments attached to the image or the shooting date/time. Click [Undo All] to restore the image to its pre-adjustment state. Click [Undo] to cancel the action immediately preceding. Click [Redo] to reinstate an action canceled with the Undo button. 104 Back Next
-
 1
1 -
2
-
3
-
4
-
5
-
6
-
7
-
8
-
9
-
10
-
11
-
12
-
13
-
14
-
15
-
16
-
17
-
18
-
19
-
20
-
21
-
22
-
23
-
24
-
25
-
26
-
27
-
28
-
29
-
30
-
31
-
32
-
33
-
34
-
35
-
36
-
37
-
38
-
39
-
40
-
41
-
42
-
43
-
44
-
45
-
46
-
47
-
48
-
49
-
50
-
51
-
52
-
53
-
54
-
55
-
56
-
57
-
58
-
59
-
60
-
61
-
62
-
63
-
64
-
65
-
66
-
67
-
68
-
69
-
70
-
71
-
72
-
73
-
74
-
75
-
76
-
77
-
78
-
79
-
80
-
81
-
82
-
83
-
84
-
85
-
86
-
87
-
88
-
89
-
90
-
91
-
92
-
93
-
94
-
95
-
96
-
97
-
98
-
 99
99 -
 100
100 -
 101
101 -
 102
102 -
 103
103 -
 104
104 -
 105
105 -
 106
106 -
 107
107 -
 108
108 -
 109
109 -
110
-
111
-
112
-
113
-
114
-
115
-
116
-
117
-
118
-
119
-
120
-
121
-
122
-
123
-
124
-
125
-
126
-
127
-
128
-
129
-
130
-
131
-
132
-
133
-
134
-
135
-
136
-
137
-
138
-
139
-
140
-
141
-
142
-
143
-
144
-
145
-
146
-
147
-
148
-
149
-
150
-
151
-
152
-
153
 |
 |
