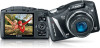
Canon PowerShot SX130 IS Getting Started Guide - Page 6
Transferring, Images, Computer, Viewing - instructions
 |
View all Canon PowerShot SX130 IS manuals
Add to My Manuals
Save this manual to your list of manuals |
Page 6 highlights
Transferring Images to a Computer for Viewing You can use the included software to transfer images you have shot with the camera to a computer for viewing. If you are already using software included with another Canon-brand compact digital camera, install the software from the included CD-ROM, overwriting your current installation. System Requirements Windows OS Computer model CPU RAM Interface Free Hard Disk Space Display Windows 7 Windows Vista Service Pack 1, Service Pack 2 Windows XP Service Pack 3 The above OS should be pre-installed on computers with built-in USB ports. Pentium 1.3 GHz or higher (still images), Core2 Duo 1.66 GHz or higher (movies) Windows 7 64 bit: 2 GB or more Windows 7 32 bit, Windows Vista 64 bit, 32 bit: 1 GB or more Windows XP: 512 MB or more (still images), 1 GB or more (movies) USB ZoomBrowser EX: 200 MB or more CameraWindow: 150 MB or more* PhotoStitch: 40 MB or more 1,024 x 768 pixels or higher * For Windows XP, Microsoft .NET Framework 3.0 or later (max. 500 MB) must be installed. Installation may take some time depending on your computer's capabilities. Macintosh OS Computer model CPU RAM Interface Free Hard Disk Space Display Mac OS X (v10.4 - v10.6) The above OS should be pre-installed on computers with built-in USB ports. PowerPC G4/G5 or Intel Processor (still images), Core Duo 1.66 GHz or higher (movies) Mac OS X v10.4 - v10.5: 512 MB or more (still images), 1 GB or more (movies) Mac OS X v10.6: 1 GB or more USB ImageBrowser: 250 MB or more CameraWindow: 150 MB or more PhotoStitch: 50 MB or more 1,024 x 768 pixels or higher 28 Transferring Images to a Computer for Viewing Preparations Windows Vista and Mac OS X (v10.5) are used for these explanations. 0 &Al --*, L1 itett DIGITAL CAMERA OW. 04IP. Install the Software. Windows Place the CD in the computer's CDROM drive. Place the supplied CD-ROM (DIGITAL CAMERA Solution Disk) (p. 2) into the computer's CD-ROM drive. Begin installation. Click [Easy Installation] and follow the on-screen instructions to proceed with the installation. If the [User Account Control] window appears, follow the on-screen instructions to proceed. When the installation finishes, click [Restart] or [Finish]. 14.tt Remove the CD-ROM. Remove the CD-ROM when your desktop screen appears. Macintosh Place the CD in the computer's CDROM drive. Place the supplied CD-ROM (DIGITAL CAMERA Solution Disk) (p. 2) into the computer's CD-ROM drive. D1F DIGITAL CAMERA somion C Begin installation. Double-click the on the CD. Click [Install], and follow the on-screen instructions to proceed with the installation. 29
-
 1
1 -
 2
2 -
 3
3 -
 4
4 -
 5
5 -
 6
6 -
 7
7 -
 8
8 -
 9
9 -
 10
10 -
 11
11 -
 12
12 -
13
-
14
-
15
-
16
-
17
-
18
 |
 |
