Canon PowerShot SX260 HS PowerShot SX260 HS / SX240 HS Camera User Guide - Page 65
Con the setting., Choose, Using the Self-Timer to Avoid Camera Shake, Customizing the Self-
 |
View all Canon PowerShot SX260 HS manuals
Add to My Manuals
Save this manual to your list of manuals |
Page 65 highlights
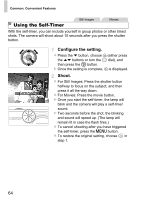
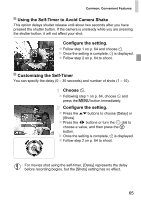
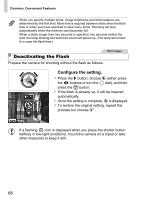
Common, Convenient Features Using the Self-Timer to Avoid Camera Shake This option delays shutter release until about two seconds after you have pressed the shutter button. If the camera is unsteady while you are pressing the shutter button, it will not affect your shot. Configure the setting. z Follow step 1 on p. 64 and choose [. X Once the setting is complete, [ is displayed. z Follow step 2 on p. 64 to shoot. Customizing the Self-Timer You can specify the delay (0 - 30 seconds) and number of shots (1 - 10). Choose $. z Following step 1 on p. 64, choose $ and press the n button immediately. Configure the setting. z Press the op buttons to choose [Delay] or [Shots]. z Press the qr buttons or turn the 5 dial to choose a value, and then press the m button. X Once the setting is complete, $ is displayed. z Follow step 2 on p. 64 to shoot. • For movies shot using the self-timer, [Delay] represents the delay before recording begins, but the [Shots] setting has no effect. 65
-
 1
1 -
2
-
3
-
4
-
5
-
6
-
7
-
8
-
9
-
10
-
11
-
12
-
13
-
14
-
15
-
16
-
17
-
18
-
19
-
20
-
21
-
22
-
23
-
24
-
25
-
26
-
27
-
28
-
29
-
30
-
31
-
32
-
33
-
34
-
35
-
36
-
37
-
38
-
39
-
40
-
41
-
42
-
43
-
44
-
45
-
46
-
47
-
48
-
49
-
50
-
51
-
52
-
53
-
54
-
55
-
56
-
57
-
58
-
59
-
 60
60 -
 61
61 -
 62
62 -
 63
63 -
 64
64 -
 65
65 -
 66
66 -
 67
67 -
 68
68 -
 69
69 -
 70
70 -
71
-
72
-
73
-
74
-
75
-
76
-
77
-
78
-
79
-
80
-
81
-
82
-
83
-
84
-
85
-
86
-
87
-
88
-
89
-
90
-
91
-
92
-
93
-
94
-
95
-
96
-
97
-
98
-
99
-
100
-
101
-
102
-
103
-
104
-
105
-
106
-
107
-
108
-
109
-
110
-
111
-
112
-
113
-
114
-
115
-
116
-
117
-
118
-
119
-
120
-
121
-
122
-
123
-
124
-
125
-
126
-
127
-
128
-
129
-
130
-
131
-
132
-
133
-
134
-
135
-
136
-
137
-
138
-
139
-
140
-
141
-
142
-
143
-
144
-
145
-
146
-
147
-
148
-
149
-
150
-
151
-
152
-
153
-
154
-
155
-
156
-
157
-
158
-
159
-
160
-
161
-
162
-
163
-
164
-
165
-
166
-
167
-
168
-
169
-
170
-
171
-
172
-
173
-
174
-
175
-
176
-
177
-
178
-
179
-
180
-
181
-
182
-
183
-
184
-
185
-
186
-
187
-
188
-
189
-
190
-
191
-
192
-
193
-
194
-
195
-
196
-
197
-
198
-
199
-
200
-
201
-
202
-
203
-
204
-
205
-
206
-
207
-
208
-
209
-
210
-
211
-
212
-
213
-
214
-
215
-
216
-
217
-
218
-
219
-
220
-
221
-
222
-
223
-
224
-
225
-
226
-
227
-
228
-
229
-
230
-
231
-
232
-
233
-
234
-
235
-
236
-
237
-
238
-
239
-
240
-
241
-
242
-
243
-
244
-
245
-
246
 |
 |
