Canon RC-IP00 Remote Camera Controller User Manual - Page 7
Preparations, Camera Control], Func], Trace], Pt Active], Delete], Store], View], Camera/preset]
 |
View all Canon RC-IP00 manuals
Add to My Manuals
Save this manual to your list of manuals |
Page 7 highlights
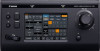
Getting Started N [CAMERA CONTROL] For controlling the currently selected camera. O [FUNC] For changing the settings of the currently selected camera. P [TRACE] For recording the camera operations of the currently selected camera to replicate the operations at a later time. Q [PT ACTIVE] Tap the button to switch [PT ACTIVE] on and off. Switching to off disables the pan/tilt operation by the control lever. R [DELETE] Tap the button to enter [DELETE] mode. S [STORE] Tap the button to enter [STORE] mode. T [VIEW] Tap the button to enter [VIEW] mode. U [CAMERA/PRESET] For selecting a camera number or preset number. Preparations 1 Set the power switch to "On". 0 The power is turned on and the POWER lamp lights up. 0 The start screen is displayed on the operation panel. The ALARM lamp lights up at the same time. During which, this unit cannot be operated. 0 The start screen disappears after about 10 seconds and the home screen is displayed. 2 Configure the settings of this unit. 0 Set the IP address of this unit as follows. A Select [SETTINGS] on the home screen of the operation panel. 0 If the home screen does not appear, select [HOME] to display the home screen. B Select [Network]. C Select [CONTROLLER]. 0 The IP address setting screen appears. D Enter the IP address and tap [ENTER]. 3 Configure the camera settings. 0 Configure the camera to be operated as follows. A Select [SETTINGS] on the home screen of the operation panel. 0 If the home screen does not appear, select [HOME] to display the home screen. B Select [Network]. C Select [CAMERA REGISTRATION]. D Perform registration according to the camera to be connected. 0 IP camera: Select [AUTO] or [Manual] 0 Serial camera: Select [Serial Activate 1] or [Serial Activate 100] Memo : 0 For details on the settings, please refer to "Camera Network Settings" (A P 16). 0 To add or change the camera to be operated, perform the above procedures again. Name of Parts 7
-
 1
1 -
 2
2 -
 3
3 -
 4
4 -
 5
5 -
 6
6 -
 7
7 -
 8
8 -
 9
9 -
 10
10 -
 11
11 -
 12
12 -
13
-
14
-
15
-
16
-
17
-
18
-
19
-
20
-
21
 |
 |
