Canon REALiS WUX4000 D Pro AV Multimedia Projector WUX5000 / WUX4000 User's Ma - Page 151
Setting Projector Information [Projector info.], work Configuration Screen
 |
View all Canon REALiS WUX4000 D Pro AV manuals
Add to My Manuals
Save this manual to your list of manuals |
Page 151 highlights
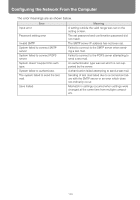
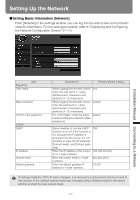
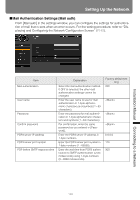
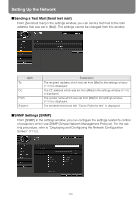
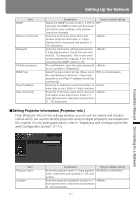
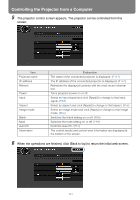
Setting Up the Network Item SNMP Receive community Password Confirm password SNMP trap Trap IP address Trap community Explanation Factory default setting Select the SNMP function version. If OFF is OFF selected, the SNMP function will be turned off and the other settings in this window cannot be changed. Enter the community name which will receive projector information in 1-byte alphanumeric characters and symbols (1 - 15 characters). Enter the community settings password in 1-byte alphanumeric characters and sym- bols (8 - 15 characters). This is also used as the password for trapping. It can be set only when the SNMP version is V3. For confirmation, enter the same password as you entered in [Password]. Select the type of error to trap. When any of OFF (no checkmarks) the checkboxes is turned on, it becomes possible to set [Trap IP address] and [Trap community]. Enter the IP address to send information to 0.0.0.0 when trap occurs. Enter in 1-byte numbers. Enter the community name which will send information when trap occurs. Enter in 1- byte alphanumeric characters and symbols (1 - 15 characters). ■Setting Projector Information [Projector info.] From [Projector info.] in the settings window, you can set the names and location names which are used to identify projectors when multiple projectors are installed on the network. For the setting procedure, refer to "Displaying and Configuring the Network Configuration Screen" (P142). Installation Manual Connecting to a Network Item Projector name Location Explanation Factory default setting Enter the projector name in 1-byte alphanu- WUX5000 or WUX4000 meric characters and symbols (1 - 63 char- acters). Enter the projector installation location in 1- byte alphanumeric characters and symbols (0 - 63 characters). 151
-
 1
1 -
2
-
3
-
4
-
5
-
6
-
7
-
8
-
9
-
10
-
11
-
12
-
13
-
14
-
15
-
16
-
17
-
18
-
19
-
20
-
21
-
22
-
23
-
24
-
25
-
26
-
27
-
28
-
29
-
30
-
31
-
32
-
33
-
34
-
35
-
36
-
37
-
38
-
39
-
40
-
41
-
42
-
43
-
44
-
45
-
46
-
47
-
48
-
49
-
50
-
51
-
52
-
53
-
54
-
55
-
56
-
57
-
58
-
59
-
60
-
61
-
62
-
63
-
64
-
65
-
66
-
67
-
68
-
69
-
70
-
71
-
72
-
73
-
74
-
75
-
76
-
77
-
78
-
79
-
80
-
81
-
82
-
83
-
84
-
85
-
86
-
87
-
88
-
89
-
90
-
91
-
92
-
93
-
94
-
95
-
96
-
97
-
98
-
99
-
100
-
101
-
102
-
103
-
104
-
105
-
106
-
107
-
108
-
109
-
110
-
111
-
112
-
113
-
114
-
115
-
116
-
117
-
118
-
119
-
120
-
121
-
122
-
123
-
124
-
125
-
126
-
127
-
128
-
129
-
130
-
131
-
132
-
133
-
134
-
135
-
136
-
137
-
138
-
139
-
140
-
141
-
142
-
143
-
144
-
145
-
 146
146 -
 147
147 -
 148
148 -
 149
149 -
 150
150 -
 151
151 -
 152
152 -
 153
153 -
 154
154 -
 155
155 -
 156
156 -
157
-
158
-
159
-
160
-
161
-
162
-
163
-
164
-
165
-
166
-
167
-
168
-
169
-
170
-
171
-
172
-
173
-
174
-
175
-
176
-
177
-
178
-
179
-
180
-
181
-
182
-
183
-
184
-
185
-
186
-
187
-
188
 |
 |
